Canon PowerShot A200 PowerShot A200/A100 Camera User Guide - Page 25
Movie Mode
 |
View all Canon PowerShot A200 manuals
Add to My Manuals
Save this manual to your list of manuals |
Page 25 highlights
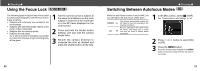
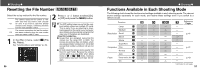
● Shooting ● • Make the brightness in each image consistent. The final image will appear unnatural if the difference in brightness is too great. • Pan (swivel) the camera to take successive shots. • To shoot close-ups, slide the camera over the subject, keeping it parallel as you move. 3 Shoot the next images in the same way. You can shoot up to 26 images. 4 Press the SET button to end the shooting. Shooting 1 Shoot the first image. 2 Shoot the next image so that it overlaps the first image. • Minor discrepancies in the overlapping portions can be corrected when the images are stitched together. • Press the or button to return to a previous image that you want to reshoot. See "Functions Available in Each Shooting Mode" (p. 57). The settings for the first image shot are applied for all subsequent images. 48 Movie Mode The resolution can be set to 320 x 240 pixels (default setting) or 160 x 120 pixels in [Resolution] of the Rec. menu (p. 41). 1 2 Press the shutter button all the way to start recording movie images. • The recording time (in seconds) and a red circle appear in the LCD monitor during shooting. Press the shutter button all the way again to stop the recording. • The maximum length of individual movie clips (A200: approx. 20 frames / second, A100: approx. 15 frames / second) PowerShot A200: approx. 9 seconds PowerShot A100: approx. 14 seconds PowerShot A200: approx. 26 seconds PowerShot A100: approx. 30 seconds (based on standard conditions established by Canon) These items may change depending on the subject or landscape conditions. ● Shooting ● The clip will end automatically after these times have elapsed or when the CF card becomes full. The exposure, focus and white balance are fixed to the settings value (of the first frame) when shooting starts. After shooting, the green indicator flashes while recording to the CF card. You cannot shoot images at this time. Quick Time 3.0 or higher is required for replay movie files (AVI / Motion JPEG) on a computer. Quick Time 5.0 is included on the Canon Digital Camera Solution CD-ROM. See "Functions Available in Each Shooting Mode" (p. 57). 49
-
 1
1 -
2
-
3
-
4
-
5
-
6
-
7
-
8
-
9
-
10
-
11
-
12
-
13
-
14
-
15
-
16
-
17
-
18
-
19
-
 20
20 -
 21
21 -
 22
22 -
 23
23 -
 24
24 -
 25
25 -
 26
26 -
 27
27 -
 28
28 -
 29
29 -
 30
30 -
31
-
32
-
33
-
34
-
35
-
36
-
37
-
38
-
39
-
40
-
41
-
42
-
43
-
44
-
45
-
46
-
47
-
48
-
49
-
50
-
51
-
52
-
53
-
54
-
55
-
56
-
57
-
58
-
59
-
60
-
61
 |
 |
