Canon imageCLASS D680 imageCLASS D680 Printer Guide - Page 72
Setup, Overlay, File Name, Overlay Placement, Background, Foreground, Position, Millimeter, Width
 |
View all Canon imageCLASS D680 manuals
Add to My Manuals
Save this manual to your list of manuals |
Page 72 highlights
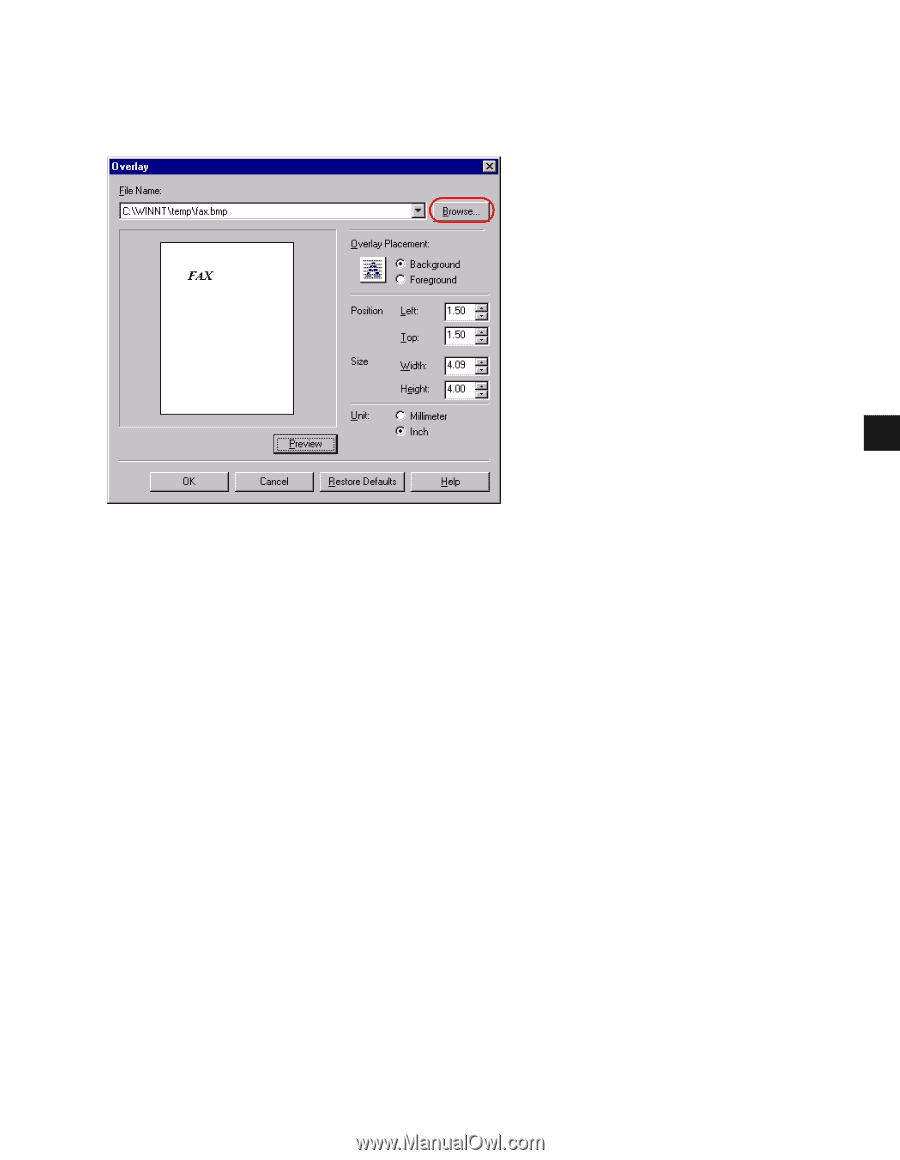
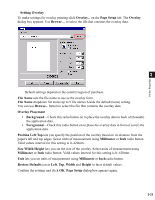
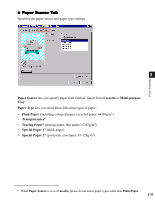
Printer Properties Setting Overlay To make settings for overlay printing click Overlay... on the Page Setup tab. The Overlay dialog box appears. Use Browse... to select the file that contains the overlay data. 3 Default settings depend on the country/region of purchase. File Name sets the file name to use as the overlay form. File Name dropdown list stores up to 9 file names beside the default (none) setting. You can use Browse... button to select the file that contains the overlay data. Overlay Placement • Background-Check this radio button on to place the overlay data in back of (beneath) the application data. • Foreground-Check this radio button on to place the overlay data in front of (over) the application data. Position Left/Top lets you specify the position of the overlay based on its distance from the paper's left and top edges. Select units of measurement using Millimeter or Inch radio button. Valid values interval for this setting is 0~420mm. Size Width/Height lets you set the size of the overlay. Select units of measurement using Millimeter or Inch radio button. Valid values interval for this setting is 0~420mm. Unit lets you set units of measurement using Millimeter or Inch radio button. Restore Defaults resets Left, Top, Width and Height to their default values. Confirm the settings and click OK. Page Setup dialog box appears again. 3-23
-
 1
1 -
2
-
3
-
4
-
5
-
6
-
7
-
8
-
9
-
10
-
11
-
12
-
13
-
14
-
15
-
16
-
17
-
18
-
19
-
20
-
21
-
22
-
23
-
24
-
25
-
26
-
27
-
28
-
29
-
30
-
31
-
32
-
33
-
34
-
35
-
36
-
37
-
38
-
39
-
40
-
41
-
42
-
43
-
44
-
45
-
46
-
47
-
48
-
49
-
50
-
51
-
52
-
53
-
54
-
55
-
56
-
57
-
58
-
59
-
60
-
61
-
62
-
63
-
64
-
65
-
66
-
 67
67 -
 68
68 -
 69
69 -
 70
70 -
 71
71 -
 72
72 -
 73
73 -
 74
74 -
 75
75 -
 76
76 -
 77
77 -
78
-
79
-
80
-
81
-
82
-
83
-
84
-
85
-
86
-
87
-
88
-
89
-
90
-
91
-
92
-
93
-
94
-
95
-
96
-
97
-
98
-
99
-
100
-
101
-
102
-
103
-
104
-
105
-
106
-
107
-
108
-
109
-
110
-
111
-
112
-
113
 |
 |