Compaq Armada E700 Compaq ArmadaStation EM Maintenance and Service Guide - Page 38
Reverse the removal procedure described above to install the rear bezel. Before
 |
View all Compaq Armada E700 manuals
Add to My Manuals
Save this manual to your list of manuals |
Page 38 highlights
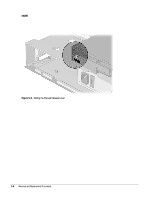
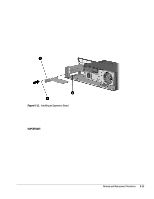
NOTE: Once the rear bezel has been removed, the manual release lever is accessible (Figure 5-8). When this lever is moved to the right, the mechanism assembly, which secures the computer when it is docked in the expansion base, releases and allows the computer to be manually undocked. Figure 5-8. Sliding the Manual Release Lever Reverse the removal procedure described above to install the rear bezel. Before installing the rear bezel, make sure the manual release lever is positioned as far to the left as it will go. 5-8 Removal and Replacement Procedures
-
 1
1 -
2
-
3
-
4
-
5
-
6
-
7
-
8
-
9
-
10
-
11
-
12
-
13
-
14
-
15
-
16
-
17
-
18
-
19
-
20
-
21
-
22
-
23
-
24
-
25
-
26
-
27
-
28
-
29
-
30
-
31
-
32
-
 33
33 -
 34
34 -
 35
35 -
 36
36 -
 37
37 -
 38
38 -
 39
39 -
 40
40 -
 41
41 -
 42
42 -
 43
43 -
44
-
45
-
46
-
47
-
48
-
49
-
50
-
51
-
52
-
53
-
54
-
55
-
56
-
57
-
58
-
59
-
60
-
61
-
62
-
63
-
64
-
65
-
66
-
67
-
68
-
69
-
70
-
71
-
72
-
73
-
74
 |
 |

5-8
Removal and Replacement Procedures
NOTE:
Once the rear bezel has been removed, the manual release lever is accessible
(Figure 5-8). When this lever is moved to the right, the mechanism assembly, which
secures the computer when it is docked in the expansion base, releases and allows the
computer to be manually undocked.
Figure 5-8.
Sliding the Manual Release Lever
Reverse the removal procedure described above to install the rear bezel. Before
installing the rear bezel, make sure the manual release lever is positioned as far to the
left as it will go.