D-Link DCS-2102 User Manual - Page 27
SETUP > Network Setup - default ip
 |
View all D-Link DCS-2102 manuals
Add to My Manuals
Save this manual to your list of manuals |
Page 27 highlights
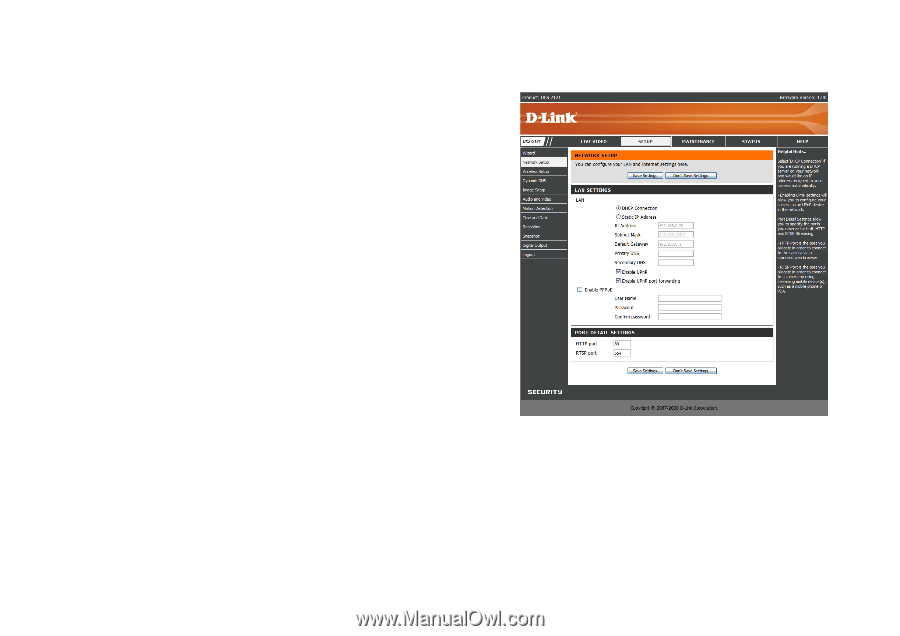
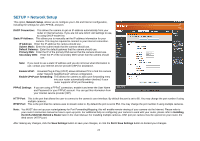
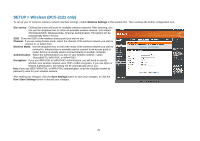
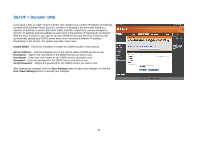
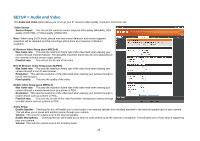
SETUP > Network Setup This option, Network Setup, allows you to configure your LAN and Internet configuration, including the settings for LAN, PPPoE, and port. DHCP Connection: This allows the camera to get an IP address automatically from your router or Internet service. If you are not sure which LAN settings to use, try using DHCP mode first. Static IP Address: This allows you to manually set the IP address information for your camera. This may be required to connect to your Internet connection. IP Address: Enter the IP address the camera should use. Subnet Mask: Enter the subnet mask that the camera should use. Default Gateway: Enter the default gateway that the camera should use. Primary DNS: Enter the IP of the primary DNS server that the camera should use. Secondary DNS: Enter the IP of the secondary DNS server that the camera should use. Note: If you need to use a static IP address and you do not know what information to use, contact your Internet service provider (ISP) for assistance. Enable UPnP: Universal Plug & Play (UPnP) allows Windows PCs to find this camera under "Network Neighborhood" without configuration. Enable UPnP port forwarding: This allows the camera to add a port forwarding entry into your router automatically when checked, if your router supports UPnP port forwarding. PPPoE Settings: If you are using a PPPoE connection, enable it and enter the User Name and Password for your PPPoE account. You can get this information from your Internet service provider (ISP). HTTP Port: This is the port that allows the user to connect to the camera's user interface. By default the port is set to 80. You may change the port number if using multiple cameras. RTSP Port: This is the port that the camera uses to stream video to. By default the port is set to 554. You may change the port number if using multiple cameras. Note: You MUST also set up your router/gateway for Port Forwarding/Mapping; this will enable remote viewing of your camera via the Internet. Please refer to your router's instruction manual on how to open up ports. For additional help on configuring your camera to work with your router, please refer to Installing the DCS-2102/2121 Behind a Router later in the User Manual. For installing multiple cameras, ONE port per camera must be opened on your router, the Web server (HTTP) port. After making any changes, click the Save Settings button to save your changes, or click the Don't Save Settings button to discard your changes. 24
-
 1
1 -
2
-
3
-
4
-
5
-
6
-
7
-
8
-
9
-
10
-
11
-
12
-
13
-
14
-
15
-
16
-
17
-
18
-
19
-
20
-
21
-
 22
22 -
 23
23 -
 24
24 -
 25
25 -
 26
26 -
 27
27 -
 28
28 -
 29
29 -
 30
30 -
 31
31 -
 32
32 -
33
-
34
-
35
-
36
-
37
-
38
-
39
-
40
-
41
-
42
-
43
-
44
-
45
-
46
-
47
-
48
-
49
-
50
-
51
-
52
-
53
-
54
-
55
-
56
-
57
-
58
-
59
-
60
-
61
 |
 |