Dell Dimension E520 Owner's Manual - Page 82
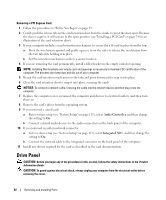
Drive Panel
 |
View all Dell Dimension E520 manuals
Add to My Manuals
Save this manual to your list of manuals |
Page 82 highlights
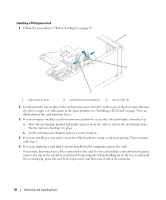
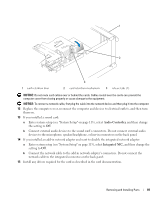
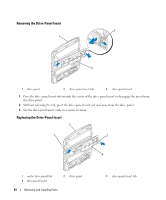
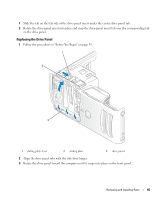
Removing a PCI Express Card 1 Follow the procedures in "Before You Begin" on page 59. 2 Gently push the release tab on the card retention door from the inside to pivot the door open. Because the door is captive, it will remain in the open position (see "Installing a PCI Card" on page 74 for an illustration of the card retention door). 3 If your computer includes a card retention mechanism, to secure the x16 card in place from the top: a Pivot the mechanism upward and gently squeeze in on the sides to release the mechanism from the two tab slots holding it in place. b Set the retention mechanism aside in a secure location. 4 If you are removing the card permanently, install a filler bracket in the empty card-slot opening. NOTE: Installing filler brackets over empty card-slot openings is necessary to maintain FCC certification of the computer. The brackets also keep dust and dirt out of your computer. 5 Reseat the card retention mechanism in the tabs and pivot downward to snap it into place. 6 Close the card retention door to snap it into place, securing the cards. NOTICE: To connect a network cable, first plug the cable into the network device and then plug it into the computer. 7 Replace the computer cover, reconnect the computer and devices to electrical outlets, and then turn them on. 8 Remove the card's driver from the operating system. 9 If you removed a sound card: a Enter system setup (see "System Setup" on page 113), select Audio Controller, and then change the setting to On. b Connect external audio devices to the audio connectors on the back panel of the computer. 10 If you removed an add-in network connector: a Enter system setup (see "System Setup" on page 113), select Integrated NIC, and then change the setting to On. b Connect the network cable to the integrated connector on the back panel of the computer. 11 Install any drivers required for the card as described in the card documentation. Drive Panel CAUTION: Before you begin any of the procedures in this section, follow the safety instructions in the Product Information Guide. CAUTION: To guard against electrical shock, always unplug your computer from the electrical outlet before removing the cover. 82 Removing and Installing Parts
-
 1
1 -
2
-
3
-
4
-
5
-
6
-
7
-
8
-
9
-
10
-
11
-
12
-
13
-
14
-
15
-
16
-
17
-
18
-
19
-
20
-
21
-
22
-
23
-
24
-
25
-
26
-
27
-
28
-
29
-
30
-
31
-
32
-
33
-
34
-
35
-
36
-
37
-
38
-
39
-
40
-
41
-
42
-
43
-
44
-
45
-
46
-
47
-
48
-
49
-
50
-
51
-
52
-
53
-
54
-
55
-
56
-
57
-
58
-
59
-
60
-
61
-
62
-
63
-
64
-
65
-
66
-
67
-
68
-
69
-
70
-
71
-
72
-
73
-
74
-
75
-
76
-
 77
77 -
 78
78 -
 79
79 -
 80
80 -
 81
81 -
 82
82 -
 83
83 -
 84
84 -
 85
85 -
 86
86 -
 87
87 -
88
-
89
-
90
-
91
-
92
-
93
-
94
-
95
-
96
-
97
-
98
-
99
-
100
-
101
-
102
-
103
-
104
-
105
-
106
-
107
-
108
-
109
-
110
-
111
-
112
-
113
-
114
-
115
-
116
-
117
-
118
-
119
-
120
-
121
-
122
-
123
-
124
-
125
-
126
-
127
-
128
-
129
-
130
-
131
-
132
-
133
-
134
-
135
-
136
-
137
-
138
-
139
-
140
-
141
-
142
-
143
-
144
-
145
-
146
-
147
-
148
-
149
-
150
-
151
-
152
-
153
-
154
-
155
-
156
-
157
-
158
-
159
-
160
-
161
-
162
 |
 |
