Dell OptiPlex 755 Administration Guide
Dell OptiPlex 755 Manual
 |
View all Dell OptiPlex 755 manuals
Add to My Manuals
Save this manual to your list of manuals |
Dell OptiPlex 755 manual content summary:
- Dell OptiPlex 755 | Administration Guide - Page 1
's Guide About Intel® Active Management Technology Intel AMT Setup and Configuration Overview Intel Management Engine BIOS Extension (MEBx) Provisioning: Setup and Configuration Completion Deployment Using the Intel AMT WebGUI Redirecting Serial and IDE Communications Troubleshooting Notes - Dell OptiPlex 755 | Administration Guide - Page 2
Dell™ Systems Management Administrator's Guide Once you are ready to deploy a computer to a user, plug the computer into a power (SCS) IP address must be manually entered into the Intel AMT capable computer Pre-Shared key (PSK) cipher suite if TLS is supported. The SCS uses the PID to look up the - Dell OptiPlex 755 | Administration Guide - Page 3
Back to Contents Page Intel® Management Engine BIOS Extension (MEBx) Dell™ Systems Management Administrator's Guide Intel MEBx Overview Configuring the Intel Management Engine (ME) Configuring Your Computer to Support Intel AMT Features MEBx Default Settings MEBx Overview The Intel® Management - Dell OptiPlex 755 | Administration Guide - Page 4
steps: 1. Under the Management Engine BIOS Extension (MEBx) main menu, select allows you to configure the specific functions of the ME such as features, power options, and so on ME Firmware Local Update Qualifier l Intel ME Features Control ¡ Manageability Feature Selection l Intel ME Power Control ¡ - Dell OptiPlex 755 | Administration Guide - Page 5
can debug a computer problem without worrying about any role the ME might have played in it. Intel ME Firmware Local Update Qualifier This option on OEM-specific in-field firmware update processes, ME firmware provides an OEM- configurable capability that leaves the local firmware update channel - Dell OptiPlex 755 | Administration Guide - Page 6
Update Qualifier Option Description The ME firmware local update channel is always enabled. A boot cycle does not change enabled to disabled. The ME FW Local Update option can be ignored. The ME firmware local update technology. The Intel ICH9 platform supports ASF specification 2.0. l Intel AMT - - Dell OptiPlex 755 | Administration Guide - Page 7
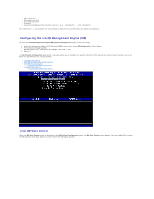
(Computer On) S3 (Suspend to RAM) S4/S5 (Suspend to disk/Soft off) ME OFF After Power Loss Supported Power Packages Power Package 1 2 3 4 5 ON boot. The image below shows the Intel AMT configuration menu after a user selects the Intel AMT Configuration option from the Management Engine BIOS - Dell OptiPlex 755 | Administration Guide - Page 8
Setup and Configuration l Un-Provision l VLAN l SOL/IDE-R l Secure Firmware Update l Set PRTC l Idle Timeout Host Name A hostname can be assigned to Small Business This allows you to select between small business and enterprise mode. Enterprise mode may have different security settings than small - Dell OptiPlex 755 | Administration Guide - Page 9
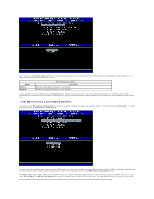
). ¡ Hash Algorithm - Describes the hash type. Currently only SHA1 is supported (PKI only). ¡ IsDefault - Displays 'Yes' if the Hash algorithm is serial numbers. ¡ Time Validity Pass - Indicates whether the certificate passed the time validity check. l Provisioning Server - The IP address and port - Dell OptiPlex 755 | Administration Guide - Page 10
TLS PKI - Remote Configuration Settings The remote configuration options are contained under the TLS PKI sub menu. There are four remote configuration items: l Remote Configuration Enable/Disable l Manage Certificate Hashes l Set FQDN l Set PKI DNS Suffix Remote Configuration Enable/Disable The - Dell OptiPlex 755 | Administration Guide - Page 11
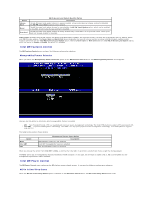
The Manage Certificate Hash screen has several keyboard controls available to you to manage the hashes on the computer. The following keys are valid when in the Manage Certificate Hash menu: l Escape key - Exits from the menu l Insert key - Adds a customized certificate hash to the computer l Delete - Dell OptiPlex 755 | Administration Guide - Page 12
present, both values are lost. The MEBx password resets to the default value (admin). To invoke this option, you need to clear the CMOS (i.e. system board jumper) VLAN This option enables or disables VLAN support for Intel AMT. If VLAN support is enabled, the VLAN Tag (1-4094) must be configured. - Dell OptiPlex 755 | Administration Guide - Page 13
user authentication on the SOL/IDER session. l Serial-Over-LAN (SOL) - DISABLED** / ENABLED supplied, the firmware cannot be updated. When the secure firmware update feature is enabled, you are able to update the firmware using the secure method. Secure firmware updates pass through the LMS driver - Dell OptiPlex 755 | Administration Guide - Page 14
(UTC) format (YYYY:MM:DD:HH:MM:SS). Valid date range is 1/1/2004 - 1/4/2021. Setting PRTC value is used for virtually maintaining PRTC during power off (G3) state. This configuration is only displayed for the Enterprise Provision Model. Idle Timeout Use this setting to define the ME WoL idle timeout - Dell OptiPlex 755 | Administration Guide - Page 15
a domain name (e.g., amt.intel.com) Provision Model l Intel AMT 3.0 Mode l Small Business SOL/IDE-R l Enable SOL l Enable IDE-R Remote FW Update Enabled Save and exit MEBx and then boot the computer to the Microsoft® Windows® operating system. Intel AMT in Static Mode Settings Example The - Dell OptiPlex 755 | Administration Guide - Page 16
Remote FW Update Enabled Save and exit MEBx and then boot computer to the Microsoft® Windows® operating system. MEBx Default Settings The table below lists all the default settings for the Intel® Management Engine BIOS Extension (MEBx). Password admin Intel ME Platform Configuration Default - Dell OptiPlex 755 | Administration Guide - Page 17
3 Un-provision setting only seen if the box is provisioned. Back to Contents Page - Dell OptiPlex 755 | Administration Guide - Page 18
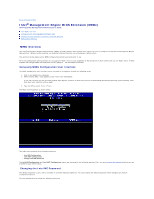
problems power or operating system state Remote troubleshooting manual inventory tracking, reducing asset accounting cost The Intel® Management Engine BIOS Extension (MEBx) is an optional ROM module provided to Dell from Intel that is included in the Dell BIOS. The MEBx has been customized for Dell - Dell OptiPlex 755 | Administration Guide - Page 19
Back to Contents Page Redirecting Serial and IDE Communications Dell™ Systems Management Administrator's Guide Intel® AMT makes it possible to redirect serial and IDE communications from a managed client to a management console regardless of the boot and power state of the managed client. The client - Dell OptiPlex 755 | Administration Guide - Page 20
and Configuration Overview Dell™ Systems Management Administrator's Guide Terms Setup and Intel AMT 3.0 allows you to connect AC power to the Intel AMT ready computer and the service saved to a USB device. l MEBx interface - The IT administrator manually configures the Management Engine BIOS - Dell OptiPlex 755 | Administration Guide - Page 21
the problems associated with manually typing in entries. USB provisioning only works if the MEBx password is set to the factory default of admin. If the password has been changed, reset it to the factory default by clearing the CMOS. For instructions, see "System Setup" in the User's Guide for - Dell OptiPlex 755 | Administration Guide - Page 22
Turns on that computer 6. The computer BIOS detects the USB drive key. ¡ If found, the BIOS looks for a setup.bin file be used again ¡ The process places the memory address into the MEBx parameter block. ¡ Dell Client Manager application by double-clicking the desktop icon or through the Start menu. - Dell OptiPlex 755 | Administration Guide - Page 23
3. Select AMT Quick Start from the left navigation menu to open the Altiris Console. 4. Click the plus (+) to expand the Intel AMT Getting Started section. 5. Click the plus (+) to expand the Section 1. Provisioning section. - Dell OptiPlex 755 | Administration Guide - Page 24
6. Click the plus (+) to expand the Basic Provisioning (without TLS) section. 7. Select Step 1. Configure DNS. The notification server with an out-of-band management solution installed must be registered in DNS as "ProvisionServer." - Dell OptiPlex 755 | Administration Guide - Page 25
8. Click Test on the DNS Configuration screen to verify that DNS has the ProvisionServer entry and that it resolves to the correct Intel setup and configuration server (SCS). The IP address for the ProvisionServer and Intel SCS are now visible. - Dell OptiPlex 755 | Administration Guide - Page 26
9. Select Step 2. Discovery Capabilities. 10. Verify that the setting is Enabled. If Disabled, click the checkbox next to Disabled and click Apply. - Dell OptiPlex 755 | Administration Guide - Page 27
11. Select Step 3. View Intel AMT Capable Computers. Any Intel AMT capable computers on the network are visible in this list. - Dell OptiPlex 755 | Administration Guide - Page 28
12. Select Step 4. Create Profile. 13. Click the plus (+) to add a new profile. - Dell OptiPlex 755 | Administration Guide - Page 29
administrator can modify the profile name and description along with the password. The administrator sets a standard password for easy maintenance in the future. Select the manual radio button and enter a new password. 15. The Network tab provides the option to enable ping responses, VLAN, WebUI - Dell OptiPlex 755 | Administration Guide - Page 30
name, CA type, and certificate template. 17. The ACL (access control list) tab is used to review users already associated with this profile and to add new users and define their access privileges. 18. The Power Policy tab has configuration options to select the sleep states for Intel AMT as well as - Dell OptiPlex 755 | Administration Guide - Page 31
19. Select Step 5. Generate Security Keys. 20. Select the icon with the arrow pointing out to Export Security Keys to USB Key. - Dell OptiPlex 755 | Administration Guide - Page 32
21. Select the Generate keys before export radio button. 22. Enter the number of keys to generate (depends on the number of computers that need to be provisioned). The default is 50. - Dell OptiPlex 755 | Administration Guide - Page 33
23. The Intel ME default password is admin. Configure the new Intel ME password for the environment. 24. Click Generate. Once the keys have been created, a link appears to the left of the Generate button. - Dell OptiPlex 755 | Administration Guide - Page 34
to the USB device. Click Save. c. Click Close in the Download complete dialog box. The setup.bin file is now visible in the drive explorer window. - Dell OptiPlex 755 | Administration Guide - Page 35
27. Close the Export Security Keys to USB Key and drive explorer windows to return to the Altiris Console. 28. Take the USB device to Provisioning (Y/N) 29. Press . 30. Press any key to continue with system boot... 31. Once complete, turn off the computer and move back to the management server. - Dell OptiPlex 755 | Administration Guide - Page 36
32. Select Step 6. Configure Automatic Profile Assignments. 33. Verify that the setting setting is enabled. In the Intel AMT 2.0+ dropdown, select the profile created previously. Configure the other settings for the environment. 34. Select Step 7. Monitor Provisioning Process. - Dell OptiPlex 755 | Administration Guide - Page 37
The computers for which the keys were applied begin to appearing in the system list. At first the status is Unprovisioned, then the system status changes to In provisioning, and finally it changes to Provisioned at the end of the process. 35. Select Step 8. Monitor Profile Assignments. - Dell OptiPlex 755 | Administration Guide - Page 38
The computers for which profiles were assigned appear in the list. Each computer is identified by the FQDN, UUID, and Profile Name columns. Once the computers are provisioned, they are visible under the Collections folder in All configured Intel AMT computers. - Dell OptiPlex 755 | Administration Guide - Page 39
Dell™ computer is defaulted to Enterprise mode when it leaves the factory. The mode can be changed during the setup and configuration process. l Small Medium Business (SMB) mode - This mode is a simplified operational mode that does not support manual process completed through the Intel ME BIOS Serial - Dell OptiPlex 755 | Administration Guide - Page 40
BIOS Extension (MEBx) is an optional ROM module that Intel provides to Dell™ to be included in the Dell BIOS. The MEBx has been customized for Dell for Enterprise mode. For instructions, see ME Configuration: computer and during the boot process, press when the Dell logo screen appears to - Dell OptiPlex 755 | Administration Guide - Page 41
the factory-default state to the setup state. 4. Select Intel ME Configuration. Press . ME Platform Configuration allows you to configure ME features such as power options, firmware update capabilities, and so on. - Dell OptiPlex 755 | Administration Guide - Page 42
5. The following message appears: System resets after configuration change. Continue (Y/N). Press . 6. Intel ME State Control is the next option. The default setting for this option is Enabled. Do not change this setting to Disabled. If you want to disable Intel AMT, change the Manageability - Dell OptiPlex 755 | Administration Guide - Page 43
7. Select Intel ME Firmware Local Update Qualifier. Press . 8. Select Always Open. Press . The default setting for this option is Always Open. 9. Select Intel ME Features Control. Press . - Dell OptiPlex 755 | Administration Guide - Page 44
10. Manageability Feature Selection is the next option. This feature sets the platform management mode. The default setting is Intel AMT. Selecting the None option disables all remote management capabilities. 11. Select Return to Previous Menu. Press . - Dell OptiPlex 755 | Administration Guide - Page 45
12. Select Intel ME Power Control. Press . 13. Intel ME ON in Host Sleep States is the next option. The default setting is Desktop: ON in S0, S3, S4-5. NOTE: For certain E-Star or low-power configurations, the default setting will be Desktop: ON in S0. - Dell OptiPlex 755 | Administration Guide - Page 46
14. Select Return to Previous Menu. Press . 15. Select Return to Previous Menu. Press . - Dell OptiPlex 755 | Administration Guide - Page 47
is complete, you can configure the Intel AMT settings. For instructions, see Intel AMT Configuration: Enabling Intel AMT for Enterprise Mode. following steps: 1. Turn on the computer and during the boot process, press when the Dell logo screen appears to enter the MEBx application. 2. A - Dell OptiPlex 755 | Administration Guide - Page 48
5. Select TCP/IP. Press . The following messages appear: l Disable Network Interface: (Y/N) Press . If the network is disabled, then all remote AMT capabilities are disabled and TCP/IP settings are not necessary. This option is a toggle, and the next time it is accessed you are prompted - Dell OptiPlex 755 | Administration Guide - Page 49
l Domain Name Type the domain name into the field. 6. Select Provision Model from the menu. Press . The following message appears: l [Intel (R) AMT 3.0 Mode] [Enterprise] change to Small Business: (Y/N) Press . - Dell OptiPlex 755 | Administration Guide - Page 50
7. Select Setup and Configuration from the menu. Press . 8. Select Current Provisioning Mode to display the current mode. Press . The current provisioning mode is displayed. Press or to exit. - Dell OptiPlex 755 | Administration Guide - Page 51
9. Select Provisioning Record. The provisioning record displays the provision PSK/PKI record data of the computer. If the data has not been entered, the MEBx displays a message that states Provision Record not present. If the data is entered, the Provision Record displays one of several messages. 10 - Dell OptiPlex 755 | Administration Guide - Page 52
12. Type the port in the Port number field and press . The default setting is 0. If left at the default setting of 0, the Intel AMT attempts to contact the provisioning server on port 9971. If the provisioning server is listening on a different port, enter it here. 13. Select TLS PSK from the - Dell OptiPlex 755 | Administration Guide - Page 53
14. Set PID and PPS is the next option. The PID and PPS can be input manually or by using a USB key once the SCS generates the codes. This option is for entering the provisioning ID (PID) and provisioning passphrase (PPS). PIDs are eight characters and PPS are 32 characters. There are dashes - Dell OptiPlex 755 | Administration Guide - Page 54
17. Select TLS PKI from the menu. Press . 18. Select Remote Configuration Enable/Disable from the menu. Press . This option is Enabled by default and can be Disabled if the network infrastructure does not support a Certificate Authority (CA). - Dell OptiPlex 755 | Administration Guide - Page 55
19. Manage Certificate Hashes option is the next option. Four hashes are configured by default. Hashes can be deleted or added per customer needs. 20. Select Set FQDN from the menu. Press . Type the FQDN of the provisioning server in the text field and press . - Dell OptiPlex 755 | Administration Guide - Page 56
21. Select Set PKI DNS Suffix from the menu. Press . Type the PKI DNS Suffix in the text field and press . 22. Select Return to Previous Menu. Press . - Dell OptiPlex 755 | Administration Guide - Page 57
23. Select Return to Previous Menu. Press . This returns you to the Intel AMT Configuration menu. 24. Skip the Un-Provision option. This option returns the computer to factory defaults. See Return to Default for more information about unprovisioning. 25. Select VLAN from the menu. Press < - Dell OptiPlex 755 | Administration Guide - Page 58
27. The following messages appear, and require the response indicated in the following bulleted list: l [Caution] System resets after configuration changes. Continue: (Y/N) Press . l User name & Password Select Enabled and then press . This option allows you to add users and passwords from - Dell OptiPlex 755 | Administration Guide - Page 59
l Serial Over LAN Select Enabled and then press . l IDE Redirection Select Enabled and then press . - Dell OptiPlex 755 | Administration Guide - Page 60
28. Secure Firmware Update is the next option. The default setting is Enabled. 29. Skip Set PRTC. - Dell OptiPlex 755 | Administration Guide - Page 61
is selected in step 13 of the process for enabling ME for the Enterprise operating mode. NOTICE: To maintain E-Star compliance for certain systems, the Desktop: ON in S0 setting must be used in step 13. 31. Select Return to Previous Menu. Press . - Dell OptiPlex 755 | Administration Guide - Page 62
32. Select Exit. Press . 33. The following message appears: Are you sure you want to exit? (Y/N): Press . - Dell OptiPlex 755 | Administration Guide - Page 63
Dell™ to be included in the Dell BIOS. The MEBx has been customized for Dell™ computers. Dell also supports setup and configuration of Intel AMT in the Small steps: 1. Turn on the computer and during the boot process, press when the Dell logo screen appears to enter the MEBx application. - Dell OptiPlex 755 | Administration Guide - Page 64
the factory-default state to the setup state. 4. Select Intel ME Configuration. Press . ME Platform Configuration allows you to configure ME features such as power options, firmware update capabilities, and so on. - Dell OptiPlex 755 | Administration Guide - Page 65
5. The following message appears: System resets after configuration change. Continue (Y/N). Press . 6. Intel ME State Control is the next option. The default setting for this option is Enabled. Do not change this setting to Disabled. If you want to disable Intel AMT, change the Manageability - Dell OptiPlex 755 | Administration Guide - Page 66
7. Select Intel ME Firmware Local Update Qualifier. Press . 8. Select Always Open. Press . The default setting for this option is Always Open. 9. Select Intel ME Features Control. Press . - Dell OptiPlex 755 | Administration Guide - Page 67
10. Manageability Feature Selection is the next option. This feature sets the platform management mode. The default setting is Intel AMT. Selecting the None option disables all remote management capabilities. 11. Select Return to Previous Menu. Press . - Dell OptiPlex 755 | Administration Guide - Page 68
12. Select Intel ME Power Control. Press . 13. Intel ME ON in Host Sleep States is the next option. The default setting is Desktop: ON in S0, S3, S4-5. NOTE: For certain E-Star or low-power configurations, the default setting will be Desktop: ON in S0. - Dell OptiPlex 755 | Administration Guide - Page 69
14. Select Return to Previous Menu. Press . 15. Select Return to Previous Menu. Press . - Dell OptiPlex 755 | Administration Guide - Page 70
To enable Intel AMT Configuration settings on the target platform, perform the following steps: 1. Turn on the computer and during the boot process, press when the Dell logo screen appears to enter the MEBx application. 2. A prompt for the password appears. Enter the new Intel ME password - Dell OptiPlex 755 | Administration Guide - Page 71
6. Select TCP/IP. Press . 7. The following messages appear and require the response indicated in the following bulleted list: l Disable Network Interface: (Y/N) Press . If the network is disabled, then all remote Intel AMT capabilities are disabled and TCP/IP settings are not necessary. - Dell OptiPlex 755 | Administration Guide - Page 72
l Domain Name Type the domain name into the field. 8. Select Provision Model from the menu. Press . 9. The following message appears: l [Intel (R) AMT 3.0 Mode] [Enterprise] change to Small Business: (Y/N) Press . - Dell OptiPlex 755 | Administration Guide - Page 73
10. Skip the Un-Provision option. This option returns the computer to factory defaults. See Return to Default for more information about unprovisioning. 11. Select VLAN from the menu. Press . 12. The following message appears: l [VLAN Disabled] Enable VLAN: (Y/N) Press . 13. Select SOL/IDE - Dell OptiPlex 755 | Administration Guide - Page 74
14. The following messages appear and require the response indicated in the following bulleted list: l [Caution] System resets after configuration changes. Continue: (Y/N) Press . l User name & Password Select Enabled and then press . This option allows you to add users and passwords from - Dell OptiPlex 755 | Administration Guide - Page 75
l Serial Over LAN Select Enabled and then press . l IDE Redirection Select Enabled and then press . - Dell OptiPlex 755 | Administration Guide - Page 76
15. Secure Firmware Update is the next option. The default setting is Enabled. 16. Skip Set PRTC. - Dell OptiPlex 755 | Administration Guide - Page 77
is selected in step 13 of the process for enabling the ME for SMB operating mode. NOTICE: To maintain E-Star compliance for certain systems, the Desktop: ON in S0 setting must be used in step 13. 18. Select Return to Previous Menu. Press . - Dell OptiPlex 755 | Administration Guide - Page 78
19. Select Exit. Press . 20. The following message appears: Are you sure you want to exit? (Y/N): Press . - Dell OptiPlex 755 | Administration Guide - Page 79
21. The computer restarts. Turn off the computer and disconnect the power cable. The computer is now in setup state and is ready for deployment. Back to Contents Page - Dell OptiPlex 755 | Administration Guide - Page 80
Sleep States Desktop: ON in S0, S3, S4-5 SOL/IDE-R Username and Password Serial Over LAN IDE Redirection Enabled Enabled Enabled Remote Firmware Update Enabled Firmware Flash Flash the firmware to upgrade to newer versions of Intel AMT. The firmware flash is built into the BIOS flash utility - Dell OptiPlex 755 | Administration Guide - Page 81
5. Select Un-Provision. 6. Press . 7. Select Full Unprovision. 8. Press . 9. Reconfigure the settings on the Intel AMT Configuration screen. Back to Contents Page - Dell OptiPlex 755 | Administration Guide - Page 82
Dell™ Systems Management Administrator's Guide support is enabled by default for SMB setup and configured computers. WebGUI support 16992) l By default, the port is 16992. Use port 16993 and https:// to connect Intel AMT setup in the MEBx. 5. Review the computer information and make any necessary
-
 1
1 -
 2
2 -
 3
3 -
 4
4 -
 5
5 -
 6
6 -
 7
7 -
8
-
9
-
10
-
11
-
12
-
13
-
14
-
15
-
16
-
17
-
18
-
19
-
20
-
21
-
22
-
23
-
24
-
25
-
26
-
27
-
28
-
29
-
30
-
31
-
32
-
33
-
34
-
35
-
36
-
37
-
38
-
39
-
40
-
41
-
42
-
43
-
44
-
45
-
46
-
47
-
48
-
49
-
50
-
51
-
52
-
53
-
54
-
55
-
56
-
57
-
58
-
59
-
60
-
61
-
62
-
63
-
64
-
65
-
66
-
67
-
68
-
69
-
70
-
71
-
72
-
73
-
74
-
75
-
76
-
77
-
78
-
79
-
80
-
81
-
82
 |
 |

Dell
™
Systems Management Administrator's Guide
Notes, Notices, and Cautions
Information in this document is subject to change without notice.
© 2007 Dell Inc. All rights reserved.
Reproduction in any manner whatsoever without the written permission of Dell Inc.
is strictly forbidden.
Intel Corporation is a contributing source of content in this document.
Trademarks used in this text:
Dell
and the
DELL
logo are trademarks of Dell Inc.;
Intel
is a registered trademark of Intel Corporation;
Microsoft
and
Windows
are either trademarks
or registered trademarks of Microsoft Corporation in the United States and/or other countries.
Other trademarks and trade names may be used in this document to refer to either the entities claiming the marks and names or their products. Dell Inc. disclaims any
proprietary interest in trademarks and trade names other than its own.
August 2007 Rev. A00
About Intel
®
Active Management Technology
Deployment
Intel AMT Setup and Configuration Overview
Using the Intel AMT WebGUI
Intel Management Engine BIOS Extension (MEBx)
Redirecting Serial and IDE Communications
Provisioning: Setup and Configuration Completion
Troubleshooting
NOTE:
A NOTE indicates important information that helps you make better use of your computer.
NOTICE:
A NOTICE indicates either potential damage to hardware or loss of data and tells you how to avoid the problem.
CAUTION:
A CAUTION indicates a potential for property damage, personal injury, or death.