Dell OptiPlex 755 Administration Guide - Page 11
Manage Certificate Hash, Escape key, Insert key, Delete key, <+> key, Enter key, Remote
 |
View all Dell OptiPlex 755 manuals
Add to My Manuals
Save this manual to your list of manuals |
Page 11 highlights
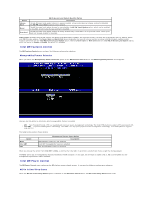
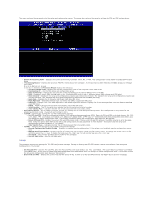
The Manage Certificate Hash screen has several keyboard controls available to you to manage the hashes on the computer. The following keys are valid when in the Manage Certificate Hash menu: l Escape key - Exits from the menu l Insert key - Adds a customized certificate hash to the computer l Delete key - Deletes the currently selected certificate hash from the computer l key - Changes the active state of the currently selected certificate hash l Enter key - Displays the details of the currently selected certificate hash Adding a Customized Hash 1. Press in the Manage Certificate Hash screen. A text field is displayed requesting the hash name. 2. You must enter the hash name. The hash name must be a maximum of 32 characters. Upon pressing you are prompted to enter the certificate hash value. 3. The certificate hash value is a 20 byte hexadecimal number. You must enter the hash data in the correct format or the message Invalid Hash Certificate Entered - Try Again is displayed. Upon pressing you are asked about setting the active state of the hash. 4. This query allows for setting the active state of the customized hash. ¡ Yes - The customized hash is be marked as active. ¡ No (Default) - VA_Hash is be maintained within EPS. Deleting a Hash 1. Press in the Manage Certificate Hash screen to display the Delete this certificate hash? (Y/N) prompt. 2. This option allows deleting of the selected certificate hash. ¡ Yes - MEBx shall send the message to FW to delete the selected hash. ¡ No - MEBx shall not delete the selected hash and returns to the Remote Configuration. Changing the Active State Press the key in the Manage Certificate Hash screen to display the Change the active state of this hash? (Y/N) prompt. Answering yes to this question toggles the active state of the currently selected certificate hash. Setting a hash as active indicates that the hash is available to use when during PSK provisioning. Viewing a Certificate Hash Press in the Manage Certificate Hash screen. The details of the selected certificate hash are displayed to include: the hash name, the certificate hash data, and the active and default states. Set FQDN When the Set FQDN option is selected under the Remote Configuration menu, you are prompted to enter the Fully Qualified Domain Name (FQDN) of the Provisioning Server.
-
 1
1 -
2
-
3
-
4
-
5
-
 6
6 -
 7
7 -
 8
8 -
 9
9 -
 10
10 -
 11
11 -
 12
12 -
 13
13 -
 14
14 -
 15
15 -
 16
16 -
17
-
18
-
19
-
20
-
21
-
22
-
23
-
24
-
25
-
26
-
27
-
28
-
29
-
30
-
31
-
32
-
33
-
34
-
35
-
36
-
37
-
38
-
39
-
40
-
41
-
42
-
43
-
44
-
45
-
46
-
47
-
48
-
49
-
50
-
51
-
52
-
53
-
54
-
55
-
56
-
57
-
58
-
59
-
60
-
61
-
62
-
63
-
64
-
65
-
66
-
67
-
68
-
69
-
70
-
71
-
72
-
73
-
74
-
75
-
76
-
77
-
78
-
79
-
80
-
81
-
82
 |
 |
