Denon DVD-5910 Owners Manual - English - Page 25
Names and Functions of Remote Control Unit Buttons
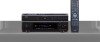 |
View all Denon DVD-5910 manuals
Add to My Manuals
Save this manual to your list of manuals |
Page 25 highlights
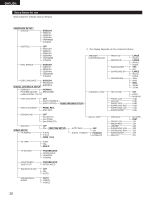
ENGLISH ENGLISH (3) Names and Functions of Remote Control Unit Buttons 2 Button not explained here function in the same way as the corresponding buttons on the main unit. q w e r t y u i POWER OFF POWER ON HDMI/DVI SELECT FORMAT NTSC/PAL OPEN/ CLOSE SUPER AUDIO CD SETUP PROGRAM /DIRECT CLEAR SEARCH MODE CALL BACK LIGHT ANGLE TOP MENU SUBTITLE AUDIO DISPLAY !9 !8 @0 @1 @2 @3 @4 @5 @6 @7 MENU RETURN @8 o !0 !1 !3 !5 !2 !4 !7 !6 STOP STILL/PAUSE PLAY SKIP SLOW/SEARCH REPEAT A-B PAGE RANDOM SETUP MARKER PICTURE ADJUST PICT ADJ. ZOOM DIMMER PURE DIRECT MEMORY SELECT @9 #0 #1 #3 #2 #4 q POWER ON/POWER OFF buttons • Press this to switch the power between on and standby. w HDMI/DVI SELECT/FORMAT buttons • Use these to select to use HDMI connector or DVI connector, and the format of video signals (480P/576P, 720P, 1080i, AUTO). e Number buttons • Use these to input numbers. Use the +10 button to input numbers of 10 or over. Example: To input 25 r LIGHT button • Press this to light the all buttons. Press again this to put out light. t ANGLE button • Press this to switch the angle. y TOP MENU button • The top menu stored on the disc is displayed. u Cursor buttons/ENTER button • Use the • and ª cursor buttons to select in the vertical direction. Use the 0 and 1 cursor buttons to select in the horizontal direction. Press the ENTER button to select the item selected with the cursor buttons. i MENU button • The DVD menu stored on the disc is displayed. o STOP button (2) !0 STILL/PAUSE button (3) !1 SKIP buttons !2 REPEAT button • Press this to play tracks repeatedly. !3 A-B repeat button (A-B) • Use this to repeat sections between two specific points. !4 RANDOM button • Press this to play the tracks on the video or music CD in random order. !5 MARKER button • Press this to mark places you want to see again. !6 SETUP button • Press this to display the default setting screen. !7 PICTURE ADJUST button • Press this to adjust the picture quality to suit your tastes. !8 OPEN/CLOSE button !9 NTSC/PAL button • Use this to switch the set's video output format (NTSC/PAL). @0 SUPER AUDIO CD SETUP button @1 PROGRAM/DIRECT button • Press this to switch between the normal play, programmed play. @2 CLEAR button • Press this to clear numbers that you have input. @3 CALL button • Press this to check the program contents. @4 SEARCH MODE button • Press this to change the search mode to search for groups or titles, tracks or chapters when selecting sections of discs directly using the number buttons. @5 AUDIO button • For DVDs, press this to switch the audio language. For video CDs, press this to switch the channel between "STEREO", "MONO LEFT" and "MONO RIGHT". @6 SUBTITLE button • Press this to switch the DVD's subtitle language. @7 DISPLAY button • Press this to display the ON-SCREEN. @8 RETURN button • Press this to return to the previous menu screen. @9 PLAY button (1) #0 SLOW/SEARCH buttons #1 PAGE -/PAGE + buttons • Use these to selected the desired still picture on DVD audio discs containing browseable still pictures. #2 ZOOM button • Press this to enlarge the image. #3 DIMMER button • Use this to adjust the brightness of the main unit's display. Can be switched in 4 steps, from all off to always on. #4 PURE DIRECT MEMORY/SELECT buttons • Use these to make and select that various setting to achieve higher quality sound. 25
-
 1
1 -
2
-
3
-
4
-
5
-
6
-
7
-
8
-
9
-
10
-
11
-
12
-
13
-
14
-
15
-
16
-
17
-
18
-
19
-
 20
20 -
 21
21 -
 22
22 -
 23
23 -
 24
24 -
 25
25 -
 26
26 -
 27
27 -
 28
28 -
 29
29 -
 30
30 -
31
-
32
-
33
-
34
-
35
-
36
-
37
-
38
-
39
-
40
-
41
-
42
-
43
-
44
-
45
-
46
-
47
-
48
-
49
-
50
-
51
-
52
-
53
-
54
-
55
-
56
-
57
-
58
-
59
-
60
-
61
-
62
-
63
-
64
-
65
-
66
-
67
-
68
-
69
-
70
-
71
-
72
-
73
-
74
-
75
-
76
-
77
-
78
-
79
-
80
-
81
-
82
-
83
-
84
-
85
-
86
 |
 |
