Denon DVD-5910 Owners Manual - English - Page 52
Adjusting The Picture Quality
 |
View all Denon DVD-5910 manuals
Add to My Manuals
Save this manual to your list of manuals |
Page 52 highlights
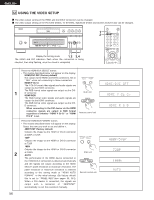
ENGLISH ENGLISH 11 ADJUSTING THE PICTURE QUALITY 1 CLEAR SEARCH MODE CALL BACK LIGHT ANGLE TOP MENU SUBTITLE AUDIO DISPLAY MENU RETURN STOP STILL/PAUSE PLAY SKIP SLOW/SEARCH REPEAT A-B PAGE RANDOM SETUP MARKER PICTURE ADJUST PICT ADJ. ZOOM DIMMER PURE DIRECT MEMORY SELECT 2,3,4,5,6,7 Press the PICTURE ADJUST button. • The image quality adjustment screen will appear. STD PICTURE Returns the settings to the factory default settings. ADJUST PICT ADJ. 1 M1 TO M5 Image quality settings that have been adjusted to your preference can be stored to 5 memories, M1 to M5. SET Remote control unit SET permits set to setup level and setting of the screen display position (horizontal and vertical). P I CT URE MODE STD M 1 M 2 M 3 M 4 M5 SET Select the memory using the 2 cursor buttons (0, 1) and press the ENTER button. IMAGE QUALITY ADJUSTMENT 1 This permits adjustment of the contrast, brightness, sharpness and hue. / Advance to Operation 3 IMAGE QUALITY ADJUSTMENT 2 This permits adjustment of the white level, black level 2 and chroma level. / Advance to Operation 4. IMAGE QUALITY ADJUSTMENT 3 This permits adjustment of the enhancer. / Advance to Operation 5. GAMMA CORRECTION This is selected when dark portions of the image are obscure, or bright portions are much brighter than necessary. / Advance to Operation 6. Remote control unit MEMORY 1 1 2 3 M H 0 0 0 0 0 When Image Quality Adjustment 1 Is Selected and Adjusted: • Press cursor button (ª), then select the image quality adjustment item with cursor buttons (0, 1), set the adjustment value with cursor buttons (•, ª), and press 3 the ENTER button. • All of the adjusted contents will be stored. CONTRAST (-6 to +6) (Factory default: 0) • This adjusts the light/dark difference of the image. BRIGHTNESS (0 to +12) (Factory default: 0) • This adjusts the brightness of the image. Remote control unit MEMORY 1 1 2 3 M H 0 0 0 0 0 52
-
 1
1 -
2
-
3
-
4
-
5
-
6
-
7
-
8
-
9
-
10
-
11
-
12
-
13
-
14
-
15
-
16
-
17
-
18
-
19
-
20
-
21
-
22
-
23
-
24
-
25
-
26
-
27
-
28
-
29
-
30
-
31
-
32
-
33
-
34
-
35
-
36
-
37
-
38
-
39
-
40
-
41
-
42
-
43
-
44
-
45
-
46
-
 47
47 -
 48
48 -
 49
49 -
 50
50 -
 51
51 -
 52
52 -
 53
53 -
 54
54 -
 55
55 -
 56
56 -
 57
57 -
58
-
59
-
60
-
61
-
62
-
63
-
64
-
65
-
66
-
67
-
68
-
69
-
70
-
71
-
72
-
73
-
74
-
75
-
76
-
77
-
78
-
79
-
80
-
81
-
82
-
83
-
84
-
85
-
86
 |
 |
