Denon DVD-5910 Owners Manual - English - Page 54
REFERENCE, To exit the Image Quality Adjustment mode
 |
View all Denon DVD-5910 manuals
Add to My Manuals
Save this manual to your list of manuals |
Page 54 highlights
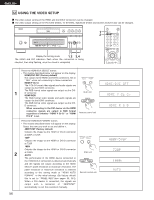
ENGLISH ENGLISH When Gamma Correction is Selected and Adjusted: Two kinds of displays are prepared for adjustment of Gamma Correction. • When use the Numerical table of Gamma Correction. (Figure 1) :Pressing the cursor button (ª) • When use the Graph of Gamma Correction. (Figure 2) :Pressing the enter button Remote control unit Select the adjust point with cursor buttons (0, 1), set the adjustment brightness level with cursor buttons (•, ª), and press the ENTER button. (If the PICTURE ADJUST button is pressed before pressing the enter button, an adjustment level is not stored) • The brightness level can be adjusted in range of 16 to 235. • Pressing the cursor button (•) raises the level (and the image becomes brighter), and pressing the cursor button (ª) lowers the level (and the image becomes darker). • A press of the CLEAR button returns all of the setting points to the standard level. 6 ✽ The level of the selected point cannot exceed the level of the points above and below that point. (A dark portion cannot be set to exceed a portion that is brighter than it.) MEMORY 1 1 2 3 G0 G1 G2 G3 G4 G5 G6 G7 G8 G9 24 32 48 64 80 96 128 160 192 224 MEMORY 1 GO : 0 2 4 235 0 0 100 (Figure 1) ✽ To exit the Image Quality Adjustment mode Press the PICTURE ADJUST button. (Figure 2) REFERENCE: • In the Graph of Gamma correction, the horizontal axis indicates the brightness level of the image that is recorded on the disc, and the vertical axis indicates the brightness level of the image when it is output from this unit. MEMORY 1 GO : 0 2 4 235 MEMORY 1 GO : 0 2 4 235 0 0 100 • When bright points of the disc side are adjusted to the "dark" of the output side, the fine parts of the bright portion that normally become hard to see, become an easily discerned image. 0 0 100 • When dark points of the disc side are adjusted to the "bright" of the output side, the fine parts of the dark portion that normally become hard to see, become an easily discerned image. 54
-
 1
1 -
2
-
3
-
4
-
5
-
6
-
7
-
8
-
9
-
10
-
11
-
12
-
13
-
14
-
15
-
16
-
17
-
18
-
19
-
20
-
21
-
22
-
23
-
24
-
25
-
26
-
27
-
28
-
29
-
30
-
31
-
32
-
33
-
34
-
35
-
36
-
37
-
38
-
39
-
40
-
41
-
42
-
43
-
44
-
45
-
46
-
47
-
48
-
 49
49 -
 50
50 -
 51
51 -
 52
52 -
 53
53 -
 54
54 -
 55
55 -
 56
56 -
 57
57 -
 58
58 -
 59
59 -
60
-
61
-
62
-
63
-
64
-
65
-
66
-
67
-
68
-
69
-
70
-
71
-
72
-
73
-
74
-
75
-
76
-
77
-
78
-
79
-
80
-
81
-
82
-
83
-
84
-
85
-
86
 |
 |
