Denon DVD-5910 Owners Manual - English - Page 75
Marking Scenes You Want To See Again
 |
View all Denon DVD-5910 manuals
Add to My Manuals
Save this manual to your list of manuals |
Page 75 highlights
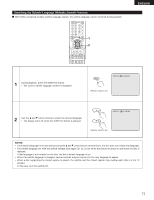
ENGLISH ENGLISH 20 MARKING SCENES YOU WANT TO SEE AGAIN 2 Set marks at scenes you want to see again so that you can start playback from the marked position whenever you want. Setting Marks (for DVD-audios and DVD-videos only) 3 1 CLEAR SEARCH MODE CALL BACK LIGHT ANGLE TOP MENU SUBTITLE AUDIO DISPLAY MENU RETURN STOP STILL/PAUSE PLAY SKIP SLOW/SEARCH REPEAT A-B PAGE RANDOM SETUP MARKER PICTURE ADJUST PICT ADJ. ZOOM DIMMER PURE DIRECT MEMORY SELECT 2,3 During playback, press the MARKER button. MARKER • The marker screen appears. 1 • Use the 0 and 1 cursor buttons to select the " " marks. • " " is displayed if the mark is not set. Remote control unit Press the ENTER button at the scene you want to mark. 2 • A number is displayed. • Up to five marks can be set. (To select another marker, use the cursor buttons (0, 1).) Remote control unit Calling Out Marked Scenes and Clearing Marks Use the 0 and 1 cursor buttons to select the marker number and 3 press the ENTER button. • If the marker screen is not displayed during playback, press the MARKER button to display it. Remote control unit Remote control unit ✽ To clear the marker display: Press the MARKER button. ✽ To clear a marker: Use the 0 and 1 cursor buttons to select a marker number and press the CLEAR button. • You can clear existing markers, but they are restored when you open the disc tray or switch the unit to standby. NOTES: • All the markers added with this unit are cleared when the unit is switched to standby or the disc tray is opened. • Depending on where the marker is set, subtitles may not be displayed. 75
-
 1
1 -
2
-
3
-
4
-
5
-
6
-
7
-
8
-
9
-
10
-
11
-
12
-
13
-
14
-
15
-
16
-
17
-
18
-
19
-
20
-
21
-
22
-
23
-
24
-
25
-
26
-
27
-
28
-
29
-
30
-
31
-
32
-
33
-
34
-
35
-
36
-
37
-
38
-
39
-
40
-
41
-
42
-
43
-
44
-
45
-
46
-
47
-
48
-
49
-
50
-
51
-
52
-
53
-
54
-
55
-
56
-
57
-
58
-
59
-
60
-
61
-
62
-
63
-
64
-
65
-
66
-
67
-
68
-
69
-
 70
70 -
 71
71 -
 72
72 -
 73
73 -
 74
74 -
 75
75 -
 76
76 -
 77
77 -
 78
78 -
 79
79 -
 80
80 -
81
-
82
-
83
-
84
-
85
-
86
 |
 |
