Edimax AR-7211A V2 Manual - Page 70
Step 1, Enable DMZ, Step 2, Step 3, Apply Changes, 6.2.2., Virtual Server, Field, Description, Usual
 |
View all Edimax AR-7211A V2 manuals
Add to My Manuals
Save this manual to your list of manuals |
Page 70 highlights
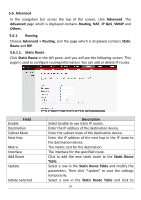
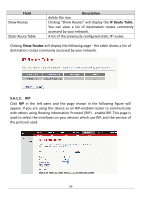
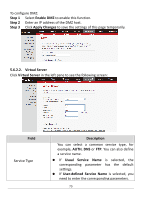
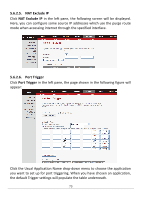
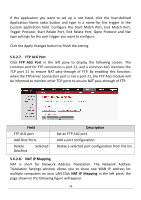
To configure DMZ: Step 1 Select Enable DMZ to enable this function. Step 2 Enter an IP address of the DMZ host. Step 3 Click Apply Changes to save the settings of this page temporarily. 5.6.2.2. Virtual Server Click Virtual Server in the left pane to see the following screen: Field Service Type Description You can select a common service type, for example, AUTH, DNS or FTP. You can also define a service name. If Usual Service Name is selected, the corresponding parameter has the default settings. If User-defined Service Name is selected, you need to enter the corresponding parameters. 70
-
 1
1 -
2
-
3
-
4
-
5
-
6
-
7
-
8
-
9
-
10
-
11
-
12
-
13
-
14
-
15
-
16
-
17
-
18
-
19
-
20
-
21
-
22
-
23
-
24
-
25
-
26
-
27
-
28
-
29
-
30
-
31
-
32
-
33
-
34
-
35
-
36
-
37
-
38
-
39
-
40
-
41
-
42
-
43
-
44
-
45
-
46
-
47
-
48
-
49
-
50
-
51
-
52
-
53
-
54
-
55
-
56
-
57
-
58
-
59
-
60
-
61
-
62
-
63
-
64
-
 65
65 -
 66
66 -
 67
67 -
 68
68 -
 69
69 -
 70
70 -
 71
71 -
 72
72 -
 73
73 -
 74
74 -
 75
75 -
76
-
77
-
78
-
79
-
80
-
81
-
82
-
83
-
84
-
85
-
86
-
87
-
88
-
89
 |
 |
70
To configure DMZ:
Step 1
Select
Enable DMZ
to enable this function.
Step 2
Enter an IP address of the DMZ host.
Step 3
Click
Apply Changes
to save the settings of this page temporarily.
5.6.2.2.
Virtual Server
Click
Virtual Server
in the left pane to see the following screen:
Field
Description
Service Type
You can select a common service type, for
example,
AUTH
,
DNS
or
FTP
. You can also define
a service name.
If
Usual
Service
Name
is
selected,
the
corresponding
parameter
has
the
default
settings.
If
User-defined Service Name
is selected, you
need to enter the corresponding parameters.