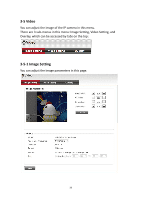
Edimax IR-113E Manual - Page 37
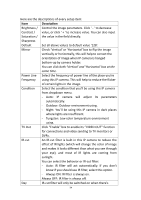
Select the condition that you'll be using this IP camera
 |
View all Edimax IR-113E manuals
Add to My Manuals
Save this manual to your list of manuals |
Page 37 highlights
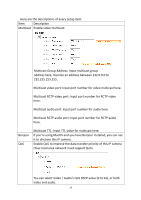
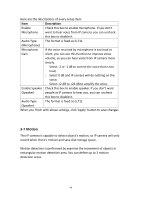
Here are the descriptions of every setup item: Item Description Brightness / Control the image parameters. Click ' - ' to decrease Contrast / value, or click ' + ' to increase value. You can also input Saturation / the value in the field directly. Sharpness Default Set all above values to default value '128'. Mirror Check 'Vertical' or 'Horizontal' box to flip the image vertically or horizontally, this will help to correct the orientation of image when IP camera is hanged bottom-up by camera holder. You can click both 'Vertical' and 'Horizontal' box at the same time. Power Line Select the frequency of power line of the place you're Frequency using this IP camera. This will help to reduce the flicker of certain lights in the image. Condition Select the condition that you'll be using this IP camera from dropdown menu. - Auto: IP camera will adjust its parameters automatically. - Outdoor: Outdoor environment using. - Night: You'll be using this IP camera in dark places where lights are insufficient. - Tungsten: Low color temperature environment using. TV Out Click "Enable" box to enable its "VIDEO OUT" function for connections and video sending to TV monitors or DVRs. IR-cut An IR-cut filter is built in this IP camera to reduce the effect of IR lights (which will change the color of image and makes it looks different than what you see through your eye), and most of IR lights are coming from sunlight. You can select the behavior or IR-cut filter: - Auto: IR filter will act automatically. If you don't know if you should use IR filter, select this option. - Always ON: IR filter is always on. Always OFF: IR filter is always off. Day IR-cut filter will only be switched on when there's 34
-
 1
1 -
2
-
3
-
4
-
5
-
6
-
7
-
8
-
9
-
10
-
11
-
12
-
13
-
14
-
15
-
16
-
17
-
18
-
19
-
20
-
21
-
22
-
23
-
24
-
25
-
26
-
27
-
28
-
29
-
30
-
31
-
 32
32 -
 33
33 -
 34
34 -
 35
35 -
 36
36 -
 37
37 -
 38
38 -
 39
39 -
 40
40 -
 41
41 -
 42
42 -
43
-
44
-
45
-
46
-
47
-
48
-
49
-
50
-
51
-
52
-
53
-
54
-
55
-
56
-
57
-
58
-
59
-
60
-
61
-
62
-
63
-
64
-
65
-
66
-
67
-
68
-
69
-
70
-
71
-
72
-
73
-
74
-
75
-
76
-
77
-
78
-
79
-
80
-
81
-
82
-
83
-
84
-
85
-
86
-
87
-
88
-
89
-
90
-
91
-
92
-
93
-
94
-
95
-
96
-
97
-
98
-
99
-
100
-
101
-
102
-
103
-
104
-
105
-
106
-
107
-
108
-
109
-
110
-
111
-
112
-
113
-
114
-
115
-
116
-
117
-
118
 |
 |