Edimax IR-113E Manual - Page 91
DI Input: Recording is activated by DI Digital
 |
View all Edimax IR-113E manuals
Add to My Manuals
Save this manual to your list of manuals |
Page 91 highlights
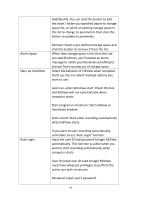
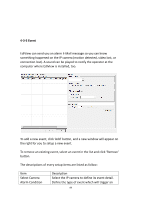
. Events To add or delete a time period, select 'ADD' or 'DEL' first, then click the time period block. Select the event to trigger recording: Round-The-Clock: Recording is time-activated (according to schedule). Motion Detection: Recording is motion-activated. Dedicated Schedule DI Input: Recording is activated by DI (Digital Input) signal located on IP camera. IP camera must have DI port and not every IP camera is equipped with DI. If you just want to add a new recording schedule between certain time and this schedule will only happen once but not every week, you can use this function to specify a time period. Select 'Start' and 'End' date / time, and click 'Add/Modify' button to add the time period to the list. You can also select an existing time period and make changes, and click 'Add / Modify' button to save changes. Comment Cameras/Devices Add to list To remove an existing schedule, select an existing schedule, and then click 'Remove' button. You can input some text to help you to memorize the purpose of this schedule Check all IP cameras that will be activated by this schedule. Click this button to add this schedule to the list. When you finishes setting, click 'OK' button to save changes you made, or click 'Cancel' button to discard all settings you made. 88
-
 1
1 -
2
-
3
-
4
-
5
-
6
-
7
-
8
-
9
-
10
-
11
-
12
-
13
-
14
-
15
-
16
-
17
-
18
-
19
-
20
-
21
-
22
-
23
-
24
-
25
-
26
-
27
-
28
-
29
-
30
-
31
-
32
-
33
-
34
-
35
-
36
-
37
-
38
-
39
-
40
-
41
-
42
-
43
-
44
-
45
-
46
-
47
-
48
-
49
-
50
-
51
-
52
-
53
-
54
-
55
-
56
-
57
-
58
-
59
-
60
-
61
-
62
-
63
-
64
-
65
-
66
-
67
-
68
-
69
-
70
-
71
-
72
-
73
-
74
-
75
-
76
-
77
-
78
-
79
-
80
-
81
-
82
-
83
-
84
-
85
-
 86
86 -
 87
87 -
 88
88 -
 89
89 -
 90
90 -
 91
91 -
 92
92 -
 93
93 -
 94
94 -
 95
95 -
 96
96 -
97
-
98
-
99
-
100
-
101
-
102
-
103
-
104
-
105
-
106
-
107
-
108
-
109
-
110
-
111
-
112
-
113
-
114
-
115
-
116
-
117
-
118
 |
 |