Epson BrightLink 585Wi Operation Guide - Easy Interactive Tools V3.0 - Page 17
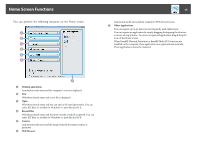
Camera Screen, General Settings, Select background, Paste, Insert image, Select camera, Record
 |
View all Epson BrightLink 585Wi manuals
Add to My Manuals
Save this manual to your list of manuals |
Page 17 highlights
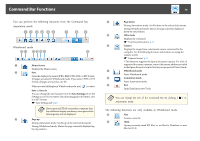
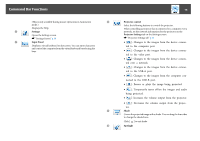
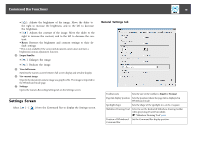
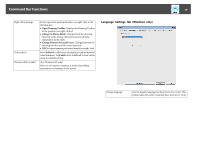
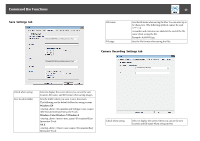
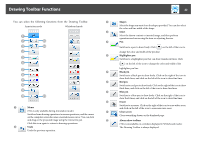
Command Bar Functions Emphasizes part of the projected image using a spotlight effect. You can drag the spotlight frame to change the emphasized area. Click [ ] to exit spotlight. You can change the shape of the spotlight from the General Settings tab on the Settings screen. The following functions are only available in Whiteboard mode. K Select background Allows you to select a background from the nine patterns provided. You can also select to show a still image of your current desktop, an image file, or an image from the document camera as the background image. L Paste Pastes data from the clipboard to the currently displayed page. M Insert image Select the image you want to insert into the currently displayed page. You can select a file in JPG, BMP, or PNG format. Camera Screen The Camera screen is displayed when you select [ Bar. ] from the Command The Camera screen allows you to display images from a document camera connected to the computer. You can make adjustments such as changing the size and brightness of the image, and then save as an image or movie file. 17 A Select camera Displays a list of the document cameras connected to the computer. Select the document camera you want to use to project images in the Camera screen. B Record • [ ]: Records the image from the document camera. The recor‐ ded image is saved in .avi format for Windows and .mov format for OS X. • [ ]: Stops recording. You can set the save location for the recorded image on the Camera Recording Settings tab on the Settings screen. s "Camera Recording Settings tab" p.20 * Audio is not recorded. C Picture Quality
-
 1
1 -
2
-
3
-
4
-
5
-
6
-
7
-
8
-
9
-
10
-
11
-
 12
12 -
 13
13 -
 14
14 -
 15
15 -
 16
16 -
 17
17 -
 18
18 -
 19
19 -
 20
20 -
 21
21 -
 22
22 -
23
-
24
-
25
-
26
-
27
 |
 |
