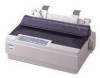
Epson C11C294131BZ User Manual
Epson C11C294131BZ - LX 300+ B/W Dot-matrix Printer Manual
 |
View all Epson C11C294131BZ manuals
Add to My Manuals
Save this manual to your list of manuals |
Epson C11C294131BZ manual content summary:
- Epson C11C294131BZ | User Manual - Page 1
alterations to this product, or (excluding the U.S.) failure to strictly comply with Seiko Epson Corporation's operating and maintenance instructions. Seiko Epson Corporation shall not be liable against any damages or problems arising from the use of any options or any consumable products other than - Epson C11C294131BZ | User Manual - Page 2
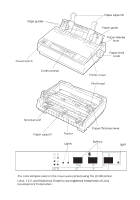
Power switch Control panel Paper supports Paper guide Paper-release lever Paper-feed knob Printer cover Print head Sprocket unit Paper support Tractor Lights Paper-thickness lever Buttons Light Roman Sans Serif Draft Draft Condensed Font LF/FF Pause 12 Micro Adjust Paper Park 3sec - Epson C11C294131BZ | User Manual - Page 3
installation. This equipment generates, uses and can radiate radio frequency energy and, if not installed and used in accordance with the instructions, may cause harmful interference to radio or television reception. However, there is no guarantee that interference will not occur in a particular - Epson C11C294131BZ | User Manual - Page 4
following support services through the Epson ConnectionSM at (800) 922-8911: t Assistance in locating your nearest Authorized Epson Reseller or Service Center t Technical assistance with the installation, configuration, and operation of Epson products t Sales of the ESC/P® Reference Manual t Epson - Epson C11C294131BZ | User Manual - Page 5
of the product. All claims under this guarantee MUST be supported by evidence of purchase, normally the bill of sale invoice, and it users are requested to contact the Service Co-ordinator Manager at Epson (UK) Limited. Epson (UK) Limited, or Epson Appointed Distributors, will at their discretion - Epson C11C294131BZ | User Manual - Page 6
. The guarantee does not cover visits to the user's premises or the repair or commissioning of the product on site. Use of options Epson (UK) Limited shall not be liable against any damages or problems arising from the use of any options or consumable products other than those designated as Original - Epson C11C294131BZ | User Manual - Page 7
The blue wire must be connected to the terminal in the plug marked with the letter N or coloured black. The brown wire must be connected to the terminal in the plug marked with the letter L or coloured white. If damage occurs to the plug, replace the cord set or consult a qualified electrician. - Epson C11C294131BZ | User Manual - Page 8
, and Notes 0-2 Important Safety Instructions 0-3 Chapter 1 Setting Up the Printer Unpacking the Printer 1-2 Choosing a place for the printer 1-3 Assembling the Printer 1-4 Installing the paper-feed knob 1-4 Attaching the paper supports 1-5 Installing the ribbon cartridge 1-5 Plugging in the - Epson C11C294131BZ | User Manual - Page 9
22 2-22 2-22 2-23 2-23 2-23 2-23 2-23 2-24 2-24 2-24 2-24 2-28 2-29 2-31 Chapter 3 Troubleshooting Problems and Solutions 3-2 Power Supply 3-2 Power is not being supplied 3-2 Printing 3-3 The printer does not print 3-3 The print is faint or uneven 3-4 Dots are missing in printed characters or - Epson C11C294131BZ | User Manual - Page 10
Parallel interface specifications A-7 Serial interface specifications A-8 Serial pin assignments A-8 Printer Settings A-9 Command Summary A-10 Sending printer commands A-10 Using the command summary A-10 Printer operation A-11 Data control A-11 Vertical motion A-11 Horizontal motion A-12 - Epson C11C294131BZ | User Manual - Page 11
Character tables User-defined characters Color printing Graphics A-14 A-15 A-16 A-16 Index x - Epson C11C294131BZ | User Manual - Page 12
Introduction Features Your Epson® 9-pin dot matrix printer offers these outstanding features: t High-speed printing. Print up Kit (C83208V) adds visual interest to printed documents by switching to a color ribbon cartridge. t Pull Tractor (C80030V) for printing continuous paper and multi-part forms ( - Epson C11C294131BZ | User Manual - Page 13
single-sheet bond paper automatically. Finding Your Way Around This manual provides fully illustrated, step-by-step instructions for setting up and operating your printer. t Chapter 1 describes how to unpack, set up, test, and connect the printer to your computer. Be sure to read this chapter first - Epson C11C294131BZ | User Manual - Page 14
all of these instructions before you set up your printer. 2. Follow all warnings and instructions marked on the printer. 3. Unplug this printer from the wall outlet before you clean it. Use a damp cloth for cleaning and do not use liquid or aerosol cleaners. 4. Do not use your printer near water or - Epson C11C294131BZ | User Manual - Page 15
manual, do not attempt to repair the printer service person under the following conditions: A. When the power cord or plug is damaged or frayed. B. If liquid has been spilled into it. C. If it has been exposed to rain or water. D. If it does not operate normally when the operating instructions - Epson C11C294131BZ | User Manual - Page 16
Chapter 1 Setting Up the Printer 1 Unpacking the Printer 1-2 Choosing a place for the printer 1-3 Assembling the Printer 1-4 Installing the paper-feed knob 1-4 Attaching the paper supports 1-5 Installing the ribbon cartridge 1-5 Plugging in the printer 1-9 Running the Self Test 1-10 - Epson C11C294131BZ | User Manual - Page 17
Unpacking the Printer Your printer box should include these items. Printer Printout guide Paper-feed knob Paper supports Ribbon cartridge Power cord In some locations, the power cord is attached to the printer. c Caution: There are several versions of this printer designed for different - Epson C11C294131BZ | User Manual - Page 18
in power can wipe out the information in your computer or printer memory. If you place the printer on a stand, follow these guidelines: t Use a stand that supports at least 10 kg (22 lb). t Never use a stand that tilts the printer. Always keep it level. t Provide enough clearance below the stand and - Epson C11C294131BZ | User Manual - Page 19
and running. Installing the paper-feed knob The first step in assembling the printer is installing the paper-feed knob. 1. Insert the knob into the hole on the printer's side and rotate it slowly until it slips onto the shaft. 2. Push firmly on the paper-feed knob until it fits against the - Epson C11C294131BZ | User Manual - Page 20
begin using the printer. 1. Raise the paper guide. Hold one of the paper supports and push the tips into the notches on the edge guide. 2. Repeat for the other paper support. Lower the paper guide. Installing the ribbon cartridge Before installing the ribbon cartridge, make sure the printer is not - Epson C11C294131BZ | User Manual - Page 21
the upright position, then pull it up to remove it. w Warning: Never move the print head while the printer is turned on; this can damage the printer. Also, if you have just used the printer, let the print head cool for a few minutes before you touch it. 2. Slide the print head to the - Epson C11C294131BZ | User Manual - Page 22
ribbon-tightening knob in the direction of the arrow to remove any slack from the ribbon so it is easier to install. 4. Insert the ribbon cartridge into the printer as shown; then press both sides of the cartridge firmly to fit the plastic hooks into the printer slots. Setting Up the - Epson C11C294131BZ | User Manual - Page 23
it moves smoothly. 7. Re-install and close the printer cover. When the printing becomes faint, you need to replace the ribbon cartridge. To remove the old ribbon cartridge, first move the print head to the center of the printer. Then remove the cartridge by lifting the posts on the either side and - Epson C11C294131BZ | User Manual - Page 24
off. It is off when the N side of the switch is pressed down. 2. Check the label on the bottom of the printer to make sure the voltage required by the printer matches that of your electrical outlet. c Caution: If the rated voltage and your outlet voltage do not match, contact your dealer - Epson C11C294131BZ | User Manual - Page 25
or single sheets; this section describes the easier way, with single sheets. 1. Make sure the printer is turned off and the paper-release lever is pushed back to the single-sheet position. Raise the paper guide upright. c Caution: You should use paper at least 210 mm or 8 1/4 inches wide to run - Epson C11C294131BZ | User Manual - Page 26
2. While holding down the LF/FF button, turn on the printer. The PAUSE light flashes. 3. Slide the left edge guide until it locks in place at the guide mark. Next, adjust the right edge guide to match the width of your paper. Setting Up the Printer 1-11 - Epson C11C294131BZ | User Manual - Page 27
of paper down firmly between the edge guides until it meets resistance. The printer loads the sheet automatically. Press the PAUSE button, then the printer begins to print. c Caution: Always close the printer cover while the printer is printing. The printer cover helps the paper feed. 5. To stop - Epson C11C294131BZ | User Manual - Page 28
to connect the cable.) Connect your computer to the desired interface as described below. You can connect a cable to both interfaces; the printer switches automatically to the appropriate interface when it receives data. Using the parallel interface You need a shielded, twisted-pair cable (not - Epson C11C294131BZ | User Manual - Page 29
clips together until they lock in place on either side of the connector. 2. Guide the interface cable through the slot on the side of the printer so that it does not block the paper supply as shown in the illustration on the ground connector at the back of the computer.) 1-14 Setting Up the Printer - Epson C11C294131BZ | User Manual - Page 30
Using the serial interface 1. Turn off both the computer and the printer. Plug the serial cable connector securely into the printer's serial interface. Tighten the screws on either side of the connector. Note: If there is a ground wire at the end of the cable, attach it - Epson C11C294131BZ | User Manual - Page 31
2. Guide the interface cable through the slot on the side of the printer so that it does not block the paper supply. 3. Plug to the ground connector at the back of the computer.) 4. Use the Printer Setting mode to change the baud rate, parity bit, data length, or ETX/ACK if necessary. See "Changing - Epson C11C294131BZ | User Manual - Page 32
the right driver for your printer. Your printer will work correctly printers box, select Epson LX-300. If LX-300 is not available, select Epson JX-80 if you plan to use color or Epson LX-810, LX-850, or LX-800 if you do not plan to use color. 5. Choose the Install button. A dialog box may instruct - Epson C11C294131BZ | User Manual - Page 33
, you must choose either LX-300, JX-80, or EX-800. The other printers cannot use color. LX-810/850 LX-800 LX-80/86 FX-850 FX-86e/800 JX-80 EX-800 Any FX printer Epson printer Draft printer If your software does not list the LX-300, you may want to contact - Epson C11C294131BZ | User Manual - Page 34
on Special Paper 2-15 Adjusting the paper-thickness lever 2-16 Multi-part forms 2-17 Labels 2-17 Envelopes 2-18 Changing the Printer Settings 2-19 Printer setting descriptions 2-22 Installing and Using Options 2-24 Cut-sheet feeder 2-24 Pull Tractor unit 2-28 Roll paper holder 2-29 - Epson C11C294131BZ | User Manual - Page 35
also flashes when you can tear off the last sheet at the edge of the printer cover. The PAUSE light goes on and the beeper sounds five times if an error button Press the FONT button during normal operation to cycle through the printer fonts listed on the control panel. When you press the button, the - Epson C11C294131BZ | User Manual - Page 36
self test. To start the self test, hold down the LF/FF button while you turn on the printer. For complete instructions, see page 1-10. PAUSE button Press the PAUSE button to stop the printer temporarily during printing or the self test. Press it again to resume activity. PAPER PARK Press the FONT - Epson C11C294131BZ | User Manual - Page 37
with your software will cancel your control panel selection. The table below shows how the FONT lights appear for each selection. Font FONT Lights 1 2 Sample Epson Roman (NLQ) N N Epson Sans Serif (NLQ) N O Epson Draft O N Epson Draft condensed O O N = on O = off 2-4 Using the Printer - Epson C11C294131BZ | User Manual - Page 38
Printing on Single Sheets You can use the paper guide to print on single sheets with a width of 182 the page, follow these steps (these instructions also work when using the pull or push tractor): 1. With paper loaded, hold down the PAUSE button until the printer beeps once and the FONT lights begin - Epson C11C294131BZ | User Manual - Page 39
in your software program as described below. 1. When you install a software program, it normally asks you what printer you are using. Make sure you choose the correct printer. See Chapter 1 for instructions. 2. Many programs have an option that you can use to set the maximum lines-per-page. If you - Epson C11C294131BZ | User Manual - Page 40
pull tractor. See page 2-11 for instructions. Printing with the push tractor When using the push tractor Printer Setting mode to on. See "Changing the Printer Settings" on page 2-19. Here's how to load continuous paper using the push tractor: 1. Make sure the printer is turned off. Remove the paper guide - Epson C11C294131BZ | User Manual - Page 41
a guide. The printer prints to the right of the position marked 0. Push the sprocket lock lever back to lock it in place. Then slide the right sprocket unit to match the width of your paper, but do not lock it. Move the paper support so it is midway between the sprocket units. 10 - Epson C11C294131BZ | User Manual - Page 42
the paper-park position. 5. To separate the incoming paper from the printed paper, attach the paper guide by holding it horizontally and fitting its notches over the printer's mounting posts as shown below. Then slide the paper guide toward the front of the printer until you feel it click. Using the - Epson C11C294131BZ | User Manual - Page 43
center until it stops at the guide mark. Then slide the right edge guide to the opposite guide mark. 7. Turn on the printer. 8. Make sure the printer cover is closed. Press the LF/FF button to feed the paper to the loading position. When the printer receives data, it begins printing automatically - Epson C11C294131BZ | User Manual - Page 44
to step 6. c Caution: When using the pull tractor, set the Auto tear off feature in the Printer Setting mode to off; otherwise the paper may jam. 1. Turn the printer off; then remove the paper guide. Pull the paper-release lever forward to the continuous paper position as shown in the illustration - Epson C11C294131BZ | User Manual - Page 45
2. Squeeze the tractor's lock tabs gently and pull the tractor away from the printer. Remove the printer cover. 3. Lift the tractor forward to the mounting slot at the top of the printer and tilt it into place as shown below. When you push the tractor onto the posts, you should feel the notches snap - Epson C11C294131BZ | User Manual - Page 46
4. Release the sprocket units by pulling the sprocket locks forward. 5. Insert the paper into the paper slot as shown below and pull it up. Position the paper using the scale on the printer as a guide. The printer prints to the right of the position marked 0. Using the Printer 2-13 10 5 0 - Epson C11C294131BZ | User Manual - Page 47
Then slide the right sprocket unit to match the width of your paper, but do not lock it. Move the paper support midway between the two sprocket units. 7. Make sure your paper has a clean, straight leading edge. Open the sprocket any slack in the paper and lock it in place. 2-14 Using the Printer - Epson C11C294131BZ | User Manual - Page 48
's mounting posts. Then slide the paper guide toward the back of the printer until you feel it click. 9. Slide the left edge guide to the center until it stops at the guide mark; slide the right edge guide to the opposite guide mark. 10. Attach the printer cover and adjust the paper position with - Epson C11C294131BZ | User Manual - Page 49
factory-set for standard office paper. Here's how to change the setting for special papers: 1. Turn the printer off and open the cover. The paper-thickness lever is on the left side of the printer. The numbers next to the lever indicate the thickness setting. For normal use, the lever should always - Epson C11C294131BZ | User Manual - Page 50
results: t Load multi-part forms with the tractor only, not in the cut-sheet feeder or paper guide. For instructions, see "Printing on Continuous Paper" on page 2-7. t Use only multi-part forms that are joined by lever should be set to 1. See page 2-11 for loading instructions. Using the Printer 2-17 - Epson C11C294131BZ | User Manual - Page 51
" on page 1-10. Insert the wide edge of the envelope into the printer first, printable-side down. When you insert the envelope between the paper guides, push it firmly and hold it until it feeds into the printer. t Use envelopes only under normal temperature and humidity conditions. t Make sure the - Epson C11C294131BZ | User Manual - Page 52
, if possible. See your software documentation for more information. If you cannot use your software program to change the printer's settings, you can use the Printer Setting mode. Here's how: c Caution: Use paper at least 210 mm (8 1/4 inches) wide for single sheets or 240 mm (9 1/2 inches) for - Epson C11C294131BZ | User Manual - Page 53
stops. 5. Press the FONT button now to print help text that guides you through the operations. (Once you are experienced with the Printer Setting mode, you can skip this step by pressing LF/FF instead.) The printed instructions include submenu tables that list all of the settings you can change - Epson C11C294131BZ | User Manual - Page 54
1 is on, FONT 2 is flashing, and the PAUSE light is on. The printer beeps once each time you press the FONT button while in Table B. 7. When you that you want to change, press the PAUSE button once. The printer automatically enters a submenu table for that setting. For example, if you choose Interface - Epson C11C294131BZ | User Manual - Page 55
table in your printed instructions. Press the FONT button to move through the settings in the table. The printer beeps twice each time match your desired setting, press the PAUSE button to make your selection. The printer saves the new setting and returns to Table B. 10. Repeat steps 6 through - Epson C11C294131BZ | User Manual - Page 56
contain the characters and symbols used in different languages. Your printer includes a wide variety of character tables. See the Appendix for off position where you can easily tear off the printed pages. When the printer receives data, it automatically reverses the paper to the top-of-form position - Epson C11C294131BZ | User Manual - Page 57
printer to ignore data from the parallel interface. Bit rate, parity bit, data length, and ETX/ACK These options are available only when the interface is set to Serial. See your computer manual feeder: 1. Make sure the printer is turned off. Remove the paper guide. 2. If the tractor is installed - Epson C11C294131BZ | User Manual - Page 58
posts on the printer. Releasing the latch levers locks the cut-sheet feeder in place. 5. Slide the left paper guide so it is aligned with the triangle mark. Next, slide the right paper guide to roughly match the width of your paper. Slide the paper support midway between the paper guides. Using the - Epson C11C294131BZ | User Manual - Page 59
allows the paper to move up and down freely. 10. Push the paper-set levers back to clamp the paper against the guide rollers. 11. Remove the paper supports from the edge guides. Insert the two stacker supports packed with the cut-sheet feeder into the holes on the edge guides. 2-26 Using the Printer - Epson C11C294131BZ | User Manual - Page 60
as shown below. View from above Release tab Release tab 13. Open the printer cover. Place the printout guide in the middle. Close the printer cover. 14. Slide the left edge guide to the center until it stops at the guide mark. Then slide the right edge guide to the opposite guide mark. Using the - Epson C11C294131BZ | User Manual - Page 61
feeder, press both release tabs and pull out the paper guide. You can easily switch between continuous paper and cut-sheet the push-tractor. (See "Printing on Continuous Paper" on page 2-7.) 3. Turn on the printer. Hold down the LF/FF button to feed paper one page. 4. Release the sprocket lock - Epson C11C294131BZ | User Manual - Page 62
is not crooked or wrinkled and lock the sprocket units in place. 8. Re-install the printer cover and the paper guide. Roll paper holder The optional roll paper holder (#8310) allows you to use your printer with 8.5-inch roll paper like that used with telex machines. To use the roll paper holder - Epson C11C294131BZ | User Manual - Page 63
paper holder. Orient the roll so that paper feeds from the bottom of the roll. Then turn on the printer. 6. Bring the leading edge of the paper up over the paper path guide for single sheets and insert it into the printer path for single sheets until you feel resistance. 2-30 Using the - Epson C11C294131BZ | User Manual - Page 64
until it stops at the guide mark. Then slide the right edge guide to the opposite guide mark. Color upgrade kit The optional color upgrade kit (C83208V) includes a color ribbon cartridge and a motor unit. Here's how to install the kit: 1. Turn off the printer and remove the printer cover. Slide the - Epson C11C294131BZ | User Manual - Page 65
center of the printer. Push it down firmly to fit the metal pins into the slots. 3. Insert the motor unit plug into the connector on the printer. 4. Slide the print head to the middle of the printer; then slide the plastic part on the color ribbon to the center of the cartridge. 2-32 Using - Epson C11C294131BZ | User Manual - Page 66
in the direction of the arrow to remove any slack in the ribbon. 6. Insert the ribbon cartridge into the printer as shown; then press both sides of the cartridge firmly to fit the plastic hooks into the printer slots. 7. Turn the ribbon-tightening knob to help feed the ribbon into place; it should - Epson C11C294131BZ | User Manual - Page 67
After you install the color ribbon cartridge, run the self test as shown on page 1-10. If the top the print speed is reduced. To switch to the black ribbon, remove the color ribbon as shown in the manual that comes with the color upgrade kit; then install the black ribbon as shown on page 1-5. You do - Epson C11C294131BZ | User Manual - Page 68
Chapter 3 Troubleshooting Problems and Solutions 3-2 Power Supply 3-2 Power is not being supplied 3-2 Printing 3-3 The printer does not print 3-3 The print is faint or uneven 3-4 Dots are missing in printed characters or graphics 3-4 Printed characters are not what you expected 3-5 The - Epson C11C294131BZ | User Manual - Page 69
dealer or qualified service person for assistance. Note: If you are an experienced user or a programmer, you can print a hexadecimal dump to isolate communication problems between the printer and computer. To into the outlet to determine whether the outlet is operating properly. 3-2 Troubleshooting - Epson C11C294131BZ | User Manual - Page 70
the printer beeps three times. The printer may be out of paper. Load paper in the printer. The printer sounds like it is printing, but nothing is printed. The ribbon cartridge may not be installed properly. See page 1-5. The ribbon may be worn out. Replace the ribbon cartridge. Troubleshooting 3-3 - Epson C11C294131BZ | User Manual - Page 71
makes a strange noise, the beeper sounds five times, and the printer stops abruptly. Turn off the printer and check for a paper jam, a ribbon jam or other problems. Let the printer cool. Then try to print again. If the printer still does not print correctly contact your dealer. The beeper sounds - Epson C11C294131BZ | User Manual - Page 72
cartridge as described on page 1-5. Printed characters are not what you expected The typestyles or characters you sent with your software did not print. Check that the software is correctly configured for your printer. For instructions by your software and adjust it if necessary. Troubleshooting 3-5 - Epson C11C294131BZ | User Manual - Page 73
straight into the paper guide. Make sure you're using the right type of paper. See the paper specifications in the Appendix. Make sure the printer cover is closed. Paper does not eject completely. Use the LF/FF button to eject the page. Make sure the printer cover is closed. 3-6 Troubleshooting - Epson C11C294131BZ | User Manual - Page 74
meter (3 feet) of the printer. Make sure the printer cover is closed. Make sure the edge guide postions are correct. Position the edge guides at the diamond-shaped guide marks. Check that the holes . If this happens, raise the paper guide to keep the printing position accurate. Troubleshooting 3-7 - Epson C11C294131BZ | User Manual - Page 75
the paper-release lever position while paper remained in the printer. Return the paper-release lever to the previous position and guide positions are correct. Position the edge guides at the diamond-shaped guide marks. There may be only one sheet left in the bin. Add more paper. 3-8 Troubleshooting - Epson C11C294131BZ | User Manual - Page 76
, clean sheets of paper. There may be too much paper in the stacker. Make sure that the paper guides are set correctly and that your paper is the proper size and quality. See the Appendix for paper specifications. load continuous paper or push the lever back to load single sheets. Troubleshooting 3-9 - Epson C11C294131BZ | User Manual - Page 77
) procedure to check the printer setting and adjust as needed.If your software program is capable of sending control codes, select the color using the ESC r command. (See the "Command Summary" in the Appendix.) The ribbon cartridge may not be installed properly. See Chapter 2. 3-10 Troubleshooting - Epson C11C294131BZ | User Manual - Page 78
A-7 Interface Specifications A-7 Parallel interface specifications A-7 Serial interface specifications A-8 Printer Settings A-9 Command Summary A-10 Sending printer commands A-10 Using the command summary A-10 Printer operation A-11 Data control A-11 Vertical motion A-11 Horizontal motion - Epson C11C294131BZ | User Manual - Page 79
Printer Specifications Printing Print method: Print speed: Printing direction: Line spacing: Paper 20 cpi Approximately 4KB Memory capacity for 6 NLQ and 6 Draft user-defined characters Epson NLQ Roman Epson NLQ Sans Serif Draft Draft Condensed One italic and 14 graphics character tables One italic - Epson C11C294131BZ | User Manual - Page 80
g/m2 (24 lb) paper only under normal temperature and humidity conditions. Single sheets (manual insertion): Width: Length: Thickness: Weight: 182 to 257 mm (7.2 to 10.1 When using side-crimped multi-part forms, raise the paper guide to keep the printing position accurate. t When using the push - Epson C11C294131BZ | User Manual - Page 81
Labels: Size: Thickness: Weight: 102 to 254 mm (4 to 10 inches) width for backing sheet 63.5 × 23.8 mm (2.50 × 0.94 inches) minimum for a label 0.07 to 0.09 mm (0.0028 to 0.0035 inches) for backing sheet 0.16 to 0.19 mm (0.0063 to 0.0075 inches) total 64 g/m2 (17 lb) for label only t Use only - Epson C11C294131BZ | User Manual - Page 82
Printable area: Single sheets and envelopes A B A B B C C A The minimum top margin is 5.3 mm (0.2 inches). B The minimum left margin is 3 mm (0.12 inches). The minimum right margin is 3 mm (0.12 inches). However, the maximum printable width is 203 mm (8 inches). C The minimum bottom margin is - Epson C11C294131BZ | User Manual - Page 83
tractor (C80030V) Cut-sheet feeder (option C80637V) Roll-paper holder (option #8310) Black ribbon cartridge (#8750) Life expectancy at 14 dots/character: 3 million characters Color ribbon cartridge (S015073) Life expectancy at 14 dots/character: Black, 1 million characters Magenta, Cyan, 0.7 million - Epson C11C294131BZ | User Manual - Page 84
(VDE 0878 part 3, part 30) EN 55022 (CISPR Pub. 22) Class B Interface Specifications Your printer is equipped with an EIA-232D serial interface and a Centronics-compatible parallel interface. The printer switches automatically to the appropriate interface when it receives data. Parallel interface - Epson C11C294131BZ | User Manual - Page 85
to Send (CTS/CS) In Signal Ground (SG) Reverse Channel Out Data Terminal Ready Out (DTR/ER) Description Printer's chassis ground Printer has transmitted serial data Printer has received serial data Always positive Ignored Return path for data control signals Connected to Pin 20 Positive - Epson C11C294131BZ | User Manual - Page 86
is initialized (some factory default settings may vary by country). To change a setting, see "Changing the Printer Settings" in Chapter 2. Function Character spacing Shape of zero 1 inch skip-over-perforation Character table Auto line feed Page length Auto tear off Tractor Interface - Epson C11C294131BZ | User Manual - Page 87
instruct the printer to print in a particular typeface, feed the paper a certain amount after printing each line, start printing on a particular place on the page, and so on. The commands your printer printer commands, see the comprehensive ESC/P Reference Manual published by Epson. A-10 Appendix - Epson C11C294131BZ | User Manual - Page 88
operation ASCII ESC @ DC1 DC3 ESC s 1/0 ESC ESC U 1 /0 ESC 8 ESC 9 BEL Dec. Hex. Description 64 40 Initialize Printer 17 11 Select Printer 19 13 Deselect Printer 115 73 Turn Half-Speed Mode On/Off 60 3C Select Unidirectional Mode (one line) 85 55 Turn Unidirectional Mode On/Off - Epson C11C294131BZ | User Manual - Page 89
ASCII ESC J n VT ESC B nn ESC b c nn ESC / c Dec. Hex. Description 74 4A Perform n/216-inch Line Feed 11 0B Tab Vertically 66 42 Set Vertical Tabs Up to 16 tabs entered in ascending order; last n should be 0 98 62 Set Vertical Tabs in Channels The c selects a channel for the vertical - Epson C11C294131BZ | User Manual - Page 90
Overall printing style ASCII ESC x n Dec. 120 Hex. 78 ESC k n 107 6B ESC ! n 33 21 Description Select NLQ or Draft n = 1: NLQ 0: Draft Select NLQ Font n = 0: Roman 1: Sans Serif Master Select To find the value of n, add together the numbers of the typestyles you want to combine from - Epson C11C294131BZ | User Manual - Page 91
ASCII ESC S0 ESC S1 ESC T ESC4 ESC 5 ESC - 1/0 Dec. Hex. Description 83 53 Select Superscript Mode 83 53 Select Subscript Mode 84 54 Cancel Superscript/Subscript Mode 52 34 Select Italic Mode 53 35 Cancel Italic Mode 45 2D Turn Underline Mode On/Off Word processing ASCII ESC a n - Epson C11C294131BZ | User Manual - Page 92
d2 d3 Table name 0 0 Italic 1 0 PC 437 (USA) 1 16 PC 437 Greek (Greek)* 3 0 PC 850 (Multilingual) 4 0 PC 851 (Greek)* d2 d3 14 0 15 0 16 0 24 0 25 0 5 0 PC 853 (Turkish)* 26 0 6 0 PC 855 (Cyrillic)* 27 0 7 0 PC 860 (Portuguese)* 28 0 8 0 PC 863 (Canadian- - Epson C11C294131BZ | User Manual - Page 93
ASCII ESC % n Dec. 37 Hex. 25 Description Select User-Defined Set n = 0: Normal set 1: User-defined set Color printing ASCII ESC r n Dec. Hex. Description 114 72 Select printing color The variable n selects the printing color according to the table below. 0: Black 4: Yellow 1: Magenta - Epson C11C294131BZ | User Manual - Page 94
printer, 1-4-9 Attaching paper supports, 1-5 Auto line feed, 2-23 tear off, 2-23 B Bit rate, 2-24 Buttons, 2-2-3 C Changing printer settings, 2-19-24 Character spacing, 2-22 table, 2-23 Choosing a place for the printer 24-34 paper-feed knob, 1-4 ribbon cartridge, 1-5-8 Interface, 2-24 parallel, 1-13- - Epson C11C294131BZ | User Manual - Page 95
, 2-3, 2-22 light, 2-2, 2-22 Plugging in the printer, 1-9 Power supply, troubleshooting, 3-2-3 Printer assembling, 1-4-9 changing the settings, 2-19-24 choosing special paper, 2-15-18 troubleshooting, 3-3-6 with pull tractor, 2-11-15 with push tractor, 2-7-11 Problems and solutions, 3-2 Pull tractor - Epson C11C294131BZ | User Manual - Page 96
T Tractor, 2-32 pull, 2-11-15 push, 2-7-11 unit, 2-28-29 Troubleshooting, 3-1-11 U Unpacking printer, 1-2 Upgrade kit, color, 2-31-34 Using command summary, A-10 control panel, 2-2-4 parallel interface, 1-13-14 printer, 2-1-34 serial interface, 1-15-16 W Warnings, cautions, and notes, 2 Where to get
-
 1
1 -
 2
2 -
 3
3 -
 4
4 -
 5
5 -
 6
6 -
 7
7 -
8
-
9
-
10
-
11
-
12
-
13
-
14
-
15
-
16
-
17
-
18
-
19
-
20
-
21
-
22
-
23
-
24
-
25
-
26
-
27
-
28
-
29
-
30
-
31
-
32
-
33
-
34
-
35
-
36
-
37
-
38
-
39
-
40
-
41
-
42
-
43
-
44
-
45
-
46
-
47
-
48
-
49
-
50
-
51
-
52
-
53
-
54
-
55
-
56
-
57
-
58
-
59
-
60
-
61
-
62
-
63
-
64
-
65
-
66
-
67
-
68
-
69
-
70
-
71
-
72
-
73
-
74
-
75
-
76
-
77
-
78
-
79
-
80
-
81
-
82
-
83
-
84
-
85
-
86
-
87
-
88
-
89
-
90
-
91
-
92
-
93
-
94
-
95
-
96
 |
 |

EPSON
®
LX-300
All rights reserved. No part of this publication may be reproduced, stored in a retrieval
system, or transmitted in any form or by any means, mechanical, photocopying, recording,
or otherwise, without the prior written permission of Seiko Epson Corporation. No patent
liability is assumed with respect to the use of the information contained herein. While
every precaution has been taken in the preparation of this book, Seiko Epson Corporation
assumes no responsibility for errors or omissions. Neither is any liability assumed for
damages resulting from the use of the information contained herein.
Neither Seiko Epson Corporation nor its affiliates shall be liable to the purchaser of this
product or third parties for damages, losses, costs, or expenses incurred by purchaser or
third parties as a result of: accident, misuse, or abuse of this product or unauthorized
modifications, repairs, or alterations to this product, or (excluding the U.S.) failure to
strictly comply with Seiko Epson Corporation’s operating and maintenance instructions.
Seiko Epson Corporation shall not be liable against any damages or problems arising from
the use of any options or any consumable products other than those designated as
Original Epson Products or Epson Approved Products by Seiko Epson Corporation.
Epson and Epson ESC/P are registered trademarks of Seiko Epson Corporation.
Epson Connection is a service mark of Epson America, Inc.
General Notice: Other product names used herein are for identification purposes only and
may be trademarks of their respective owners. Epson disclaims any and all rights in those
marks.
Copyright © 1995 by Seiko Epson Corporation
Nagano, Japan
User’s Guide