Epson C11C294131BZ User Manual - Page 42
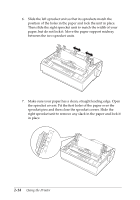
notches over the printer's mounting posts as shown below.
 |
View all Epson C11C294131BZ manuals
Add to My Manuals
Save this manual to your list of manuals |
Page 42 highlights
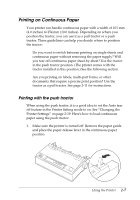
4. Make sure your paper has a clean, straight leading edge. Open the sprocket covers. Fit the first holes of the paper over the sprocket pins and then close the sprocket covers. Slide the right sprocket unit to remove any slack in the paper and lock it in place. Now the paper is in the paper-park position. 5. To separate the incoming paper from the printed paper, attach the paper guide by holding it horizontally and fitting its notches over the printer's mounting posts as shown below. Then slide the paper guide toward the front of the printer until you feel it click. Using the Printer 2-9
-
 1
1 -
2
-
3
-
4
-
5
-
6
-
7
-
8
-
9
-
10
-
11
-
12
-
13
-
14
-
15
-
16
-
17
-
18
-
19
-
20
-
21
-
22
-
23
-
24
-
25
-
26
-
27
-
28
-
29
-
30
-
31
-
32
-
33
-
34
-
35
-
36
-
 37
37 -
 38
38 -
 39
39 -
 40
40 -
 41
41 -
 42
42 -
 43
43 -
 44
44 -
 45
45 -
 46
46 -
 47
47 -
48
-
49
-
50
-
51
-
52
-
53
-
54
-
55
-
56
-
57
-
58
-
59
-
60
-
61
-
62
-
63
-
64
-
65
-
66
-
67
-
68
-
69
-
70
-
71
-
72
-
73
-
74
-
75
-
76
-
77
-
78
-
79
-
80
-
81
-
82
-
83
-
84
-
85
-
86
-
87
-
88
-
89
-
90
-
91
-
92
-
93
-
94
-
95
-
96
 |
 |

4.
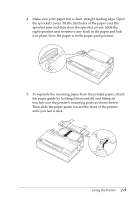
Make sure your paper has a clean, straight leading edge. Open
the sprocket covers. Fit the first holes of the paper over the
sprocket pins and then close the sprocket covers. Slide the
right sprocket unit to remove any slack in the paper and lock
it in place. Now the paper is in the paper-park position.
5.
To separate the incoming paper from the printed paper, attach
the paper guide by holding it horizontally and fitting its
notches over the printer’s mounting posts as shown below.
Then slide the paper guide toward the front of the printer
until you feel it click.
Using the Printer
2-9