Epson C11C294131BZ User Manual - Page 61
Pull Tractor unit
 |
View all Epson C11C294131BZ manuals
Add to My Manuals
Save this manual to your list of manuals |
Page 61 highlights
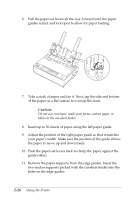
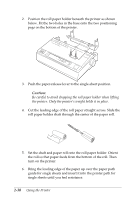
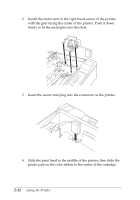
Note: To remove the paper guide from the cut-sheet feeder, press both release tabs and pull out the paper guide. You can easily switch between continuous paper and cut-sheet feeder operation. See "Switching back to single sheets" in Chapter 2 for details. Note: When you print several pages of continuous paper, fold the first printed page forward at the perforation after the perforation emerges from below the printer cover. This helps the printer feed the printed pages properly and prevents paper jams. Pull Tractor unit An additional pull tractor (C80030V) is available as an option. You can improve the performance of continuous paper handling by using two tractors at the same time. This is especially useful with continuous pre-printed forms, multi-part forms, and labels. When you use two tractors, set Tractor in the Printer Setting mode to Double. See page 2-23 for more information. 1. Make sure the paper-release lever is pulled forward to the continuous-paper position. Install the built-in tractor in the push-tractor position. Install the optional tractor in the pull-tractor position. 2. Load continuous paper on the sprocket units of the push-tractor. (See "Printing on Continuous Paper" on page 2-7.) 3. Turn on the printer. Hold down the LF/FF button to feed paper one page. 4. Release the sprocket lock levers of the pull tractor and adjust the sprocket units to match the width of the paper. Be sure that the sprocket units on both the tractors are aligned so that the paper is not crooked. 2-28 Using the Printer
-
 1
1 -
2
-
3
-
4
-
5
-
6
-
7
-
8
-
9
-
10
-
11
-
12
-
13
-
14
-
15
-
16
-
17
-
18
-
19
-
20
-
21
-
22
-
23
-
24
-
25
-
26
-
27
-
28
-
29
-
30
-
31
-
32
-
33
-
34
-
35
-
36
-
37
-
38
-
39
-
40
-
41
-
42
-
43
-
44
-
45
-
46
-
47
-
48
-
49
-
50
-
51
-
52
-
53
-
54
-
55
-
 56
56 -
 57
57 -
 58
58 -
 59
59 -
 60
60 -
 61
61 -
 62
62 -
 63
63 -
 64
64 -
 65
65 -
 66
66 -
67
-
68
-
69
-
70
-
71
-
72
-
73
-
74
-
75
-
76
-
77
-
78
-
79
-
80
-
81
-
82
-
83
-
84
-
85
-
86
-
87
-
88
-
89
-
90
-
91
-
92
-
93
-
94
-
95
-
96
 |
 |
