Epson C11C294131BZ User Manual - Page 40
Printing on Continuous Paper, Printing with the push tractor
 |
View all Epson C11C294131BZ manuals
Add to My Manuals
Save this manual to your list of manuals |
Page 40 highlights
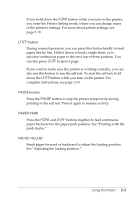
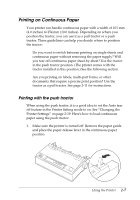
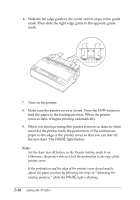
Printing on Continuous Paper Your printer can handle continuous paper with a width of 101 mm (4.0 inches) to 254 mm (10.0 inches). Depending on where you position the tractor, you can use it as a pull tractor or a push tractor. These guidelines can help you decide where to position the tractor: t Do you want to switch between printing on single sheets and continuous paper without removing the paper supply? Will you tear off continuous paper sheet-by-sheet? Use the tractor in the push tractor position. (The printer comes with the tractor installed in this position.) See the following section. t Are you printing on labels, multi-part forms, or other documents that require a precise print position? Use the tractor as a pull tractor. See page 2-11 for instructions. Printing with the push tractor When using the push tractor, it is a good idea to set the Auto tear off feature in the Printer Setting mode to on. See "Changing the Printer Settings" on page 2-19. Here's how to load continuous paper using the push tractor: 1. Make sure the printer is turned off. Remove the paper guide and place the paper-release lever in the continuous paper position. Using the Printer 2-7
-
 1
1 -
2
-
3
-
4
-
5
-
6
-
7
-
8
-
9
-
10
-
11
-
12
-
13
-
14
-
15
-
16
-
17
-
18
-
19
-
20
-
21
-
22
-
23
-
24
-
25
-
26
-
27
-
28
-
29
-
30
-
31
-
32
-
33
-
34
-
 35
35 -
 36
36 -
 37
37 -
 38
38 -
 39
39 -
 40
40 -
 41
41 -
 42
42 -
 43
43 -
 44
44 -
 45
45 -
46
-
47
-
48
-
49
-
50
-
51
-
52
-
53
-
54
-
55
-
56
-
57
-
58
-
59
-
60
-
61
-
62
-
63
-
64
-
65
-
66
-
67
-
68
-
69
-
70
-
71
-
72
-
73
-
74
-
75
-
76
-
77
-
78
-
79
-
80
-
81
-
82
-
83
-
84
-
85
-
86
-
87
-
88
-
89
-
90
-
91
-
92
-
93
-
94
-
95
-
96
 |
 |