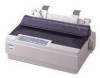
Epson C11C294131BZ User Manual - Page 50
Multi-part forms, Labels, Choose labels mounted on a continuous backing sheet
 |
View all Epson C11C294131BZ manuals
Add to My Manuals
Save this manual to your list of manuals |
Page 50 highlights
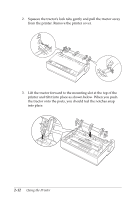
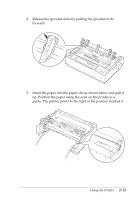
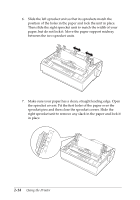
3. Close the cover. When you finish printing, move the paper-thickness lever back to position 0. Multi-part forms You can use the built-in tractor to print on carbonless multi-part forms of up to three parts (one original plus two copies). Before you print on the forms, set the paper thickness lever as described in the previous section. These tips will help you get good results: t Load multi-part forms with the tractor only, not in the cut-sheet feeder or paper guide. For instructions, see "Printing on Continuous Paper" on page 2-7. t Use only multi-part forms that are joined by spot gluing and that are free of wrinkles and waves. Never load multi-part forms joined by metal staples, tape, or continuous gluing. t If you need to adjust the loading position, use your software program or change the loading position as described on page 2-5. t When you use side-crimped multi-part forms, the copies may not align with the original. If this happens, raise the paper guide. Labels You must use the tractor as a pull tractor to print on labels. Keep these tips in mind: t Choose labels mounted on a continuous backing sheet with sprocket holes made for use with a tractor. Do not print labels as single sheets, because the shiny backing sheet almost always slips a little. t You load labels the same way you load continuous paper, except that the paper thickness lever should be set to 1. See page 2-11 for loading instructions. Using the Printer 2-17
-
 1
1 -
2
-
3
-
4
-
5
-
6
-
7
-
8
-
9
-
10
-
11
-
12
-
13
-
14
-
15
-
16
-
17
-
18
-
19
-
20
-
21
-
22
-
23
-
24
-
25
-
26
-
27
-
28
-
29
-
30
-
31
-
32
-
33
-
34
-
35
-
36
-
37
-
38
-
39
-
40
-
41
-
42
-
43
-
44
-
 45
45 -
 46
46 -
 47
47 -
 48
48 -
 49
49 -
 50
50 -
 51
51 -
 52
52 -
 53
53 -
 54
54 -
 55
55 -
56
-
57
-
58
-
59
-
60
-
61
-
62
-
63
-
64
-
65
-
66
-
67
-
68
-
69
-
70
-
71
-
72
-
73
-
74
-
75
-
76
-
77
-
78
-
79
-
80
-
81
-
82
-
83
-
84
-
85
-
86
-
87
-
88
-
89
-
90
-
91
-
92
-
93
-
94
-
95
-
96
 |
 |
