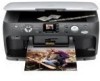
Epson CX7800 Basics
Epson CX7800 - Stylus Color Inkjet Manual
 |
UPC - 010343855687
View all Epson CX7800 manuals
Add to My Manuals
Save this manual to your list of manuals |
Epson CX7800 manual content summary:
- Epson CX7800 | Basics - Page 1
Basics Guide Basic Copying, Printing, and Scanning Maintaining Your Epson Stylus CX7800 Solving Problems - Epson CX7800 | Basics - Page 2
and ink jet printers. Trademarks Epson, Epson Stylus, and Print Image Matching are registered trademarks and Exceed Your Vision is a trademark of Seiko Epson Corporation. DURABrite is a registered trademark, PhotoEnhance is a trademark, and Epson Connection, Epson Store, and SoundAdvice are service - Epson CX7800 | Basics - Page 3
26 Printing From Your Computer 28 Printing in Windows 28 Printing With Macintosh OS X 31 Using Special Papers 34 Scanning a Photo, Document, Film, or Slide 35 Maintaining Your Epson Stylus CX7800 38 Checking the Print Head Nozzles 38 Cleaning the Print Head 39 Replacing Ink Cartridges 41 - Epson CX7800 | Basics - Page 4
Solving Problems 46 LCD Screen Messages 46 Problems and Solutions 48 Where To Get Help 50 Notices 51 Index 57 4 Contents - Epson CX7800 | Basics - Page 5
■ Solve simple problems This book tells you how to do most of these things without ever turning on your computer! Of course your Epson Stylus CX7800 can do lots more when you connect it to your Windows® or Macintosh® computer. For additional instructions, see the on-screen User's Guide by selecting - Epson CX7800 | Basics - Page 6
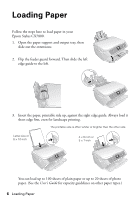
here to load paper in your Epson Stylus CX7800. 1. Open the paper support and output tray, then slide out the extensions. 2. Flip the feeder guard forward. Then slide the left edge guide to the left. 3. Insert the paper, printable side up, against the right edge guide. Always load it short edge - Epson CX7800 | Basics - Page 7
the best results, you'll want to use one of Epson's special ink jet papers designed for your printer. For example, your photos will look great printed on Epson® Premium Glossy Photo Paper. See page 34 for more information. 4. Slide the left edge guide against the left edge of the paper (but not too - Epson CX7800 | Basics - Page 8
Copying a Photo or Document Follow the instructions in this section to: ■ Position your photo or document correctly on the glass (see below) ■ Make copies of a open the document cover beyond where it stops and do not place heavy objects on top of the Epson Stylus CX7800. 8 Copying a Photo or Document - Epson CX7800 | Basics - Page 9
it to give you more room when scanning. If you need to press the document flat while you copy or scan it, do not press too hard × 6-inch, or 5 × 7-inch photo paper. Copying a Document 1. Make sure the Epson Stylus CX7800 is turned on. 2. Place the document on the glass as described on page 8. Be sure - Epson CX7800 | Basics - Page 10
button to select Letter. 10. Press the x Start button. The P On light flashes and the Epson Stylus CX7800 starts printing. To cancel copying, press 6. Press the x Start button. The P On light flashes and the Epson Stylus CX7800 scans the photograph and displays it on the LCD screen. 7. Press the u - Epson CX7800 | Basics - Page 11
Press the u or d Copies button to set the number of copies. 10. Press the l or r Photo/Options button to select Color or B&W copy. 11. Press the x Start button. The P On light flashes and the Epson Stylus CX7800 starts printing. To cancel copying, press the y Stop/Clear Settings button. Do not pull - Epson CX7800 | Basics - Page 12
that came with your Epson Stylus CX7800 to scan 35mm slides, or strips of negative and positive film. To get professional results that look and feel like traditional photos, try one of the special Epson papers listed on page 34. Before you scan and print see: ■ "Placing 35mm Slides in the Holder - Epson CX7800 | Basics - Page 13
3. Place your slides in the film holder in the orientation shown below with the shiny side up. Note: Make sure there is no gap between the holder and the document table; otherwise the prints may not be clear. Continue with the steps on page 15 to scan and print your photos. Placing 35mm Film Strips - Epson CX7800 | Basics - Page 14
show below with the shiny side up. (The images should not appear reversed.) Make sure the film slides under the tabs. 4. Close the film strip cover. Gently press until it clicks into place. 5. Place lamp Continue with the steps on page 15 to scan and print your photos. 14 Copying a Photo or Document - Epson CX7800 | Basics - Page 15
Positive Film: for positive color film ■ Slides: for slides ■ B&W Negative Film: for black and white scanned and a preview of the first photo appears on the LCD screen. 6. Press the l or r Photo/Options button to view the photos. Press the u or d Copies button to select the number of copies to print - Epson CX7800 | Basics - Page 16
Storing the Film Holder 1. Open the document cover and remove the document mat. Pull up on the fastener at the top of the document mat. Then pull out the document mat. 2. With the film strip side on top and the pads facing the document cover, place the film holder inside the lower hooks on the - Epson CX7800 | Basics - Page 17
ON (for positive color film) ■ Slides Restoration ON (for slides) ■ B&W Negative Film Restoration ON ( scanned and a preview of the photo appears on the LCD screen. 5. Press the l or r Photo/Options button to view the photos. Press the u or d Copies button to select the number of copies to print - Epson CX7800 | Basics - Page 18
Inserting the Card" on page 20 ■ "Printing an Index Sheet to Select Photos" on page 22 ■ "Printing All Photos or DPOF Photos" on page 24 For instructions on copying memory card files between your Epson Stylus CX7800 and a computer or other device, see the User's Guide. 18 Printing From a Memory Card - Epson CX7800 | Basics - Page 19
slot CompactFlash® Microdrive™ * Adapter required The Epson Stylus CX7800 supports image files that meet the following requirements: Media camera Supports Exif version 2.21 80 × 80 pixels to 9200 × 9200 pixels Up to 999 * DCF is the "Design rule for Camera File system" standard. Printing From - Epson CX7800 | Basics - Page 20
Inserting the Card 1. Make sure the Epson Stylus CX7800 is turned on. Note: When you print directly from a memory card, it is best if the Epson Stylus CX7800 is not connected to your computer (or your computer is turned off). 2. Open the memory card door. 3. Make sure the memory card access light is - Epson CX7800 | Basics - Page 21
your Epson Stylus CX7800 is not connected to your computer (or your computer is turned off ). 2. Load several sheets of photo paper. 3. Insert the memory card if it is not already in the slot (see page 20). 4. Press the Memory Card mode button to select Print Select. Note: If your camera supports - Epson CX7800 | Basics - Page 22
card. After marking the photos on the index sheet that you want to print, the Epson Stylus CX7800 scans the sheet and automatically prints the selected photos. Printing the Index Sheet 1. Make sure your Epson Stylus CX7800 is not connected to your computer (or your computer is turned off ). 2. Load - Epson CX7800 | Basics - Page 23
beneath each photo you want to print to indicate how many copies you want (1, 2, or 3). OK: Not OK: Make sure just one circle is filled in for each selected photo and mark the sheet carefully; once it has been scanned you will not be able to change your selections. Note: If you want - Epson CX7800 | Basics - Page 24
All Photos or DPOF Photos Follow the steps below to print one copy of each photo on the card or to print only those photos that were pre-selected with your camera's DPOF feature. Note: See your camera's manual for instructions on selecting photos with DPOF. 1. Insert the memory card (see page - Epson CX7800 | Basics - Page 25
by pulling it straight out of its slot. Using Auto Correct With Auto Correct you can print using the P.I.M. (PRINT Image Matching®) or Exif Print data stored in your photos, or print using the PhotoEnhance™ setting. 1. Press the Setup/Utilities button. 2. Press the l or r Photo/Options button to - Epson CX7800 | Basics - Page 26
your JPEG photos by connecting your digital camera directly to your Epson Stylus CX7800. Your photos must be sized from 80 × 80 pixels to 9200 × 9200 pixels. 1. Make sure your Epson Stylus CX7800 is not printing from a computer. 2. Remove any memory cards from slots. 3. Load the type of paper you - Epson CX7800 | Basics - Page 27
of any cameras. Depending on the Epson Stylus CX7800 settings and your digital camera settings, some combinations of paper type, size, and layout may not be supported. In addition, some of your digital camera settings may not be reflected in the printed output. Printing From a Digital Camera 27 - Epson CX7800 | Basics - Page 28
the basic steps for printing a photo or document stored on your Windows or Macintosh computer. Note: For detailed instructions on printing, see the on-screen User's Guide. Before you start, make sure you've installed your printer software and connected the Epson Stylus CX7800 to your computer as - Epson CX7800 | Basics - Page 29
4. Make sure EPSON Stylus CX7800 Series is selected, then click the Preferences or Properties button. (If you see a Setup, Printer, or Options button, click it. Then click Preferences or Properties on the next screen.) 5. On the Main tab, select the basic print settings: Select the type of document - Epson CX7800 | Basics - Page 30
, or instructions on saving them as a group so you can reuse them later, click ? or Help. 7. If you want to change the layout settings, click the Page Layout tab and select settings as necessary. 8. Click OK to save your settings, then click OK or Print to start printing. This window appears and - Epson CX7800 | Basics - Page 31
Feeder - Borderless) option in the Paper Size list for your paper size (US Letter, 8 x 10, 5 x 7, or 4 x 6). 4. Click OK to close the Page Setup window. 5. Open the File menu and select Print. You see a window like this one: Select Stylus CX7800 Select Print Settings Printing From Your Computer 31 - Epson CX7800 | Basics - Page 32
, such as Reverse print order. ■ Cover Page (OS X 10.4.x only): Print a cover page before or after your document. ■ ColorSync or Color Management: Select ColorSync®or adjust the color controls, change the gamma setting, or turn off color adjustments in the printer software. ■ Expansion: Reduce or - Epson CX7800 | Basics - Page 33
OS X 10.2.x, click the Print Center icon instead, then double-click Stylus CX7800 in the Printer List window. You see a screen like this: Pause printing Resume printing Cancel printing Select the print job 11. When you're finished, close the printer window or Print Center. Printing From Your - Epson CX7800 | Basics - Page 34
32) setting in your printer software: For this paper Plain paper or Epson Premium Bright White Paper Epson Matte Paper Heavyweight Epson Double-Sided Matte Paper Epson Photo Quality Ink Jet Paper Epson Ultra Premium Glossy Photo Paper Epson Premium Glossy Photo Paper Epson Premium Semigloss Photo - Epson CX7800 | Basics - Page 35
use your Epson Stylus CX7800 to scan a photo, document, film, or slide and save it on your computer or other device, or e-mail it to someone else. You can even automatically restore faded color photographs as you scan. For details, see your on-screen User's Guide. The EPSON Scan software provides - Epson CX7800 | Basics - Page 36
, start your application. Then open the File menu, choose Import or Acquire, and select Epson Stylus CX7800. You see the EPSON Scan standby window: 4. If the Mode setting in the upper right corner is set to Full Auto Mode, click the Scan button. 36 Scanning a Photo, Document, Film, or Slide - Epson CX7800 | Basics - Page 37
35mm color negative film strips or slides. To scan black and white film or slides, use Home or Professional mode. For details, see the on-screen User's Guide. If you are in Home or Professional Mode, you see a different EPSON Scan settings window. (You can change the mode using the Mode selector - Epson CX7800 | Basics - Page 38
Maintaining Your Epson Stylus CX7800 If you notice a decline in print quality, follow the instructions in this chapter for: ■ "Checking the Print Head Nozzles" (see below) ■ "Cleaning the Print Head" on page 39 ■ "Replacing Ink Cartridges" on page 41 Checking the Print Head Nozzles If your printouts - Epson CX7800 | Basics - Page 39
and the nozzle check indicates that the print head needs to be cleaned. 1. Make sure the Epson Stylus CX7800 is turned on but not printing, and the ink low icon is not displayed in the upper-left corner of the LCD screen. (If the ink low icon is displayed, you need to replace an ink cartridge before - Epson CX7800 | Basics - Page 40
Epson Stylus CX7800 while head cleaning is in progress. You may damage it. 6. When cleaning finishes, make sure paper is loaded in the Epson Stylus CX7800. Press the l or r Photo/Options button to select Check Ink Nozzles. Then press the x Start button. Print head does not need to be cleaned: Print - Epson CX7800 | Basics - Page 41
also turn the printer off and wait overnight. This lets any dried ink soften. Then try cleaning the print head again. Tip: If you do not use your Epson Stylus CX7800 often, it is a good idea to print a few pages at least once a month to maintain good print quality. Replacing Ink Cartridges The LCD - Epson CX7800 | Basics - Page 42
Caution: Leave the empty cartridge installed until you have obtained a replacement, or the ink remaining in the print head nozzles may dry out. We recommend that you use genuine Epson cartridges. The use of other products may affect your print quality and could result in printer damage. Yields vary - Epson CX7800 | Basics - Page 43
1. Make sure the Epson Stylus CX7800 is turned on. 2. If an ink cartridge is empty, the LCD screen displays the ink levels and indicates the empty cartridge. Press the x Start button. If an ink cartridge is low, the ink low icon appears on the LCD screen. Press the Setup/Utilities button. Press the - Epson CX7800 | Basics - Page 44
leak. Do not touch the green chip on the front of the cartridge. This can damage the ink cartridge. 6. Place the new ink cartridge into the cartridge holder and push it down until it clicks into place. 7. Replace any other cartridges that need to be replaced. 44 Maintaining Your Epson Stylus CX7800 - Epson CX7800 | Basics - Page 45
8. Close the ink cartridge cover and press it until it clicks into place. 9. Close the scanner. 10. Press the x Start button. The Epson Stylus CX7800 begins charging ink and the P On light starts flashing. This takes about one minute. When it's finished, the P On light stops flashing and remains on. - Epson CX7800 | Basics - Page 46
" (below) ■ "Problems and Solutions" on page 48 ■ "Where To Get Help" on page 50 LCD Screen Messages Message Cause Empty ink cartridge. Solution Change the empty ink cartridges; see page 41. The ink cartridge is not Install the ink cartridge correctly; see installed or not installed page 41 - Epson CX7800 | Basics - Page 47
photos on card used to print the index sheet-or the scanning. the film holder and on the document table, and try again; see page 12. Not enough ink to Install new ink cartridges; see page 41. perform head cleaning. There is a problem with Turn the Epson Stylus CX7800 off and the Epson Stylus - Epson CX7800 | Basics - Page 48
're having trouble using your Epson Stylus CX7800. Copying Problems ■ Make guide. Paper Feeding Problems ■ If paper doesn't feed, remove it from the sheet feeder. Flip through the stack to separate the sheets a little. Then reload the paper against the right edge guide, and slide the left edge guide - Epson CX7800 | Basics - Page 49
deliver ink properly. Run a nozzle check as described on page 38 to see if the print head needs cleaning. Then clean the print head as described on page 39. ■ If you notice jagged vertical lines, you may need to align the print head. See your User's Guide for instructions. ■ The ink cartridges may - Epson CX7800 | Basics - Page 50
in the following table. Service World Wide Web Automated Telephone Services Access From the Internet, you can reach Epson Support at http://support.epson.com. At this site, you can download drivers and other files, look at product documentation, access troubleshooting information, and receive - Epson CX7800 | Basics - Page 51
tilted or at an angle. ■ Do not open the scanner section while the Epson Stylus CX7800 is copying, printing, or scanning. ■ Do not spill liquid on the Epson Stylus CX7800. ■ Except as specifically explained in your documentation, do not attempt to service the Epson Stylus CX7800 yourself. Notices 51 - Epson CX7800 | Basics - Page 52
inside the Epson Stylus CX7800 or touch any cartridges during printing. ■ Install a new ink cartridge immediately after removing an empty one. Leaving cartridges uninstalled can dehydrate the print head and may prevent the Epson Stylus CX7800 from printing. ■ If you remove an ink cartridge for later - Epson CX7800 | Basics - Page 53
installation. This equipment generates, uses, and can radiate radio frequency energy and, if not installed and used in accordance with the instructions connector, do not leave cables connected to unused interfaces. Changes or modifications not expressly approved by the manufacturer could void the - Epson CX7800 | Basics - Page 54
CPU Boards and Power Supplies used with Class B Personal Computers: We: Located at: Epson America, Inc. MS 3-13 3840 Kilroy Airport Way Long Beach, CA 90806 Telephone: Name: Epson Type of Product: Multifunction printer Model: C251A ENERGY STAR Compliance As an ENERGY STAR® Partner, Epson has - Epson CX7800 | Basics - Page 55
Will Do To Correct Problems: Should your Epson printer prove defective during the warranty period, please call the Epson ConnectionSM at (562) 276-4382 (U.S.) or (905) 709-3839 (Canada) for warranty repair instructions and return authorization. An Epson service technician will provide telephone - Epson CX7800 | Basics - Page 56
of misuse, abuse, improper installation, neglect, improper shipping, damage caused by disasters such as fire, flood, and lightning, improper electrical current, software problems, interaction with nonEpson products, or service other than by an Epson Authorized Servicer. If a claimed defect cannot - Epson CX7800 | Basics - Page 57
from, 26 to 27 Canceling printing, 21, 30, 33 Cartridges, replacing, 41 to 45 Cleaning print head, 39 to 41 Color Management, turning off, 32 Color restoration, 17 ColorSync, 32 Copying documents, 9 to 10 photos, 10 to 11 placing originals, 8 to 9 problems, 48 slides and negatives, 12 to 15 speeding - Epson CX7800 | Basics - Page 58
quality problems, 49 Index sheet printing, 22 selecting photos, 23 to 24 Ink cartridges installing, 41 to 45 replacing, 41 to 45 safety instructions, 52 L Lamp, fluorescent, 12, 14 LCD screen messages, 46 to 47 safety instructions, 52 Loading film, 12 to 14 negatives, 13 to 14 paper, 6 to 7 slides - Epson CX7800 | Basics - Page 59
color, 17 scanning, 35 to 37 Stopping printing, 21, 30, 33 Support, 50 T Technical support, 50 Troubleshooting copying, 48 image quality, 49 LCD messages, 46 to 47 memory card, 47 paper feeding, 48 scanning, 49 Type setting, Windows, 29, 34 U Utilities Cleaning print head, 39 to 41 Nozzle Check, 38 - Epson CX7800 | Basics - Page 60
CPD-20267 Printed in XXXXXX XX.XX-XX XXX
-
 1
1 -
 2
2 -
 3
3 -
 4
4 -
 5
5 -
 6
6 -
 7
7 -
8
-
9
-
10
-
11
-
12
-
13
-
14
-
15
-
16
-
17
-
18
-
19
-
20
-
21
-
22
-
23
-
24
-
25
-
26
-
27
-
28
-
29
-
30
-
31
-
32
-
33
-
34
-
35
-
36
-
37
-
38
-
39
-
40
-
41
-
42
-
43
-
44
-
45
-
46
-
47
-
48
-
49
-
50
-
51
-
52
-
53
-
54
-
55
-
56
-
57
-
58
-
59
-
60
 |
 |
Basics Guide
Basic Copying, Printing, and Scanning
Maintaining Your Epson Stylus CX7800
Solving Problems