Epson CX7800 Basics - Page 40
CX7800. Press the, appears on the LCD screen. Cleaning takes approximately 30 seconds. - print head
 |
UPC - 010343855687
View all Epson CX7800 manuals
Add to My Manuals
Save this manual to your list of manuals |
Page 40 highlights
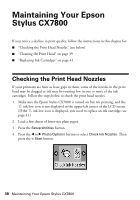
4. Press the l or r Photo/Options button to select Clean Print Head. Then press the x Start button. 5. Press the x Start button again. The Epson Stylus CX7800 runs a head cleaning cycle and the processing icon appears on the LCD screen. Cleaning takes approximately 30 seconds. Caution: Never turn off the Epson Stylus CX7800 while head cleaning is in progress. You may damage it. 6. When cleaning finishes, make sure paper is loaded in the Epson Stylus CX7800. Press the l or r Photo/Options button to select Check Ink Nozzles. Then press the x Start button. Print head does not need to be cleaned: Print head needs to be cleaned: 40 Maintaining Your Epson Stylus CX7800
-
 1
1 -
2
-
3
-
4
-
5
-
6
-
7
-
8
-
9
-
10
-
11
-
12
-
13
-
14
-
15
-
16
-
17
-
18
-
19
-
20
-
21
-
22
-
23
-
24
-
25
-
26
-
27
-
28
-
29
-
30
-
31
-
32
-
33
-
34
-
 35
35 -
 36
36 -
 37
37 -
 38
38 -
 39
39 -
 40
40 -
 41
41 -
 42
42 -
 43
43 -
 44
44 -
 45
45 -
46
-
47
-
48
-
49
-
50
-
51
-
52
-
53
-
54
-
55
-
56
-
57
-
58
-
59
-
60
 |
 |

40
Maintaining Your Epson Stylus CX7800
4.
Press the
l
or
r
Photo/Options
button to select
Clean Print Head
. Then
press the
x
Start
button.
5.
Press the
x
Start
button again.
The Epson Stylus CX7800 runs a head cleaning cycle and the processing icon
appears on the LCD screen. Cleaning takes approximately 30 seconds.
Caution:
Never turn off the Epson Stylus CX7800 while head cleaning is in progress. You
may damage it.
6.
When cleaning finishes, make sure paper is loaded in the Epson Stylus
CX7800. Press the
l
or
r
Photo/Options
button to select
Check Ink
Nozzles
. Then press the
x
Start
button.
Print head does
not need to be
cleaned:
Print head needs
to be cleaned: