Epson CX7800 Basics - Page 7
Slide the left edge guide against the left edge of the paper but not too tightly. - ink
 |
UPC - 010343855687
View all Epson CX7800 manuals
Add to My Manuals
Save this manual to your list of manuals |
Page 7 highlights
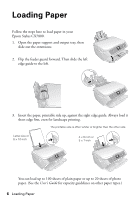
Note: The type of paper you choose affects the way your printout looks, so be sure to select the correct paper for your job. If you are just making a copy or printing a rough draft of an image, plain paper is fine. However, for the best results, you'll want to use one of Epson's special ink jet papers designed for your printer. For example, your photos will look great printed on Epson® Premium Glossy Photo Paper. See page 34 for more information. 4. Slide the left edge guide against the left edge of the paper (but not too tightly). 5. Flip the feeder guard back. 6. Make sure the paper thickness lever is set down to the m L position. Loading Paper 7
-
 1
1 -
 2
2 -
 3
3 -
 4
4 -
 5
5 -
 6
6 -
 7
7 -
 8
8 -
 9
9 -
 10
10 -
 11
11 -
 12
12 -
13
-
14
-
15
-
16
-
17
-
18
-
19
-
20
-
21
-
22
-
23
-
24
-
25
-
26
-
27
-
28
-
29
-
30
-
31
-
32
-
33
-
34
-
35
-
36
-
37
-
38
-
39
-
40
-
41
-
42
-
43
-
44
-
45
-
46
-
47
-
48
-
49
-
50
-
51
-
52
-
53
-
54
-
55
-
56
-
57
-
58
-
59
-
60
 |
 |

Loading Paper
7
Note:
The type of paper you choose affects the way your printout looks, so be sure to
select the correct paper for your job. If you are just making a copy or printing a
rough draft of an image, plain paper is fine. However, for the best results, you’ll
want to use one of Epson’s special ink jet papers designed for your printer. For
example, your photos will look great printed on Epson
®
Premium Glossy Photo
Paper. See page 34 for more information.
4.
Slide the left edge guide against the left edge of the paper (but not too tightly).
5.
Flip the feeder guard back.
6.
Make sure the paper thickness lever is set down to the
m
L
position.