Epson CX7800 Basics - Page 17
Restoring Color in Faded Photos, Slides, and Negatives - print black only
 |
UPC - 010343855687
View all Epson CX7800 manuals
Add to My Manuals
Save this manual to your list of manuals |
Page 17 highlights
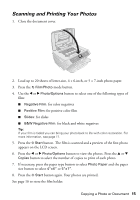
Restoring Color in Faded Photos, Slides, and Negatives If you have color-faded photos, negatives, or slides, you can bring them back to life using the Color Restoration feature. 1. Load up to 20 sheets of letter-size, 4 × 6-inch, or 5 × 7-inch photo paper. 2. Press the Film/Photo mode button. 3. Press the l or r Photo/Options button to select the type of photo you want to restore: ■ Copy Photograph Restoration ON (for photos) ■ Negative Film Restoration ON (for color negatives) ■ Positive Film Restoration ON (for positive color film) ■ Slides Restoration ON (for slides) ■ B&W Negative Film Restoration ON (for black and white negatives) 4. Press the x Start button. The photo or film is scanned and a preview of the photo appears on the LCD screen. 5. Press the l or r Photo/Options button to view the photos. Press the u or d Copies button to select the number of copies to print. 6. If necessary, press the paper type button to select Photo Paper and the paper size button to select 4"x 6", or 5"x 7". 7. Press the x Start button again. Your photos are printed. To cancel copying, press the y Stop/Clear Settings button. Do not pull out paper that is being printed; it will be ejected automatically to the output tray. Copying a Photo or Document 17
-
 1
1 -
2
-
3
-
4
-
5
-
6
-
7
-
8
-
9
-
10
-
11
-
 12
12 -
 13
13 -
 14
14 -
 15
15 -
 16
16 -
 17
17 -
 18
18 -
 19
19 -
 20
20 -
 21
21 -
 22
22 -
23
-
24
-
25
-
26
-
27
-
28
-
29
-
30
-
31
-
32
-
33
-
34
-
35
-
36
-
37
-
38
-
39
-
40
-
41
-
42
-
43
-
44
-
45
-
46
-
47
-
48
-
49
-
50
-
51
-
52
-
53
-
54
-
55
-
56
-
57
-
58
-
59
-
60
 |
 |
