Epson CX7800 Basics - Page 6
Loading Paper - not printing
 |
UPC - 010343855687
View all Epson CX7800 manuals
Add to My Manuals
Save this manual to your list of manuals |
Page 6 highlights
Loading Paper Follow the steps here to load paper in your Epson Stylus CX7800. 1. Open the paper support and output tray, then slide out the extensions. 2. Flip the feeder guard forward. Then slide the left edge guide to the left. 3. Insert the paper, printable side up, against the right edge guide. Always load it short edge first, even for landscape printing. The printable side is often whiter or brighter than the other side. Letter-size or 8 × 10-inch 4 × 6-inch or 5 × 7-inch You can load up to 100 sheets of plain paper or up to 20 sheets of photo paper. (See the User's Guide for capacity guidelines on other paper types.) 6 Loading Paper
-
 1
1 -
 2
2 -
 3
3 -
 4
4 -
 5
5 -
 6
6 -
 7
7 -
 8
8 -
 9
9 -
 10
10 -
 11
11 -
 12
12 -
13
-
14
-
15
-
16
-
17
-
18
-
19
-
20
-
21
-
22
-
23
-
24
-
25
-
26
-
27
-
28
-
29
-
30
-
31
-
32
-
33
-
34
-
35
-
36
-
37
-
38
-
39
-
40
-
41
-
42
-
43
-
44
-
45
-
46
-
47
-
48
-
49
-
50
-
51
-
52
-
53
-
54
-
55
-
56
-
57
-
58
-
59
-
60
 |
 |

6
Loading Paper
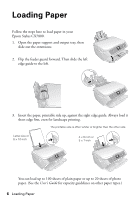
Loading Paper
Follow the steps here to load paper in your
Epson Stylus CX7800.
1.
Open the paper support and output tray, then
slide out the extensions.
2.
Flip the feeder guard forward. Then slide the left
edge guide to the left.
3.
Insert the paper, printable side up, against the right edge guide. Always load it
short edge first, even for landscape printing.
You can load up to 100 sheets of plain paper or up to 20 sheets of photo
paper. (See the
User’s Guide
for capacity guidelines on other paper types.)
4 × 6-inch or
5 × 7-inch
Letter-size or
8 × 10-inch
The printable side is often whiter or brighter than the other side.