Garmin GPSMAP 60CS Owner's Manual - Page 57
A Track Elevation Profile can also be created from Digital Elevation
 |
UPC - 753759044060
View all Garmin GPSMAP 60CS manuals
Add to My Manuals
Save this manual to your list of manuals |
Page 57 highlights
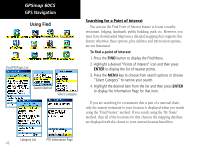
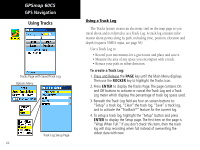
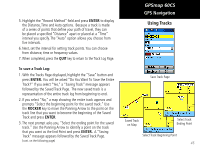
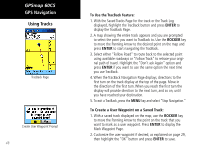
GPSmap 60CS Track Profiles Once you have saved a track, you not only have a record of the path you traveled but an altitude profile as well. GPS Navigation Using Tracks To view a Track Profile: 1. With the Saved Tracks Page for the Track displayed, press the MENU key to display the Profile option. 2. Then press ENTER to display the Track Profile. The beginning of the track is marked by a flag and you can scroll across the profile by pressing the left ROCKER key arrow. As you scroll the profile, the elevation for each point on the profile is displayed at the top of the page and the distance from the Start point and the End Point are displayed at the bottom. 3. At any point along the profile, you can press ENTER to display that point on the map. 4. Press the MENU key to use "Zoom Ranges" and "Hide Symbols" options. View Profile Page Option Track Profile Page Profile Options Menu - Displays only when you have DEM maps loaded on your GPSmap 60CS. A Track Elevation Profile can also be created from Digital Elevation Models (DEM) maps (MapSource U.S. Topo 24K) which include elevation data contained in the map. When these types of maps are available, a "Use Map Data" - "Use Track Data" option menu displays when you select "Profile" See page 88 for more information about MapSource U.S. Topo 24K maps. Zoom Ranges Page 47
-
 1
1 -
2
-
3
-
4
-
5
-
6
-
7
-
8
-
9
-
10
-
11
-
12
-
13
-
14
-
15
-
16
-
17
-
18
-
19
-
20
-
21
-
22
-
23
-
24
-
25
-
26
-
27
-
28
-
29
-
30
-
31
-
32
-
33
-
34
-
35
-
36
-
37
-
38
-
39
-
40
-
41
-
42
-
43
-
44
-
45
-
46
-
47
-
48
-
49
-
50
-
51
-
 52
52 -
 53
53 -
 54
54 -
 55
55 -
 56
56 -
 57
57 -
 58
58 -
 59
59 -
 60
60 -
 61
61 -
 62
62 -
63
-
64
-
65
-
66
-
67
-
68
-
69
-
70
-
71
-
72
-
73
-
74
-
75
-
76
-
77
-
78
-
79
-
80
-
81
-
82
-
83
-
84
-
85
-
86
-
87
-
88
-
89
-
90
-
91
-
92
-
93
-
94
-
95
-
96
-
97
-
98
-
99
-
100
-
101
-
102
-
103
-
104
-
105
-
106
-
107
-
108
 |
 |
