GE 27956FE1 User Guide - Page 15
Programming the Photo Frame - reset
 |
UPC - 044319805383
View all GE 27956FE1 manuals
Add to My Manuals
Save this manual to your list of manuals |
Page 15 highlights
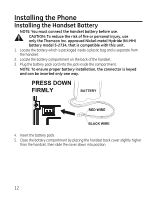
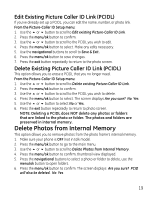
Programming the Photo Frame Specifications: The Photo Frame is compatible with SD and XD memory cards, or Sony memory sticks (Sony MS compatible ONLY with an SD adaptor), JPEG Image file formats and has an Internal Memory capacity of 32MB (approx. 100 photos at maximum of 2M/photo). Frame Setup A menu structure allows access to all of the built-in features. You may program the following items in the main menu: Add Photos to Internal Memory, PictureCaller ID Setup, Delete Photos from Internal Memory, Frame Preferences and Reset All Settings. NOTE: During programming, all handsets must be OFF (not in talk mode). NOTE: Press the exit button repeatedly to return to an upper level menu or to return to the photo screen. After 60 seconds of inactivity, the frame will automatically exit programming mode and return to the photo screen without saving any changes. NOTE: The handset cannot access nor navigate the Frame Setup menu. NOTE: If photo display "freezes" during programming, wait for several minutes to allow for reset. If reset does not happen after two minutes, disconnect power to reboot. Adding Photos to Internal Memory This option allows you to view thumbnails of photos and folders, and navigate the file structure of photos that are on an inserted memory card. You can also add photos from the memory card to the phone's memory. (refer to your camera instructions on how to properly format and transfer photos.) NOTE: The photo frame is shipped with 4 default photos that will activate the slide show. After the first photo is added from a memory card the default photos are deactivated and only the new photo(s) stored to internal memory can be accessed. 1. Insert a loaded memory card into the slot on the side of the base, behind the frame. 2. Press the menu/ok button to go to the main menu. 3. Use the 5 or 6 button to scroll to Add Photos to Internal Memory. 4. Press the menu/ok button to confirm, the contents of the root directory are displayed. 15
-
 1
1 -
2
-
3
-
4
-
5
-
6
-
7
-
8
-
9
-
 10
10 -
 11
11 -
 12
12 -
 13
13 -
 14
14 -
 15
15 -
 16
16 -
 17
17 -
 18
18 -
 19
19 -
 20
20 -
21
-
22
-
23
-
24
-
25
-
26
-
27
-
28
-
29
-
30
-
31
-
32
-
33
-
34
-
35
-
36
-
37
-
38
-
39
-
40
-
41
-
42
-
43
-
44
-
45
-
46
-
47
-
48
-
49
-
50
-
51
-
52
-
53
-
54
-
55
-
56
-
57
-
58
-
59
-
60
-
61
-
62
-
63
-
64
-
65
-
66
-
67
-
68
-
69
-
70
-
71
-
72
-
73
-
74
-
75
-
76
-
77
-
78
-
79
-
80
-
81
-
82
-
83
-
84
-
85
-
86
-
87
-
88
-
89
-
90
-
91
-
92
-
93
-
94
-
95
-
96
-
97
-
98
-
99
-
100
 |
 |