GE 27956FE1 User Guide - Page 22
Frame On/Off Time, Brightness, Language - handsets
 |
UPC - 044319805383
View all GE 27956FE1 manuals
Add to My Manuals
Save this manual to your list of manuals |
Page 22 highlights
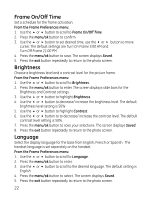
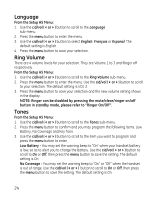
Frame On/Off Time Set a schedule for the frame activation. From the Frame Preferences menu: 1. Use the 5 or 6 button to scroll to Frame On/Off Time. 2. Press the menu/ok button to confirm. 3. Use the 5 or 6 button to set desired time, use the 3 or 4 button to move curser. The default settings are Turn On Frame 5:00 AM and Turn Off Frame 11:00 PM. 4. Press the menu/ok button to save. The screen displays Saved. 5. Press the exit button repeatedly to return to the photo screen. Brightness Choose a brightness level and a contrast level for the picture frame. From the Frame Preferences menu: 1. Use the 5 or 6 button to scroll to Brightness. 2. Press the menu/ok button to enter. The screen displays slide bars for the Brightness and Contrast settings. 3. Use the 5 or 6 button to highlight Brightness. 4. Use the 3 or 4 button to decrease/ increase the brightness level. The default brightness level setting is 50% 5. Use the 5 or 6 button to highlight Contrast. 6. Use the 3 or 4 button to to decrease/ increase the contrast level. The default contrast level setting is 50%. 7. Press the menu/ok button to save your selections. The screen displays Saved. 8. Press the exit button repeatedly to return to the photo screen. Language Select the display language for the base from English, French or Spanish. The handset language is set separately on the handset. From the Frame Preferences menu: 1. Use the 5 or 6 button to scroll to Language. 2. Press the menu/ok button to enter. 3. Use the 5 or 6 button to scroll to the desired language. The default setting is English. 4. Press the menu/ok button to select. The screen displays Saved. 5. Press the exit button repeatedly to return to the photo screen. 22
-
 1
1 -
2
-
3
-
4
-
5
-
6
-
7
-
8
-
9
-
10
-
11
-
12
-
13
-
14
-
15
-
16
-
 17
17 -
 18
18 -
 19
19 -
 20
20 -
 21
21 -
 22
22 -
 23
23 -
 24
24 -
 25
25 -
 26
26 -
 27
27 -
28
-
29
-
30
-
31
-
32
-
33
-
34
-
35
-
36
-
37
-
38
-
39
-
40
-
41
-
42
-
43
-
44
-
45
-
46
-
47
-
48
-
49
-
50
-
51
-
52
-
53
-
54
-
55
-
56
-
57
-
58
-
59
-
60
-
61
-
62
-
63
-
64
-
65
-
66
-
67
-
68
-
69
-
70
-
71
-
72
-
73
-
74
-
75
-
76
-
77
-
78
-
79
-
80
-
81
-
82
-
83
-
84
-
85
-
86
-
87
-
88
-
89
-
90
-
91
-
92
-
93
-
94
-
95
-
96
-
97
-
98
-
99
-
100
 |
 |