GE 27956FE1 User Guide - Page 18
Enter Caller's Information
 |
UPC - 044319805383
View all GE 27956FE1 manuals
Add to My Manuals
Save this manual to your list of manuals |
Page 18 highlights
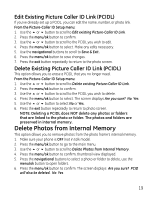
• Press the 4 button to move the flashing cursor to the right. • Press the 3 button to delete a digit. • Press the menu/ok button to save. to input Linked Photo: • Use the navigational buttons to select the desired photo or folder (selecting a folder will enable all photos in folder to cycle for the Caller ID instead of just one photo) • Press the menu/ok button to select. The screen displays Are you sure? No Yes. Select Yes to save or No to return to photo selection, to edit Telephone Number: • Press the 3 button to delete digits. • Use the 5 or 6 button to re-enter number. 7. Use the navigational buttons to highlight Save & Exit. 8. Press the menu/ok button to save and return to Use CID Records menu. NOTE: The Use CID Records screen DOES NOT display associated PCIDL's. Review existing PCIDL's before adding possible duplicates. 9. Press the exit button repeatedly to return to the photo screen. Note: If internal memory is too full to store any more of photos to CID links, then when user selects Picture-Caller ID Setup, an alert panel appears: Phone memory is full. Delete some pictures or folders to free up some space. Would you like to do that now? Yes No. Selecting No exits to the Frame Setup Menu with Picture-Caller ID Setup highlighted; Selecting Yes goes to the Delete Photos from Interal Memory screen. Enter Caller's Information From the Add new Picture-Caller ID Link menu: 1. Use the 5 or 6 button to scroll to Enter Caller's Info. 2. Press the menu/ok button to select. 3. Repeat Steps 5-9 in the Use CID Records Section to enter information. 18
-
 1
1 -
2
-
3
-
4
-
5
-
6
-
7
-
8
-
9
-
10
-
11
-
12
-
 13
13 -
 14
14 -
 15
15 -
 16
16 -
 17
17 -
 18
18 -
 19
19 -
 20
20 -
 21
21 -
 22
22 -
 23
23 -
24
-
25
-
26
-
27
-
28
-
29
-
30
-
31
-
32
-
33
-
34
-
35
-
36
-
37
-
38
-
39
-
40
-
41
-
42
-
43
-
44
-
45
-
46
-
47
-
48
-
49
-
50
-
51
-
52
-
53
-
54
-
55
-
56
-
57
-
58
-
59
-
60
-
61
-
62
-
63
-
64
-
65
-
66
-
67
-
68
-
69
-
70
-
71
-
72
-
73
-
74
-
75
-
76
-
77
-
78
-
79
-
80
-
81
-
82
-
83
-
84
-
85
-
86
-
87
-
88
-
89
-
90
-
91
-
92
-
93
-
94
-
95
-
96
-
97
-
98
-
99
-
100
 |
 |