GE 27956FE1 User Guide - Page 16
To select a photo
 |
UPC - 044319805383
View all GE 27956FE1 manuals
Add to My Manuals
Save this manual to your list of manuals |
Page 16 highlights
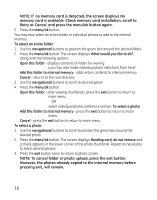
NOTE: If no memory card is detected, the screen displays No memory card is available. Check memory card installation, scroll to Retry or Cancel, and press the menu/ok button again. 5. Press the menu/ok button. You may now select an entire folder or individual photos to add to the internal memory. To select an entire folder: 1. Use the navigational buttons to position the green box around the desired folder. 2. Press the menu/ok button. The screen displays What would you like to do?, along with the following options; Open this folder - displays contents of folder for viewing (you may also make individual photo selections from here) Add this folder to internal memory - adds entire contents to internal memory Cancel - returns to the root directory 3. Use the navigational buttons to scroll to desired option 4. Press the menu/ok button. Open this folder - after viewing thumbnails, press the exit button to return to main menu OR select individual photos (reference section; To select a photo) Add this folder to internal memory - press the exit button to return to main menu Cancel - press the exit button to return to main menu To select a photo: 1. Use the navigational buttons to scroll to position the green box around the desired photo. 2. Press the menu/ok button. The screen displays Reading card, do not remove and a check appears in the lower corner of the photo thumbnail. Repeat as necessary to select desired photos. 3. Press the exit button twice to return to photo screen. NOTE: To cancel folder or photo upload, press the exit button. However, the photos already copied to the internal memory before pressing exit, will remain. 16
-
 1
1 -
2
-
3
-
4
-
5
-
6
-
7
-
8
-
9
-
10
-
 11
11 -
 12
12 -
 13
13 -
 14
14 -
 15
15 -
 16
16 -
 17
17 -
 18
18 -
 19
19 -
 20
20 -
 21
21 -
22
-
23
-
24
-
25
-
26
-
27
-
28
-
29
-
30
-
31
-
32
-
33
-
34
-
35
-
36
-
37
-
38
-
39
-
40
-
41
-
42
-
43
-
44
-
45
-
46
-
47
-
48
-
49
-
50
-
51
-
52
-
53
-
54
-
55
-
56
-
57
-
58
-
59
-
60
-
61
-
62
-
63
-
64
-
65
-
66
-
67
-
68
-
69
-
70
-
71
-
72
-
73
-
74
-
75
-
76
-
77
-
78
-
79
-
80
-
81
-
82
-
83
-
84
-
85
-
86
-
87
-
88
-
89
-
90
-
91
-
92
-
93
-
94
-
95
-
96
-
97
-
98
-
99
-
100
 |
 |