GE E1486TW User Manual (English (6.97 MB)) - Page 50
Panorama Mode - review
 |
UPC - 810027016072
View all GE E1486TW manuals
Add to My Manuals
Save this manual to your list of manuals |
Page 50 highlights
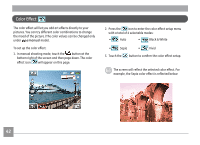
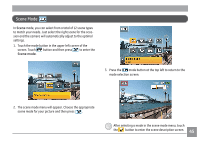
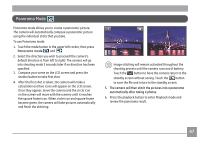
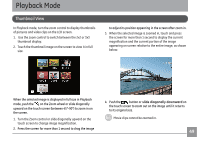
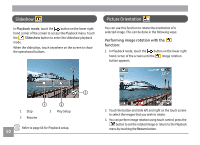
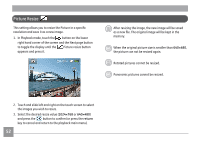
Panorama Mode Panorama mode allows you to create a panoramic picture. The camera will automatically compose a panoramic picture using the individual shots that you take. To use Panorama mode: 1. Touch the mode button in the upper left corder, then press Panorama mode and . 2. Select the direction you wish to proceed (the camera's default direction is from left to right). The camera will go into shooting mode 3 seconds later if no direction has been specified. 3. Compose your scene on the LCD screen and press the shutter button to take first shot. 4 After the first shot is taken, the camera will make a calculation and two icons will appear on the LCD screen. Once they appear, move the camera and the circle icon on the screen will move with the scenery until it reaches the square frame icon. When circle icon and square frame become green, the camera will take pictures automatically and finish the stitching. Image stitching will remain activated throughout the shooting process until the camera runs out of battery. Touch the button to have the camera return to the standby screen without saving. Touch the button to save the file and return to the standby screen. 5. The camera will then stitch the pictures into a panorama automatically after taking 4 photos. 6. Press the playback button to enter Playback mode and review the panorama result. 47
-
 1
1 -
2
-
3
-
4
-
5
-
6
-
7
-
8
-
9
-
10
-
11
-
12
-
13
-
14
-
15
-
16
-
17
-
18
-
19
-
20
-
21
-
22
-
23
-
24
-
25
-
26
-
27
-
28
-
29
-
30
-
31
-
32
-
33
-
34
-
35
-
36
-
37
-
38
-
39
-
40
-
41
-
42
-
43
-
44
-
 45
45 -
 46
46 -
 47
47 -
 48
48 -
 49
49 -
 50
50 -
 51
51 -
 52
52 -
 53
53 -
 54
54 -
 55
55 -
56
-
57
-
58
-
59
-
60
-
61
-
62
-
63
-
64
-
65
-
66
-
67
-
68
-
69
-
70
-
71
-
72
-
73
-
74
-
75
-
76
-
77
-
78
-
79
-
80
-
81
-
82
-
83
-
84
-
85
-
86
-
87
-
88
-
89
-
90
-
91
-
92
-
93
 |
 |
