GE E1486TW User Manual (English (6.97 MB)) - Page 67
Delete
 |
UPC - 810027016072
View all GE E1486TW manuals
Add to My Manuals
Save this manual to your list of manuals |
Page 67 highlights
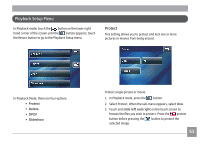
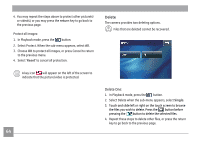
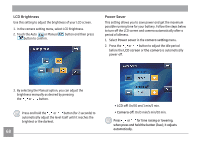
4. You may repeat the steps above to protect other picture(s) or video(s), or you may press the return key to go back to the previous page. Protect all images: 1. In Playback mode, press the button. 2. Select Protect. When the sub-menu appears, select All. 3. Choose OK to protect all images, or press Cancel to return to the previous menu. 4. Select 'Reset' to cancel all protection. A key icon will appear on the left of the screen to indicate that the picture/video is protected. 64 Delete The camera provides two deleting options. Files that are deleted cannot be recovered. Delete One: 1. In Playback mode, press the button. 2. Select Delete when the sub-menu appears, select Single. 3. Touch and slide left or right on the touch screen to browse the files you wish to delete. Press the button before pressing the button to delete the selected files. 4. Repeat these steps to delete other files, or press the return key to go back to the previous page.
-
 1
1 -
2
-
3
-
4
-
5
-
6
-
7
-
8
-
9
-
10
-
11
-
12
-
13
-
14
-
15
-
16
-
17
-
18
-
19
-
20
-
21
-
22
-
23
-
24
-
25
-
26
-
27
-
28
-
29
-
30
-
31
-
32
-
33
-
34
-
35
-
36
-
37
-
38
-
39
-
40
-
41
-
42
-
43
-
44
-
45
-
46
-
47
-
48
-
49
-
50
-
51
-
52
-
53
-
54
-
55
-
56
-
57
-
58
-
59
-
60
-
61
-
 62
62 -
 63
63 -
 64
64 -
 65
65 -
 66
66 -
 67
67 -
 68
68 -
 69
69 -
 70
70 -
 71
71 -
 72
72 -
73
-
74
-
75
-
76
-
77
-
78
-
79
-
80
-
81
-
82
-
83
-
84
-
85
-
86
-
87
-
88
-
89
-
90
-
91
-
92
-
93
 |
 |
