GE PGS968SEPSS Use and Care Manual - Page 15
Using the clock, timer and control lockout.
 |
UPC - 084691199755
View all GE PGS968SEPSS manuals
Add to My Manuals
Save this manual to your list of manuals |
Page 15 highlights
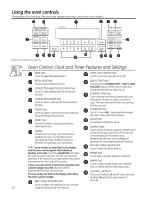
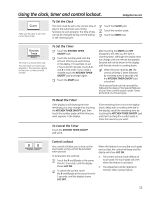
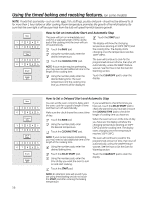
Using the clock, timer and control lockout. GEAppliances.com Make sure the clock is set to the correct time of day. To Set the Clock The clock must be set to the correct time of day for the automatic oven timing functions to work properly. The time of day cannot be changed during a timed baking or self-cleaning cycle. Touch the CLOCK pad. Touch the number pads. Touch the START pad. The timer is a minute timer only. The timer does not control oven operations. The maximum setting on the timer is 9 hours and 59 minutes. To Set the Timer Touch the KITCHEN TIMER ON/OFF pad. Touch the number pads until the amount of time you want shows in the display. For example, to set 2 hours and 45 minutes, touch 2, 4 and 5 in that order. If you make a mistake touch the KITCHEN TIMER ON/OFF pad and begin again. Touch the START pad. After touching the START pad, SET disappears; this tells you the time is counting down, although the display does not change until one minute has passed. Seconds will not be shown in the display until the last minute is counting down. When the timer reaches :00, the control will beep 3 times followed by one beep every 6 seconds until the KITCHEN TIMER ON/OFF pad is touched. The 6-second tone can be canceled by following the steps in the Special features of your oven control section under Tones at the End of a Timed Cycle. To Reset the Timer If the display is still showing the time remaining, you may change it by touching the KITCHEN TIMER ON/OFF pad, then touch the number pads until the time you want appears in the display. If the remaining time is not in the display (clock, delay start or cooking time are in the display), recall the remaining time by touching the KITCHEN TIMER ON/OFF pad and then touching the number pads to enter the new time you want. To Cancel the Timer Touch the KITCHEN TIMER ON/OFF pad twice. Control Lockout Your control will allow you to lock out the touch pads so they cannot be activated when pressed. To lock/unlock the controls: Touch the 9 and 0 pads at the same time for 3 seconds, until the display shows LOC ON. To unlock the control, touch the 9 and 0 pads at the same time for 3 seconds, until the display shows LOC OFF. When this feature is on and the touch pads are touched, the control will beep and the display will show LOC ON. n The control lockout mode affects all touch pads. No touch pads will work when this feature is activated. n The adjustment will be retained in memory after a power failure. 15
-
 1
1 -
2
-
3
-
4
-
5
-
6
-
7
-
8
-
9
-
 10
10 -
 11
11 -
 12
12 -
 13
13 -
 14
14 -
 15
15 -
 16
16 -
 17
17 -
 18
18 -
 19
19 -
 20
20 -
21
-
22
-
23
-
24
-
25
-
26
-
27
-
28
-
29
-
30
-
31
-
32
-
33
-
34
-
35
-
36
-
37
-
38
-
39
-
40
-
41
-
42
-
43
-
44
-
45
-
46
-
47
-
48
-
49
-
50
-
51
-
52
-
53
-
54
-
55
-
56
-
57
-
58
-
59
-
60
-
61
-
62
-
63
-
64
-
65
-
66
-
67
-
68
-
69
-
70
-
71
-
72
-
73
-
74
-
75
-
76
-
77
-
78
-
79
-
80
-
81
-
82
-
83
-
84
-
85
-
86
-
87
-
88
-
89
-
90
-
91
-
92
-
93
-
94
-
95
-
96
 |
 |