GE PGS968SEPSS Use and Care Manual - Page 33
Warning, Caution - rating
 |
UPC - 084691199755
View all GE PGS968SEPSS manuals
Add to My Manuals
Save this manual to your list of manuals |
Page 33 highlights
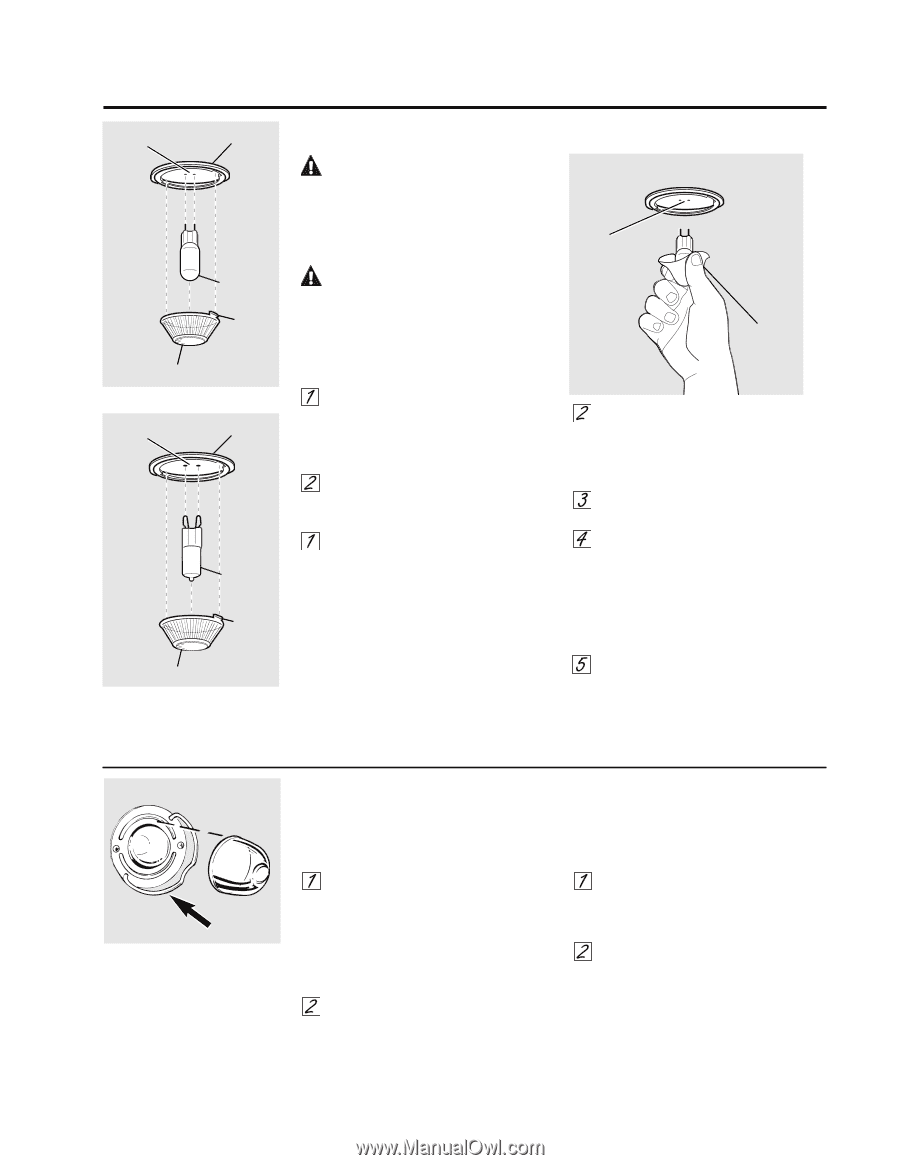
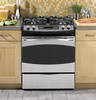
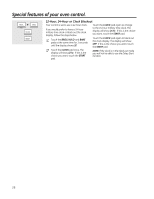
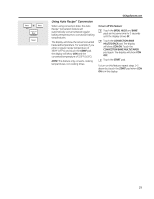
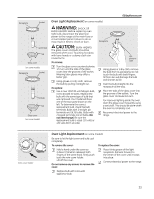
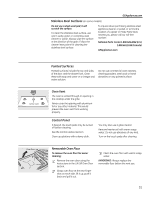
Receptacle Socket G6.35 Bulb Tab Glass cover (on some models) Receptacle Socket G9 Bulb Tab Glass cover (on some models) GEAppliances.com Oven Light Replacement (on some models) WARNING: SHOCK OR BURN HAzARD: Before replacing oven light bulb, disconnect the electrical power to the range at the main fuse or circuit breaker panel. Failure to do so may result in electric shock or burn. CAUTION: BURN HAzARD: The glass cover and bulb should be removed when cool. Touching hot glass with bare hands or a damp cloth can cause burns. To remove: Turn the glass cover counterclockwise 1/4 turn until the tabs of the glass cover clear the grooves of the socket. Wearing latex gloves may offer a better grip. Using gloves or a dry cloth, remove the bulb by pulling it straight out. To replace: Use a new 120/130-volt halogen bulb, not to exceed 50 watts. Replace the bulb with the same type of bulb that was removed. Your model will have one of the two types shown on the left. To determine the correct replacement bulb, check the bulb terminals. Bulbs with 2 straight pin terminals are G6.35 bulbs. Bulbs with 2 looped terminals are G9 bulbs. (Do not interchange.) Be sure the replacement bulb is rated 120 volts or 130 volts (NOT 12 volts). Receptacle Use gloves or cloth Using gloves or a dry cloth, remove the bulb from its packaging. Do not touch the bulb with bare fingers. Oil from skin will damage the bulb and shorten its life. Push the bulb straight into the receptacle all the way. Place the tabs of the glass cover into the grooves of the socket. Turn the glass cover clockwise 1/4 turn. For improved lighting inside the oven, clean the glass cover frequently using a wet cloth. This should be done when the oven is completely cool. Reconnect electrical power to the range. Wire cover holder Oven Light Replacement (on some models) Be sure to let the light cover and bulb cool completely. To remove the cover: To replace the cover: Hold a hand under the cover so it doesn't fall when released. With fingers of the same hand, firmly push back the wire cover holder. Lift off the cover. Do not remove any screws to remove the cover. Place it into groove of the light receptacle. Pull wire forward to the center of the cover until it snaps into place. Connect electrical power to the range. Replace bulb with a 40-watt appliance bulb. 33
-
 1
1 -
2
-
3
-
4
-
5
-
6
-
7
-
8
-
9
-
10
-
11
-
12
-
13
-
14
-
15
-
16
-
17
-
18
-
19
-
20
-
21
-
22
-
23
-
24
-
25
-
26
-
27
-
 28
28 -
 29
29 -
 30
30 -
 31
31 -
 32
32 -
 33
33 -
 34
34 -
 35
35 -
 36
36 -
 37
37 -
 38
38 -
39
-
40
-
41
-
42
-
43
-
44
-
45
-
46
-
47
-
48
-
49
-
50
-
51
-
52
-
53
-
54
-
55
-
56
-
57
-
58
-
59
-
60
-
61
-
62
-
63
-
64
-
65
-
66
-
67
-
68
-
69
-
70
-
71
-
72
-
73
-
74
-
75
-
76
-
77
-
78
-
79
-
80
-
81
-
82
-
83
-
84
-
85
-
86
-
87
-
88
-
89
-
90
-
91
-
92
-
93
-
94
-
95
-
96
 |
 |