GE PGS968SEPSS Use and Care Manual - Page 39
Problem, Possible Causes, What To Do, GEAppliances.com - installation instructions
 |
UPC - 084691199755
View all GE PGS968SEPSS manuals
Add to My Manuals
Save this manual to your list of manuals |
Page 39 highlights
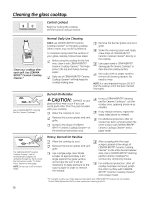
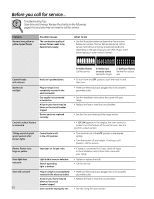
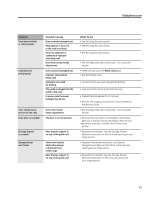
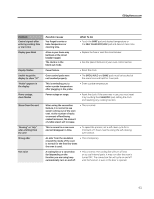
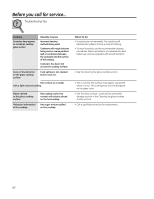
GEAppliances.com Problem Food does not bake or roast properly Food does not broil properly Oven temperature too hot or too cold Oven door is crooked Storage drawer is crooked Storage drawer won't close Possible Causes Oven controls improperly set. Rack position is incorrect or the rack is not level. Incorrect cookware or cookware of improper size being used. Oven thermostat needs adjustment . Oven controls improperly set. Improper rack position being used. Cookware not suited for broiling. The probe is plugged into the outlet in the oven. In some areas the power (voltage) may be low. Oven thermostat needs adjustment. The door is out of position. Rear drawer support is on top of the guide rail. Power cord may be obstructing drawer in the lower back of the range. Rear drawer support is on top of the guide rail. What To Do • See the Using the oven section. • See the Using the oven section. • See the Using the oven section. • See the Adjust the oven thermostat - Do it yourself! section. • Make sure you touch the BROIL HI/LO pad. • See the Broiling Guide. • For best results, use a pan designed for broiling. • Unplug and remove the probe from the oven. • Preheat the broil element for 10 minutes. • Broil for the longest period of time recommended in the Broiling Guide. • See the Adjust the oven thermostat - Do it yourself! section. • Because the oven door is removable, it sometimes gets out of position during installation. Remove and replace the oven door. See the Lift-Off Oven Door section. • Reposition the drawer. See the Storage Drawer Removal instructions in the Care and cleaning of your range section. • Reposition the drawer and power cord. See the Storage Drawer Removal instructions in the Care and cleaning of your range section. • Reposition the drawer. See the Storage Drawer Removal instructions in the Care and cleaning of your range section. 39
-
 1
1 -
2
-
3
-
4
-
5
-
6
-
7
-
8
-
9
-
10
-
11
-
12
-
13
-
14
-
15
-
16
-
17
-
18
-
19
-
20
-
21
-
22
-
23
-
24
-
25
-
26
-
27
-
28
-
29
-
30
-
31
-
32
-
33
-
 34
34 -
 35
35 -
 36
36 -
 37
37 -
 38
38 -
 39
39 -
 40
40 -
 41
41 -
 42
42 -
 43
43 -
 44
44 -
45
-
46
-
47
-
48
-
49
-
50
-
51
-
52
-
53
-
54
-
55
-
56
-
57
-
58
-
59
-
60
-
61
-
62
-
63
-
64
-
65
-
66
-
67
-
68
-
69
-
70
-
71
-
72
-
73
-
74
-
75
-
76
-
77
-
78
-
79
-
80
-
81
-
82
-
83
-
84
-
85
-
86
-
87
-
88
-
89
-
90
-
91
-
92
-
93
-
94
-
95
-
96
 |
 |