HP 2500 HP Color LaserJet 2500 series - Getting Started Guide - Page 16
Drucken einer Testseite.
 |
View all HP 2500 manuals
Add to My Manuals
Save this manual to your list of manuals |
Page 16 highlights
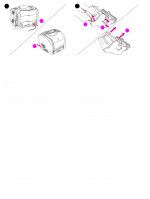
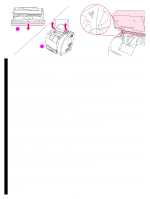
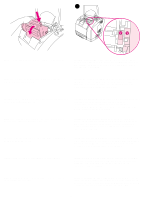
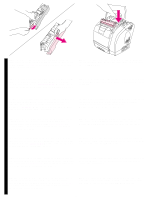
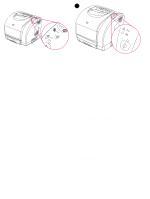
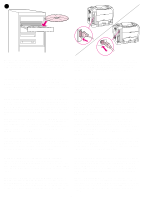
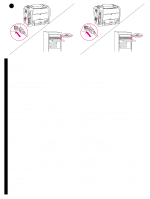
20 21 English Français Deutsch Italiano Print a Demo page. With the Ready light on, press GO to print a Demo page, which verifies that the printer works. Note: If the page does not print, reconnect the power cable. Make sure the Ready light is on and no other lights are on or blinking. Make sure paper is loaded and supplies are installed correctly. Choose ONE of these installations. To connect directly for Windows®, go to step 22. To install for a network, go to step 23. If the "New Hardware Found" message is on your computer screen, go to step 24. To install only the printer driver for Windows 95, go to step 25. To connect directly for Macintosh, go to step 26. Imprimez une page de démonstration. Lorsque le voyant Prêt est allumé, appuyez sur REPRISE pour imprimer une page de démonstration et vérifier que l'imprimante fonctionne. Remarque : Si la page ne s'imprime pas, rebranchez le câble d'alimentation. Assurez-vous que le voyant Prêt est allumé et qu'aucun autre voyant n'est allumé ni ne clignote. Assurez-vous que le papier est chargé et que les fournitures sont correctement installées. Drucken einer Testseite. Drücken Sie bei leuchtender Bereit-LED die Taste START, um eine Testseite zu drucken. Auf diese Weise wird geprüft, ob der Drucker ordnungsgemäß funktioniert. Hinweis: Wenn die Seite nicht gedruckt wird, ziehen Sie das Netzkabel ab, und schließen Sie es dann wieder an. Vergewissern Sie sich, dass die Bereit-LED leuchtet und keine weiteren LEDs leuchten oder blinken. Stellen Sie sicher, dass Papier eingelegt und das Zubehör ordnungsgemäß eingesetzt ist. Stampa di una pagina di dimostrazione. Quando la spia Pronta è accessa, premere CONTINUA per stampare una pagina di dimostrazione al fine di verificare il corretto funzionamento della stampante. Nota: se la pagina di prova non viene stampata, scollegare e ricollegare il cavo di alimentazione. Assicurarsi che la spia Pronta sia accesa e che le altre spie non siano accese o lampeggianti. Assicurarsi che sia stata caricata la carta e che i componenti della stampante siano stati installati correttamente. Imprima una página de prueba. Con la luz Preparada encendida, pulse CONTINUAR para imprimir una página de prueba que verifique que la impresora funciona. Nota: Si la página no se imprime, vuelva a conectar el cable de alimentación. Asegúrese de que la luz Preparada esté encendida y de que no hay más luces parpadeando o encendidas. compruebe que el papel esté cargado y que los suministros están correctamente instalados. Druk een testpagina af. Druk op START om een testpagina af te drukken wanneer het Klaar-lichtje brandt. Hiermee controleert u of de printer werkt. Opmerking: Sluit het netsnoer opnieuw aan wanneer geen pagina wordt afgedrukt. Controleer of het Klaar-lichtje brandt en de andere lichtjes niet knipperen. Controleer of er papier is geladen en de benodigdheden op de juiste wijze zijn geïnstalleerd. Imprima uma página de demonstração. Com a luz Pronta acesa, pressione CONTINUAR para imprimir uma página de demonstração que verifica se a impressora está funcionando. Nota: Se a página não for impressa, reconecte o cabo de alimentação. Verifique se a luz Pronta está acesa e se nenhuma outra luz está acesa ou piscando. Verifique se o papel está carregado e se os suprimentos estão instalados corretamente. Choisissez l'UNE des installations suivantes. Pour une connexion directe sous Windows®, passez à l'étape 22. Pour une installation en réseau, passez à l'étape 23. Si le message Nouveau périphérique détecté apparaît à l'écran, passez à l'étape 24. Pour installer uniquement le pilote d'imprimante pour Windows 95, passez à l'étape 25. Pour une connexion directe sous Macintosh, passez à l'étape 26. Auswählen EINER der folgenden Installationen. Für eine direkte Verbindung unter Windows® fahren Sie mit Schritt 22 fort. Für die Installation in einem Netzwerk fahren Sie mit Schritt 23 fort. Wenn die Meldung "Neue Hardwarekomponente gefunden" auf dem Bildschirm angezeigt wird, fahren Sie mit Schritt 24 fort. Wenn Sie nur den Druckertreiber unter Windows 95 installieren möchten, fahren Sie mit Schritt 25 fort. Für eine direkte Verbindung bei Macintosh-Computern fahren Sie mit Schritt 26 fort. Scegliere UNA delle installazioni descritte di seguito. Per il collegamento diretto per Windows®, passare al punto 22. Per un'installazione in rete, passare al punto 23. Se viene visualizzato il messaggio "Nuovo componente hardware individuato", passare al punto 24. Per l'installazione del solo driver di stampa per Windows 95, passare al punto 25. Per il collegamento diretto per Macintosh, passare al punto 26. Elija UNA de estas instalaciones. Para conectar directamente en Windows®, vaya al paso 22. Para instalar en red, vaya al paso 23. Si el mensaje "Nuevo hardware encontrado" está en la pantalla del equipo, vaya al paso 24. Para instalar sólo el controlador de impresora para Windows 95, vaya al paso 25. Para conectar directamente en Macintosh, vaya al paso 26. Kies ÉÉN van deze installatieopties. Als u de printer rechtstreeks op een Windows®-systeem wilt aansluiten, gaat u verder met stap 22. Als u de printer op een netwerk wilt aansluiten, gaat u verder met stap 23. Wanneer het bericht Nieuwe hardware gevonden op het computerscherm verschijnt, gaat u verder met stap 24. Als u alleen de printerdriver voor Windows 95 wilt installeren, gaat u verder met stap 25. Als u de printer rechtstreeks op een Macintosh-systeem wilt aansluiten, gaat u verder met stap 26. Escolha UM destes tipos de instalação. Para conectar-se diretamente no caso do Windows®, vá para a etapa 22. Para instalar em uma rede, vá para a etapa 23. Se a mensagem "Novo hardware encontrado" estiver na tela do computador, vá para a etapa 24. Para instalar apenas o driver da impressora para Windows 95, vá para a etapa 25. Para conectar-se diretamente no caso do Macintosh, vá para a etapa 26. 15 Español Nederlands Português
-
 1
1 -
2
-
3
-
4
-
5
-
6
-
7
-
8
-
9
-
10
-
 11
11 -
 12
12 -
 13
13 -
 14
14 -
 15
15 -
 16
16 -
 17
17 -
 18
18 -
 19
19 -
 20
20 -
 21
21 -
22
-
23
-
24
-
25
-
26
-
27
-
28
-
29
-
30
-
31
-
32
-
33
-
34
-
35
-
36
 |
 |
