HP 2500 HP Color LaserJet 2500 series - Getting Started Guide - Page 22
USB Printer Selection
 |
View all HP 2500 manuals
Add to My Manuals
Save this manual to your list of manuals |
Page 22 highlights
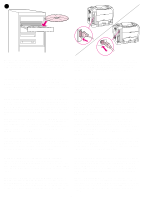
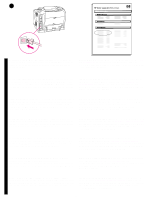
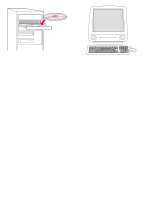
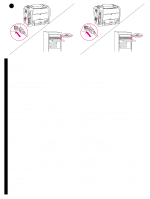
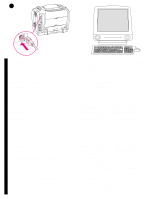
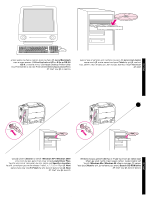
26 Mac OS 8.6 - 9.x English Français Deutsch Italiano Connect the printer directly to a Macintosh. Connect a USB cable between the USB port on the printer and the USB port on the computer. You cannot connect parallel and USB cables at the same time. Note: A USB cable is not included. Use a 2-meter standard USB cable. OS 8.6 to 9.2x: 1) Run the Installer and restart. Run the Apple Desktop Printer Utility from HD/Applications/Utilities. 2) Double-click Printer (USB). Next to USB Printer Selection, click Change. 3) Select the printer, click Auto Setup, and then click Create. On the Printing menu, click Set Default Printer. 4) Go to step 27. Connectez directement l'imprimante à un Macintosh. Branchez un câble USB entre le port USB de l'imprimante et celui de l'ordinateur. Vous ne pouvez pas brancher un câble parallèle et un câble USB en même temps. Remarque : Le câble USB n'est pas inclus. Utilisez un câble USB standard de 2 mètres. Direktanschluss an einen Macintosh-Computer. Schließen Sie ein USB-Kabel am USB-Anschluss des Druckers und am USB-Anschluss des Computers an. Es ist nicht möglich, gleichzeitig ein USB- und ein Parallelkabel anzuschließen. Hinweis: Im Lieferumfang ist kein USB-Kabel enthalten. Verwenden Sie ein 2-Meter langes USB-Standardkabel. Collegamento diretto della stampante ad un computer Macintosh. Collegare la porta USB della stampante e la porta USB del computer mediante un cavo USB. Non è possibile utilizzare contemporaneamente cavi paralleli e USB. Nota: il cavo USB non è incluso nella confezione. Utilizzare un cavo USB standard di lunghezza pari a 2 metri. De OS 8.6 à 9.2x : 1) Exécutez le programme d'installation et redémarrez l'ordinateur. Exécutez l'utilitaire Apple Desktop Printer à partir de HD/Applications/Utilitaires. 2) Double-cliquez sur Imprimante (USB). En regard de Sélection imprimante USB, cliquez sur Changer. 3) Sélectionnez l'imprimante, cliquez sur Réglage auto, puis sur Créer. Dans le menu Impression, cliquez sur Définir l'imprimante par défaut. 4) Passez à l'étape 27. OS 8.6 - 9.2x: 1) Führen Sie das Installationsprogramm aus, starten Sie den PC neu. Führen Sie unter HD/Programme/Schreibtischprogramme das Apple Schreibtischdrucker-Dienstprogramm aus. 2) Doppelklicken Sie auf Drucker (USB). Klicken Sie neben Auswahl USB-Drucker auf Ändern. 3) Wählen Sie den Drucker aus, klicken Sie auf Automatisch und auf Erstellen. Klicken Sie im Menü Druckersoftware auf Standarddrucker festlegen. 4) Fahren Sie mit Schritt 27 fort. OS versioni 8.6 - 9.2x: 1) Eseguire il programma di installazione e riavviare il computer. Eseguire l'utility Apple Desktop Printer da HD/Applications/Utilities. 2) Fare doppio clic su Printer (USB). Accanto a USB Printer Selection, fare clic su Change. 3) Selezionare la stampante, fare clic su Auto Setup, quindi su Create. Nel menu Printing, fare clic su Set Default Printer. 4) Passare al punto 27. Conexión de la impresora directamente a un equipo Macintosh. Conecte un cable USB entre el puerto USB de la impresora y el puerto USB del equipo. No puede conectar los cables paralelo y USB al mismo tiempo. Nota: No se incluye cable USB. Utilice un cable USB estándar de 2 metros. De printer rechtstreeks aansluiten op een Macintosh. Sluit een USB-kabel aan op de USB-poort op de printer en de USB-poort op de computer. U kunt de parallelle kabel en de USB-kabel niet tegelijkertijd aansluiten. Opmerking: Een USB-kabel is niet meegeleverd. Gebruik een standaard USB-kabel van 2 meter. OS 8.6 a 9.2x: 1) Ejecute el instalador y reinicie el sistema. Ejecute la utilidad de impresora del escritorio de Apple desde HD/Applications/Utilities. 2) Efectúe una doble selección en Impresora (USB). Junto a Selección de impresora USB, seleccione Cambiar. 3) Seleccione la impresora, seleccione Configuración automática y Crear. En el menú Impresión, seleccione Configurar impresora predeterminada. 4) Vaya al paso 27. OS 8.6 tot en met 9.2x: 1) Voer het installatieprogramma uit en start de computer opnieuw op. Voer de Apple Desktop Printer Utility uit door Programma's/Hulpprogramma's te kiezen. 2) Dubbelklik op Printer (USB). Klik naast Selectie USB-printer op Wijzig. 3) Selecteer de printer, klik op Autoconfig en klik vervolgens op Maak aan. Klik op Standaardprinter instellen in het menu Printers. 4) Ga verder met stap 27. Conecte a impressora diretamente a um Macintosh. Conecte um cabo USB entre a porta correspondente na impressora e a porta USB do computador. Você não pode conectar os cabos paralelo e USB ao mesmo tempo. Nota: Cabo USB não incluído. Utilize um cabo USB padrão com 2 metros. 21 OS 8.6 a 9.2x: 1) Execute o Instalador e reinicie o computador. Execute o Apple Desktop Printer Utility pelo caminho HD/Aplicativos/Utilitários. 2) Clique duas vezes em Impressora (USB). Próximo a Seleção de impressora USB, clique em Alterar. 3) Selecione a impressora, clique em Configuração automática e, em seguida, clique em Criar. No menu Impressão, clique em Selecionar impressora padrão. 4) Vá para a etapa 27. Español Nederlands Português
-
 1
1 -
2
-
3
-
4
-
5
-
6
-
7
-
8
-
9
-
10
-
11
-
12
-
13
-
14
-
15
-
16
-
 17
17 -
 18
18 -
 19
19 -
 20
20 -
 21
21 -
 22
22 -
 23
23 -
 24
24 -
 25
25 -
 26
26 -
 27
27 -
28
-
29
-
30
-
31
-
32
-
33
-
34
-
35
-
36
 |
 |
