HP 2500 HP Color LaserJet 2500 series - Getting Started Guide - Page 6
Benennung der Druckerkomponenten.
 |
View all HP 2500 manuals
Add to My Manuals
Save this manual to your list of manuals |
Page 6 highlights
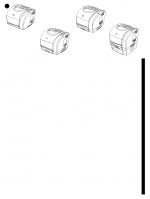
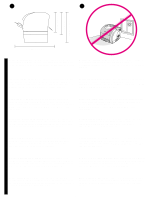
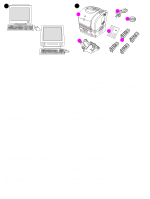
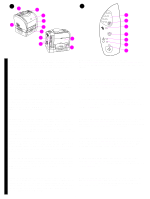
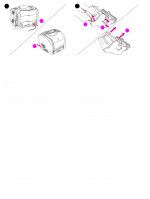
6 7 2 3 4 1 5 2 1 6 3 7 4 8 10 5 9 6 11 7 Locate the printer parts. 1) power switch; 2) top output bin; 3) control panel; 4) top cover; 5) tray 1; 6) tray 2 (2500, 2500n, and 2500tn models); 7) tray 3 (2500tn model); 8) dual inline memory module (DIMM) access door; 9) interface ports, 10) rear output door; and 11) power connector. Understand the control panel. 1) print-cartridge lights, 2) ROTATE CAROUSEL button 3) imaging drum light 4) CANCEL JOB button 5) Attention light (amber) 6) Ready light (green) 7) Go light and GO button (green). English Français Deutsch Italiano Repérez les pièces de l'imprimante. 1) bouton d'alimentation 2) bac de sortie supérieur 3) panneau de commande 4) capot 5) bac 1 6) bac 2 (modèles 2500, 2500n et 2500tn) 7) bac 3 (modèle 2500tn) 8) trappe d'accès au module de mémoire à deux rangées de connexions (DIMM) 9) ports d'interface 10) porte de sortie arrière et 11) connecteur d'alimentation. Description du panneau de commande. 1) voyants des cartouches d'encre 2) bouton FAIRE PIVOTER LE CARROUSEL 3) voyant du tambour d'imagerie 4) bouton ANNULER TÂCHE 5) voyant Attention (orange) 6) voyant Prêt (vert) 7) voyant Reprise et bouton REPRISE (vert). Benennung der Druckerkomponenten. 1) Netzschalter 2) Oberes Ausgabefach 3) Bedienfeld 4) Obere Abdeckung 5) Fach 1 6) Fach 2 (Druckermodelle 2500, 2500N und 2500TN) 7) Fach 3 (Modell 2500TN) 8) Zugangsklappe für das DIMM-Modul 9) Schnittstellenanschlüsse 10) Hintere Ausgabeklappe und 11) Netzanschluss Benennung der Bedienfeldkomponenten. 1) Druckpatronen-LEDs 2) Taste PATRONENWECHSLER DREHEN 3) Bildtrommel-LED 4) Taste JOB ABBRECHEN 5) Achtung-LED (gelb) 6) Bereit-LED (grün) 7) Start-LED und Taste START (grün) Individuazione dei componenti della stampante. 1) interruttore di accensione; 2) scomparto di uscita superiore; 3) pannello di controllo; 4) coperchio superiore; 5) cassetto 1; 6) cassetto 2 (modelli 2500, 2500n e 2500tn); 7) cassetto 3 (modello 2500tn); 8) sportello di accesso al modulo DIMM (Dual Inline Memory, modulo doppio di memoria in linea); 9) porte di interfaccia, 10) sportello di uscita posteriore e 11) connettore di alimentazione. Identifique los componentes de la impresora. 1) conmutador eléctrico 2) bandeja de salida superior 3) panel de control 4) cubierta superior 5) bandeja 1 6) bandeja 2 (modelos 2500, 2500n y 2500tn) 7) bandeja 3 (modelo 2500tn) 8) puerto de acceso del módulo de memoria con doble hilera (DIMM) 9) puertos de interfaz 10) puerta de salida posterior y 11) conector eléctrico. Componenti del pannello di controllo. 1) spie delle cartucce di stampa, 2) pulsante ROTAZIONE CARTUCCE 3) spia del tamburo fotosensibile 4) pulsante ANNULLA OPERAZIONE 5) spia Attenzione (giallo) 6) spia Pronta (verde) 7) spia Continua e pulsante CONTINUA (verde). Identifique los elementos del panel de control. 1) luces del cartucho de impresión 2) botón GIRAR CARRO 3) luz del tambor de formación de imágenes 4) botón CANCELAR TRABAJO 5) luz Atención (ámbar) 6) luz Preparada (verde) 7) luz Continuar y botón CONTINUAR (verde). Zoek de onderdelen van de printer. 1) aan/uit-schakelaar, 2) bovenste uitvoerbak, 3) bedieningspaneel, 4) printerkap, 5) lade 1, 6) lade 2 (model 2500, 2500n en 2500tn), 7) lade 3 (model 2500tn), 8) toegangsklep voor DIMM-geheugenmodules, 9) interfacepoorten, 10) achterste uitvoerklep en 11) stroomaansluiting. Bestudeer het bedieningspaneel. 1) lichtjes voor tonercassette, 2) knop HOUDER DRAAIEN, 3) lichtje voor drumcassette, 4) knop TAAK ANNULEREN, 5) Attentie-lichtje (geel) 6) Klaar-lichtje (groen) 7) lichtje en knop START (groen). Localize as peças da impressora. 1) interruptor; 2) compartimento superior de saída; 3) painel de controle; 4) tampa superior; 5) bandeja 1; 6) bandeja 2 (modelos 2500, 2500n e 2500tn); 7) bandeja 3 (modelo 2500tn); 8) porta de acesso ao dual inline memory module (módulo duplo de memória em linha) (DIMM); 9) portas de interface 10) porta de saída traseira e 11) conector de alimentação. Conheça o painel de controle. 1) luzes dos cartuchos de impressão, 2) botão GIRAR CARROSSEL 3) luz do tambor de imagens 4) botão CANCELAR TRABALHO 5) luz de Atenção (âmbar) 6) luz Pronta (verde) 7) luz Continuar e botão CONTINUAR (verde). 5 Español Nederlands Português
-
 1
1 -
 2
2 -
 3
3 -
 4
4 -
 5
5 -
 6
6 -
 7
7 -
 8
8 -
 9
9 -
 10
10 -
 11
11 -
 12
12 -
13
-
14
-
15
-
16
-
17
-
18
-
19
-
20
-
21
-
22
-
23
-
24
-
25
-
26
-
27
-
28
-
29
-
30
-
31
-
32
-
33
-
34
-
35
-
36
 |
 |
