HP 5550 HP Deskjet 5550 Series printers - (English) Windows User's Guide - Page 71
Close the top cover., into place. - blinking lights
 |
UPC - 808736333603
View all HP 5550 manuals
Add to My Manuals
Save this manual to your list of manuals |
Page 71 highlights
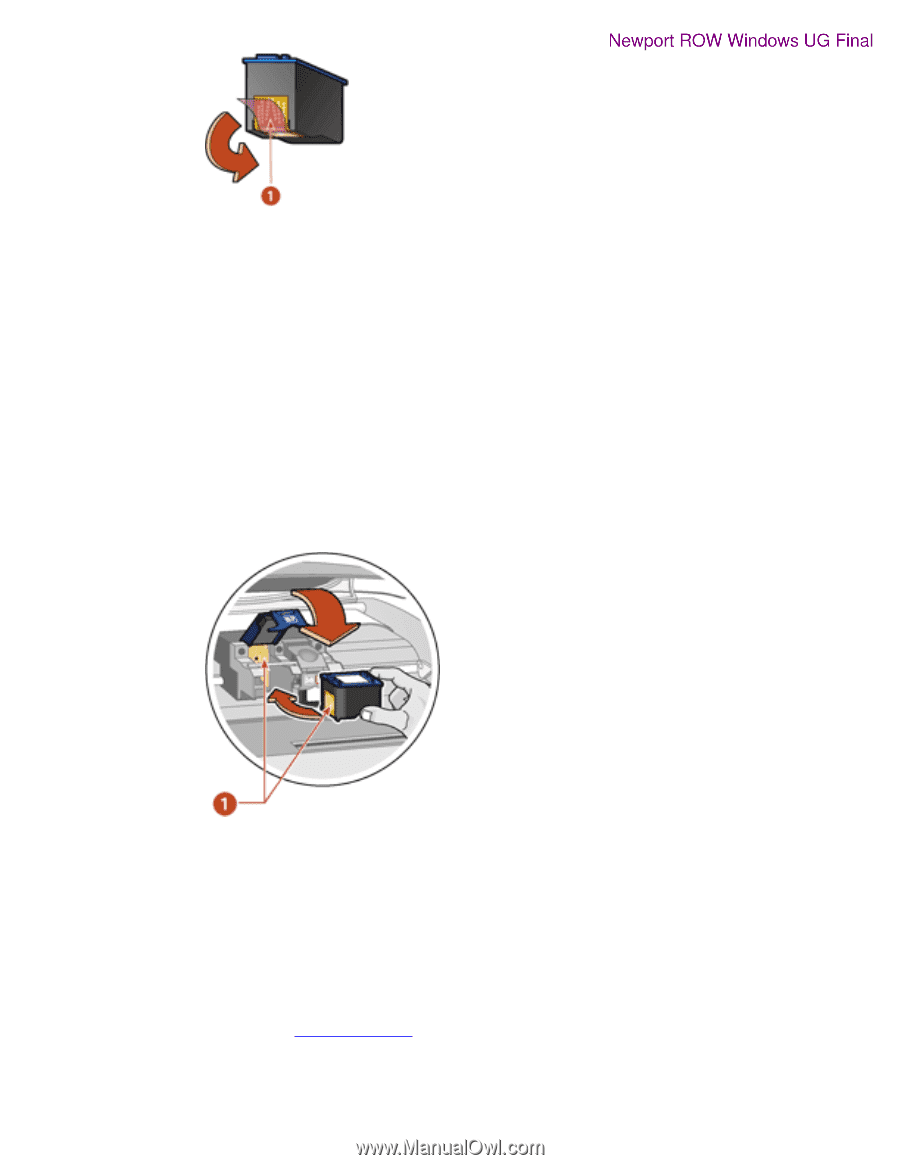
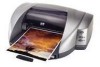
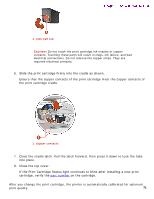
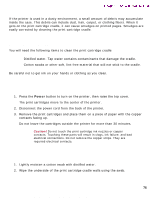
replace_ink_cartridge Newport ROW Windows UG Final 1. pink pull tab Caution! Do not touch the print cartridge ink nozzles or copper contacts. Touching these parts will result in clogs, ink failure, and bad electrical connections. Do not remove the copper strips. They are required electrical contacts. 6. Slide the print cartridge firmly into the cradle as shown. Ensure that the copper contacts of the print cartridge meet the copper contacts of the print cartridge cradle. 1. copper contacts 7. Close the cradle latch. Pull the latch forward, then press it down to tuck the tabs into place. 8. Close the top cover. If the Print Cartridge Status light continues to blink after installing a new print cartridge, verify the part number on the cartridge. After you change the print cartridge, the printer is automatically calibrated for optimum print quality. 71 file:///C|/Projects/Newport/Win_UG_ROW/ug_replacecartridge_fs.html (2 of 3) [5/9/2002 10:18:58 AM]
-
 1
1 -
2
-
3
-
4
-
5
-
6
-
7
-
8
-
9
-
10
-
11
-
12
-
13
-
14
-
15
-
16
-
17
-
18
-
19
-
20
-
21
-
22
-
23
-
24
-
25
-
26
-
27
-
28
-
29
-
30
-
31
-
32
-
33
-
34
-
35
-
36
-
37
-
38
-
39
-
40
-
41
-
42
-
43
-
44
-
45
-
46
-
47
-
48
-
49
-
50
-
51
-
52
-
53
-
54
-
55
-
56
-
57
-
58
-
59
-
60
-
61
-
62
-
63
-
64
-
65
-
 66
66 -
 67
67 -
 68
68 -
 69
69 -
 70
70 -
 71
71 -
 72
72 -
 73
73 -
 74
74 -
 75
75 -
 76
76 -
77
-
78
-
79
-
80
-
81
-
82
-
83
-
84
-
85
-
86
-
87
-
88
-
89
-
90
-
91
-
92
-
93
-
94
-
95
-
96
-
97
-
98
-
99
-
100
-
101
-
102
-
103
-
104
-
105
-
106
-
107
-
108
-
109
-
110
-
111
-
112
-
113
-
114
-
115
-
116
-
117
-
118
-
119
-
120
-
121
-
122
-
123
-
124
-
125
 |
 |