HP 6125G HP 6125G & 6125G/XG Blade Switches Installation Guide-6W100 - Page 16
Configuring the basic network settings, Configuration example, Configuring Telnet - blade switch configuration guide
 |
View all HP 6125G manuals
Add to My Manuals
Save this manual to your list of manuals |
Page 16 highlights
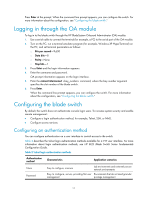
Authentication method Characteristics Application scenarios Username password and Complex to configure, secure, providing Environments where multiple operators hierarchical user management cooperate to manage the switch Configuring the basic network settings An HP 6125 blade switch without any configuration can perform basic data forwarding immediately after connecting to a network. To implement more forwarding features, you can configure the basic network settings such as IP address, static route, and VLAN. For more information, see HP 6125 Blade Switch Series Configuration Guides. Configuration example Configuring Telnet # Enter system view. system-view # Enable the Telnet server. [Sysname] telnet server enable # Enter the user interface view VTY 0. [Sysname] user-interface vty 0 # Enable password authentication on the user interface. [Sysname-ui-vty0] authentication-mode password # Set the password to hello. [Sysname-ui-vty0] set authentication password cipher hello # Set the user privilege level to 3 so Telnet users accessing VTY 0 can use all commands. [Sysname-ui-vty0] user privilege level 3 [Sysname-ui-vty0] quit Configuring the basic network settings 1. Specify an IP address: # Create VLAN-interface 1. [Sysname] interface vlan-interface 1 # Assign an IP address, for example, 192.168.0.1, to VLAN-interface 1. [Sysname-Vlan-interface1] ip address 192.168.0.1 24 [Sysname-Vlan-interface1] quit 2. Configure a static route: # Configure a static route, with the destination IP address 172.16.1.0 and the next hop IP address 192.168.0.2. [Sysname] ip route-static 172.16.1.0 255.255.255.0 192.168.0.2 3. Configure a VLAN: # Create VLAN 10 and enter its view. [Sysname] vlan 10 [Sysname-vlan10] 12
-
 1
1 -
2
-
3
-
4
-
5
-
6
-
7
-
8
-
9
-
10
-
 11
11 -
 12
12 -
 13
13 -
 14
14 -
 15
15 -
 16
16 -
 17
17 -
 18
18 -
 19
19 -
 20
20 -
 21
21 -
22
-
23
-
24
-
25
-
26
-
27
-
28
-
29
-
30
-
31
-
32
-
33
-
34
-
35
 |
 |