HP 6125G HP 6125G & 6125G/XG Blade Switches Installation Guide-6W100 - Page 7
Installing the blade switch, Preparing for installation, Installing and removing the blade switch
 |
View all HP 6125G manuals
Add to My Manuals
Save this manual to your list of manuals |
Page 7 highlights
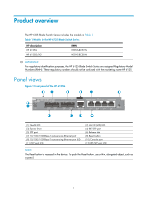
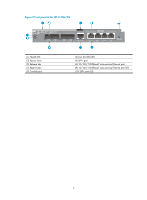
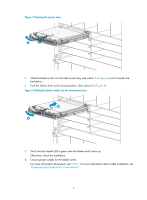
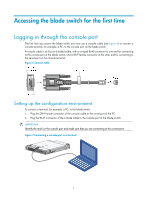
Installing the blade switch The HP 6125 switches can be installed into the HP BladeSystem c3000 and c7000 enclosures. The installation position in the enclosure in this document is only for illustration. For more information, see HP BladeSystem Enclosure Setup and Installation Guide . Preparing for installation WARNING! The blade switches are Class 1 laser devices. Do not stare into any fiber port when the blade switch has power. The laser light emitted from the optical fiber may hurt your eyes. CAUTION: Take ESD-preventive measures to avoid damaging the components. For more information, see HP BladeSystem Enclosure Setup and Installation Guide . • To avoid any equipment damage or bodily injury caused by improper use, follow the enclosure safety recommendations. For more information, see HP BladeSystem Enclosure Setup and Installation Guide. • Identify the interconnect bay to install the blade switch. For more information, see HP BladeSystem Enclosure Setup and Installation Guide. Installing and removing the blade switch IMPORTANT: • If the blade switch does not install easily, make sure that it is correctly oriented. • To prevent dust from entering the system, install the interconnect blank into the interconnect bay after removing the blade switch. Installing the blade switch 1. Wear an ESD-preventive wrist strap and make sure it makes good skin contact and is well grounded. 2. Remove the interconnect blank from the slot. Keep the removed interconnect blank for future use. 3. Unpack the blade switch. 4. Press the release tab (see callout 1 in Figure 3) and then pull the ejector lever to the open position (see callout 2 in Figure 3). 3
-
 1
1 -
 2
2 -
 3
3 -
 4
4 -
 5
5 -
 6
6 -
 7
7 -
 8
8 -
 9
9 -
 10
10 -
 11
11 -
 12
12 -
13
-
14
-
15
-
16
-
17
-
18
-
19
-
20
-
21
-
22
-
23
-
24
-
25
-
26
-
27
-
28
-
29
-
30
-
31
-
32
-
33
-
34
-
35
 |
 |