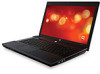
HP 620 Notebook PC User Guide - Windows XP - Page 63
Creating (burning) a CD or DVD, Removing an optical disc (CD, DVD, or BD), Start, All Programs
 |
UPC - 885631889732
View all HP 620 manuals
Add to My Manuals
Save this manual to your list of manuals |
Page 63 highlights
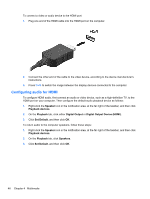
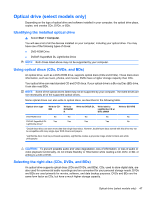
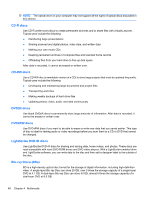
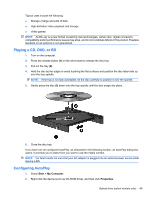
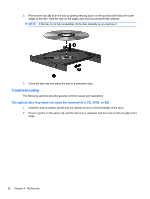
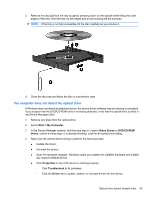
Creator Business reads the source disc and copies the data to a temporary folder on your hard drive. 5. When prompted, remove the source disc from the optical drive and insert a blank disc into the drive. After the information is copied, the disc you created is ejected automatically. Creating (burning) a CD or DVD CAUTION: Observe the copyright warning. It is a criminal offense, under applicable copyright laws, to make unauthorized copies of copyright-protected material, including computer programs, films, broadcasts, and sound recordings. Do not use this computer for such purposes. If your optical drive is a CD-RW, DVD-RW, or DVD±RW optical drive, you can use software such as Windows Media Player to burn data and audio files, including MP3 and WAV music files. Observe the following guidelines when burning a CD or DVD: ● Before burning a disc, save and close any open files and close all programs. ● A CD-R or DVD-R is usually best for burning audio files because after the information is copied, it cannot be changed. ● Because some home and car stereos will not play CD-RWs, use CD-Rs to burn music CDs. ● A CD-RW or DVD-RW is generally best for burning data files or for testing audio or video recordings before you burn them to a CD or DVD that cannot be changed. ● DVD players used in home systems usually do not support all DVD formats. Refer to the user guide that came with your DVD player for a list of supported formats. ● An MP3 file uses less space than other music file formats, and the process for creating an MP3 disc is the same as the process for creating a data file. MP3 files can be played only on MP3 players or on computers with MP3 software installed. To burn a CD or DVD, follow these steps: 1. Download or copy the source files into a folder on your hard drive. 2. Insert a blank disc into the optical drive. 3. Select Start > All Programs and the name of the software you want to use. 4. Select the kind of disc you want to create-data, audio, or video. 5. Right-click Start, click Explore, and then navigate to the folder where the source files are stored. 6. Open the folder, and then drag the files to the drive that contains the blank disc. 7. Initiate the burning process as directed by the program you have selected. For specific instructions, refer to the software manufacturer's instructions. These instructions may be provided with the software, on disc, or on the manufacturer's Web site. Removing an optical disc (CD, DVD, or BD) 1. Press the release button (1) on the drive bezel to release the disc tray, and then gently pull out the tray (2) until it stops. Optical drive (select models only) 51
-
 1
1 -
2
-
3
-
4
-
5
-
6
-
7
-
8
-
9
-
10
-
11
-
12
-
13
-
14
-
15
-
16
-
17
-
18
-
19
-
20
-
21
-
22
-
23
-
24
-
25
-
26
-
27
-
28
-
29
-
30
-
31
-
32
-
33
-
34
-
35
-
36
-
37
-
38
-
39
-
40
-
41
-
42
-
43
-
44
-
45
-
46
-
47
-
48
-
49
-
50
-
51
-
52
-
53
-
54
-
55
-
56
-
57
-
 58
58 -
 59
59 -
 60
60 -
 61
61 -
 62
62 -
 63
63 -
 64
64 -
 65
65 -
 66
66 -
 67
67 -
 68
68 -
69
-
70
-
71
-
72
-
73
-
74
-
75
-
76
-
77
-
78
-
79
-
80
-
81
-
82
-
83
-
84
-
85
-
86
-
87
-
88
-
89
-
90
-
91
-
92
-
93
-
94
-
95
-
96
-
97
-
98
-
99
-
100
-
101
-
102
-
103
-
104
-
105
-
106
-
107
-
108
-
109
-
110
-
111
-
112
-
113
-
114
-
115
-
116
-
117
-
118
-
119
-
120
-
121
-
122
-
123
-
124
-
125
-
126
-
127
-
128
-
129
-
130
-
131
-
132
-
133
-
134
-
135
-
136
-
137
-
138
-
139
-
140
-
141
-
142
-
143
-
144
-
145
-
146
-
147
-
148
-
149
-
150
-
151
-
152
-
153
-
154
-
155
-
156
-
157
-
158
 |
 |