HP ENVY 14-1000 HP ENVY 14 Notebook PC - Maintenance and Service Guide - Page 49
The 2/blue WWAN antenna cable is connected to the WWAN module 2/Aux terminal.
 |
View all HP ENVY 14-1000 manuals
Add to My Manuals
Save this manual to your list of manuals |
Page 49 highlights
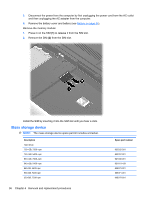
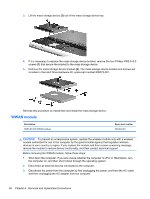
4. Remove the battery cover and battery (see Battery on page 34). 5. Remove the hard drive (see Mass storage device on page 36). Remove the WWAN module: 1. Disconnect the WWAN antenna cables from the terminals on the WWAN module. NOTE: The 1/red WWAN antenna cable is connected to the WWAN module 1/Main terminal. The 2/blue WWAN antenna cable is connected to the WWAN module 2/Aux terminal. 2. Remove the two Phillips PM2.0×3.0 screws that secure the WWAN module to the system board. (The WWAN module tilts up.) Component replacement procedures 39
-
 1
1 -
2
-
3
-
4
-
5
-
6
-
7
-
8
-
9
-
10
-
11
-
12
-
13
-
14
-
15
-
16
-
17
-
18
-
19
-
20
-
21
-
22
-
23
-
24
-
25
-
26
-
27
-
28
-
29
-
30
-
31
-
32
-
33
-
34
-
35
-
36
-
37
-
38
-
39
-
40
-
41
-
42
-
43
-
 44
44 -
 45
45 -
 46
46 -
 47
47 -
 48
48 -
 49
49 -
 50
50 -
 51
51 -
 52
52 -
 53
53 -
 54
54 -
55
-
56
-
57
-
58
-
59
-
60
-
61
-
62
-
63
-
64
-
65
-
66
-
67
-
68
-
69
-
70
-
71
-
72
-
73
-
74
-
75
-
76
-
77
-
78
-
79
-
80
-
81
-
82
-
83
-
84
-
85
-
86
-
87
-
88
-
89
-
90
-
91
-
92
-
93
-
94
-
95
-
96
-
97
-
98
-
99
-
100
-
101
-
102
-
103
-
104
-
105
-
106
 |
 |
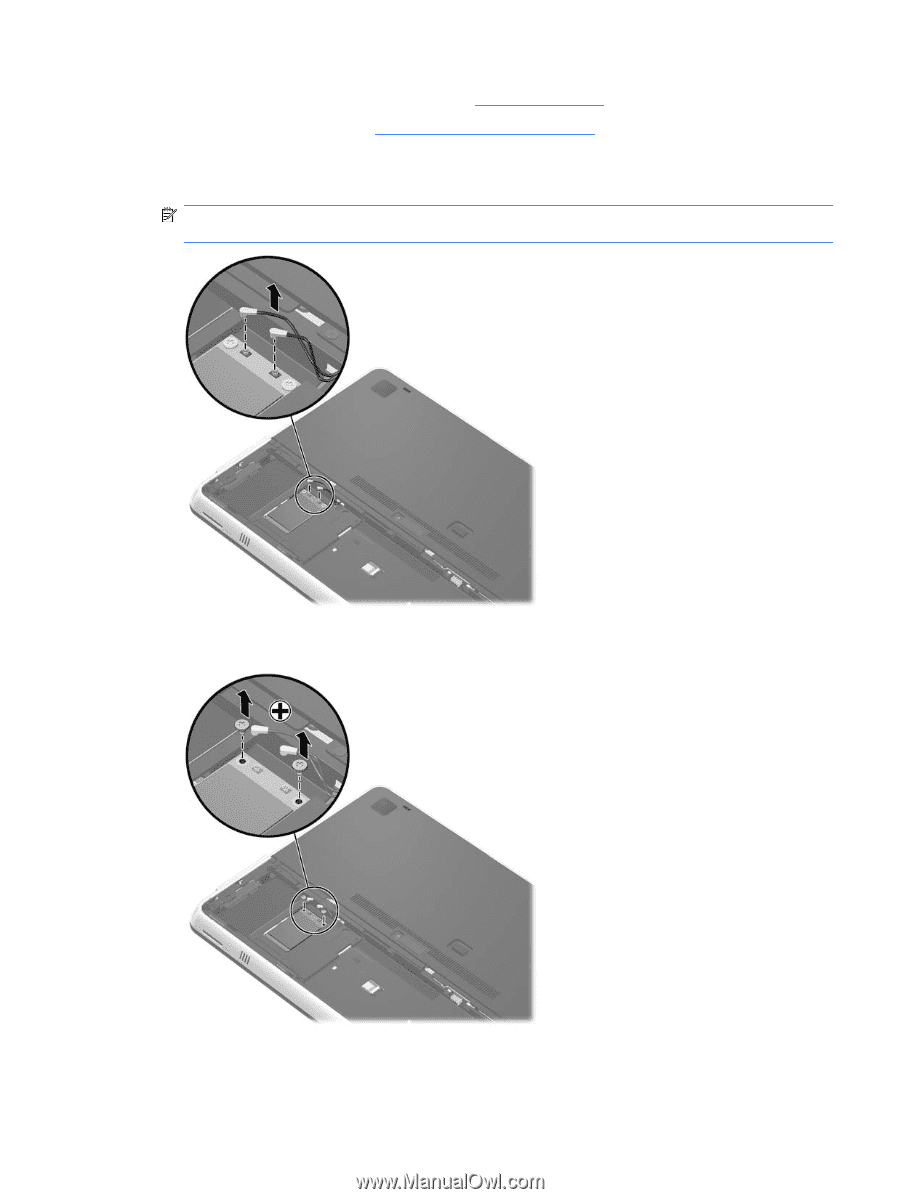
4.
Remove the battery cover and battery (see
Battery
on page
34
).
5.
Remove the hard drive (see
Mass storage device
on page
36
).
Remove the WWAN module:
1.
Disconnect the WWAN antenna cables from the terminals on the WWAN module.
NOTE:
The 1/red WWAN antenna cable is connected to the WWAN module 1/Main terminal.
The 2/blue WWAN antenna cable is connected to the WWAN module 2/Aux terminal.
2.
Remove the two Phillips PM2.0×3.0 screws that secure the WWAN module to the system board.
(The WWAN module tilts up.)
Component replacement procedures
39