HP LaserJet Pro MFP M148-M149 User Guide - Page 102
Scan to a network folder (touchscreen models only), Web Server.
 |
View all HP LaserJet Pro MFP M148-M149 manuals
Add to My Manuals
Save this manual to your list of manuals |
Page 102 highlights
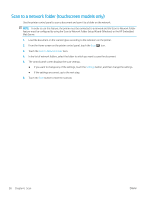
Scan to a network folder (touchscreen models only) Use the printer control panel to scan a document and save it to a folder on the network. NOTE: In order to use this feature, the printer must be connected to a network and the Scan to Network Folder feature must be configured by using the Scan to Network Folder Setup Wizard (Windows) or the HP Embedded Web Server. 1. Load the document on the scanner glass according to the indicators on the printer. 2. From the Home screen on the printer control panel, touch the Scan icon. 3. Touch the Scan to Network Folder item. 4. In the list of network folders, select the folder to which you want to save the document. 5. The control panel screen displays the scan settings. ● If you want to change any of the settings, touch the Settings button, and then change the settings. ● If the settings are correct, go to the next step. 6. Touch the Scan button to start the scan job. 90 Chapter 6 Scan ENWW
-
 1
1 -
2
-
3
-
4
-
5
-
6
-
7
-
8
-
9
-
10
-
11
-
12
-
13
-
14
-
15
-
16
-
17
-
18
-
19
-
20
-
21
-
22
-
23
-
24
-
25
-
26
-
27
-
28
-
29
-
30
-
31
-
32
-
33
-
34
-
35
-
36
-
37
-
38
-
39
-
40
-
41
-
42
-
43
-
44
-
45
-
46
-
47
-
48
-
49
-
50
-
51
-
52
-
53
-
54
-
55
-
56
-
57
-
58
-
59
-
60
-
61
-
62
-
63
-
64
-
65
-
66
-
67
-
68
-
69
-
70
-
71
-
72
-
73
-
74
-
75
-
76
-
77
-
78
-
79
-
80
-
81
-
82
-
83
-
84
-
85
-
86
-
87
-
88
-
89
-
90
-
91
-
92
-
93
-
94
-
95
-
96
-
 97
97 -
 98
98 -
 99
99 -
 100
100 -
 101
101 -
 102
102 -
 103
103 -
 104
104 -
 105
105 -
 106
106 -
 107
107 -
108
-
109
-
110
-
111
-
112
-
113
-
114
-
115
-
116
-
117
-
118
-
119
-
120
-
121
-
122
-
123
-
124
-
125
-
126
-
127
-
128
-
129
-
130
-
131
-
132
-
133
-
134
-
135
-
136
-
137
-
138
-
139
-
140
-
141
-
142
-
143
-
144
-
145
-
146
-
147
-
148
-
149
-
150
-
151
-
152
-
153
-
154
-
155
-
156
-
157
-
158
-
159
-
160
-
161
-
162
-
163
-
164
-
165
-
166
-
167
-
168
-
169
-
170
-
171
-
172
-
173
-
174
-
175
-
176
-
177
-
178
-
179
-
180
-
181
-
182
-
183
-
184
-
185
-
186
-
187
-
188
-
189
-
190
-
191
-
192
-
193
-
194
-
195
-
196
-
197
-
198
-
199
-
200
-
201
-
202
-
203
-
204
-
205
-
206
-
207
-
208
 |
 |
