HP Pavilion dv6-3300 Notebook Essentials - Windows 7 - Page 31
Using Internet Services & Offers, Using ISP-provided icons
 |
View all HP Pavilion dv6-3300 manuals
Add to My Manuals
Save this manual to your list of manuals |
Page 31 highlights
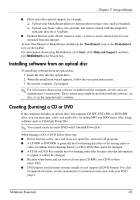
Chapter 6: Networking Using Internet Services & Offers If the Internet Services & Offers utility is supported in the country or region in which you purchased the computer, access the utility by selecting Start > All Programs > Online Services > Get Online. The Internet Services & Offers utility assists with these tasks: ■ Signing up for a new Internet account ■ Configuring the computer to use an existing account Using ISP-provided icons If ISP-provided icons are supported in the country or region where you purchased the computer, the icons might be displayed either individually on the Windows desktop or grouped in a desktop folder named Online Services. To set up a new Internet account or configure the computer to use an existing account, double-click an icon, and then follow the instructions on the screen. Using the Windows Connect to the Internet wizard Use the Windows Connect to the Internet wizard to connect to the Internet if you: ■ Already have an account with an ISP. ■ Have a disc from an ISP. ■ Do not have an Internet account and would like to select an ISP from the list provided within the wizard. (The list of ISP providers is not available in all regions.) ■ Selected an unlisted ISP and the ISP has provided you with such information as a specific IP address and POP3 and SMTP settings. To access the Windows Connect to the Internet wizard and instructions for using the wizard, select Start > Help and Support > Connect to the Internet wizard. ✎ If prompted within the wizard to choose between enabling or disabling Windows Firewall, choose to enable the firewall. Connecting to an existing wireless network To connect the computer to an existing wireless network: 1. Click the network icon in the notification area, at the far right of the taskbar. 2. Select a network. 3. Click Connect. 4. If required, enter the security key. Notebook Essentials 25
-
 1
1 -
2
-
3
-
4
-
5
-
6
-
7
-
8
-
9
-
10
-
11
-
12
-
13
-
14
-
15
-
16
-
17
-
18
-
19
-
20
-
21
-
22
-
23
-
24
-
25
-
 26
26 -
 27
27 -
 28
28 -
 29
29 -
 30
30 -
 31
31 -
 32
32 -
 33
33 -
 34
34 -
 35
35 -
 36
36 -
37
-
38
-
39
-
40
-
41
-
42
-
43
-
44
-
45
-
46
-
47
-
48
-
49
-
50
-
51
-
52
 |
 |
