HP Pro Mini 260 G9 Desktop PC Maintenance and Service Guide - Page 9
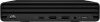
Rear panel components, To identify the rear panel components, use this illustration and table.
 |
View all HP Pro Mini 260 G9 Desktop PC manuals
Add to My Manuals
Save this manual to your list of manuals |
Page 9 highlights
Table 1-1 Identifying the front panel components (continued) Front panel components 2 USB SuperSpeed 10 Gbps port 5 Power button NOTE: Use a standard USB Type-A charging cable or cable adapter (purchased separately) when charging a small external device such as a smartphone. 3 USB port with HP Sleep and Charge 6 Drive light NOTE: Use a standard USB Type-A charging cable or cable adapter (purchased separately) when charging a small external device such as a smartphone. NOTE: The combo jack supports headphones, line output devices, microphones, line input devices, or CTIA-style headsets. NOTE: The light on the power button is normally white when the power is on. If the light blinks red, the computer displays a diagnostic code to indicate a problem. See Interpreting POST diagnostic front panel lights and audible codes on page 79 to interpret the code. Rear panel components To identify the rear panel components, use this illustration and table. Table 1-2 Identifying the rear panel components Rear panel components 1 Thumbscrew 8 USB SuperSpeed port NOTE: Use a standard USB Type-A charging cable or cable adapter (purchased separately) when charging a small external device such as a smartphone. 2 Security cable lock slot 9 USB port (includes KVM connection) NOTE: Use a standard USB Type-A charging cable or cable adapter (purchased separately) when charging a small external device such as a smartphone. 3 Optional port 10 USB port NOTE: Use a standard USB Type-A charging cable or cable adapter (purchased separately) 2 Chapter 1 Computer features
-
 1
1 -
2
-
3
-
 4
4 -
 5
5 -
 6
6 -
 7
7 -
 8
8 -
 9
9 -
 10
10 -
 11
11 -
 12
12 -
 13
13 -
 14
14 -
15
-
16
-
17
-
18
-
19
-
20
-
21
-
22
-
23
-
24
-
25
-
26
-
27
-
28
-
29
-
30
-
31
-
32
-
33
-
34
-
35
-
36
-
37
-
38
-
39
-
40
-
41
-
42
-
43
-
44
-
45
-
46
-
47
-
48
-
49
-
50
-
51
-
52
-
53
-
54
-
55
-
56
-
57
-
58
-
59
-
60
-
61
-
62
-
63
-
64
-
65
-
66
-
67
-
68
-
69
-
70
-
71
-
72
-
73
-
74
-
75
-
76
-
77
-
78
-
79
-
80
-
81
-
82
-
83
-
84
-
85
-
86
-
87
-
88
-
89
-
90
-
91
-
92
-
93
-
94
-
95
-
96
-
97
-
98
-
99
-
100
-
101
-
102
-
103
-
104
-
105
-
106
-
107
-
108
-
109
-
110
 |
 |
