HP ProBook 430 HP ProBook 430 G1 Notebook PC Maintenance and Service Guide - Page 51
toward the edge of the computer to disconnect the hard drive
 |
View all HP ProBook 430 manuals
Add to My Manuals
Save this manual to your list of manuals |
Page 51 highlights
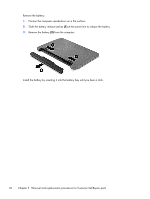
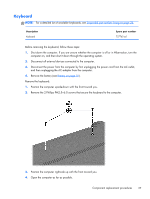
2. Loosen and remove the 4 Phillips PM2.5×6.0 hard drive retaining plate screws. 3. Lift the top edge of the hard drive retaining plate (1) up, and then pull the retaining plate (2) up at an angle to remove it from the computer. 4. Pull the hard drive tab (1) toward the edge of the computer to disconnect the hard drive. Component replacement procedures 41
-
 1
1 -
2
-
3
-
4
-
5
-
6
-
7
-
8
-
9
-
10
-
11
-
12
-
13
-
14
-
15
-
16
-
17
-
18
-
19
-
20
-
21
-
22
-
23
-
24
-
25
-
26
-
27
-
28
-
29
-
30
-
31
-
32
-
33
-
34
-
35
-
36
-
37
-
38
-
39
-
40
-
41
-
42
-
43
-
44
-
45
-
 46
46 -
 47
47 -
 48
48 -
 49
49 -
 50
50 -
 51
51 -
 52
52 -
 53
53 -
 54
54 -
 55
55 -
 56
56 -
57
-
58
-
59
-
60
-
61
-
62
-
63
-
64
-
65
-
66
-
67
-
68
-
69
-
70
-
71
-
72
-
73
-
74
-
75
-
76
-
77
-
78
-
79
-
80
-
81
-
82
-
83
-
84
-
85
-
86
-
87
-
88
-
89
-
90
-
91
-
92
-
93
-
94
-
95
-
96
-
97
-
98
-
99
-
100
-
101
-
102
-
103
-
104
-
105
-
106
-
107
-
108
-
109
-
110
-
111
-
112
-
113
-
114
-
115
-
116
-
117
-
118
-
119
-
120
-
121
-
122
-
123
-
124
-
125
-
126
-
127
-
128
-
129
-
130
-
131
-
132
-
133
-
134
-
135
-
136
-
137
-
138
-
139
 |
 |
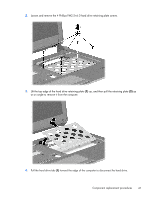
2.
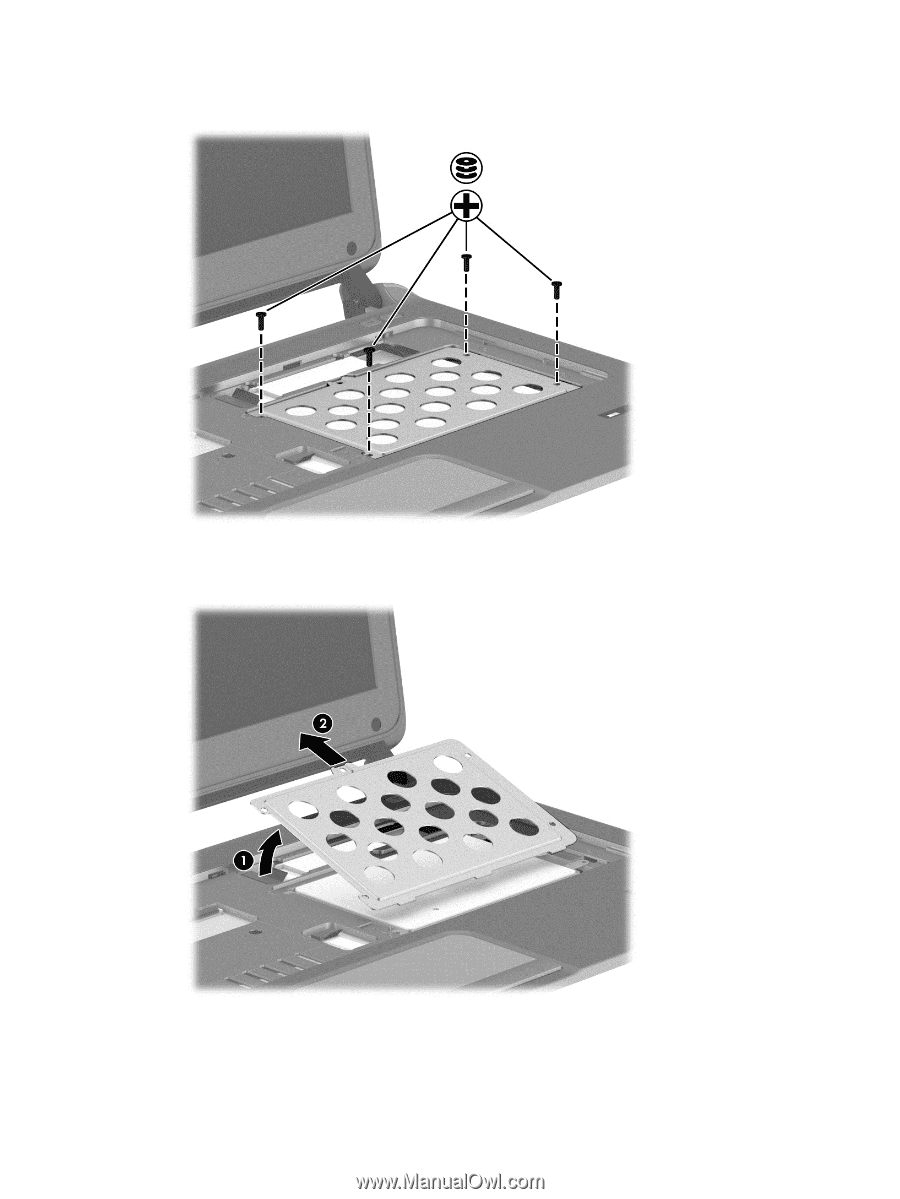
Loosen and remove the 4 Phillips PM2.5×6.0 hard drive retaining plate screws.
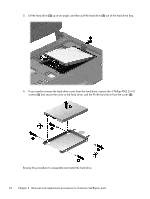
3.
Lift the top edge of the hard drive retaining plate
(1)
up, and then pull the retaining plate
(2)
up
at an angle to remove it from the computer.
4.
Pull the hard drive tab
(1)
toward the edge of the computer to disconnect the hard drive.
Component replacement procedures
41