HP ProBook 4525s HP ProBook 4525s Notebook PC - Maintenance and Service Guide - Page 62
Remove the power button board., to remove it.
 |
View all HP ProBook 4525s manuals
Add to My Manuals
Save this manual to your list of manuals |
Page 62 highlights
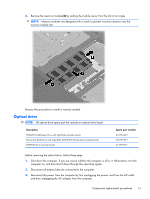
Remove the power button board. 1. Release the ZIF connector (1) and disconnect the ribbon cable (2) from the system board. 2. Remove the screw (1) that secures the power button board to the base pan and the slide the board out of the retainer (2) to the left (3) to remove it. Reverse this procedure to install the power button board. 54 Chapter 4 Removal and replacement procedures
-
 1
1 -
2
-
3
-
4
-
5
-
6
-
7
-
8
-
9
-
10
-
11
-
12
-
13
-
14
-
15
-
16
-
17
-
18
-
19
-
20
-
21
-
22
-
23
-
24
-
25
-
26
-
27
-
28
-
29
-
30
-
31
-
32
-
33
-
34
-
35
-
36
-
37
-
38
-
39
-
40
-
41
-
42
-
43
-
44
-
45
-
46
-
47
-
48
-
49
-
50
-
51
-
52
-
53
-
54
-
55
-
56
-
 57
57 -
 58
58 -
 59
59 -
 60
60 -
 61
61 -
 62
62 -
 63
63 -
 64
64 -
 65
65 -
 66
66 -
 67
67 -
68
-
69
-
70
-
71
-
72
-
73
-
74
-
75
-
76
-
77
-
78
-
79
-
80
-
81
-
82
-
83
-
84
-
85
-
86
-
87
-
88
-
89
-
90
-
91
-
92
-
93
-
94
-
95
-
96
-
97
-
98
-
99
-
100
-
101
-
102
-
103
-
104
-
105
-
106
-
107
-
108
-
109
-
110
-
111
-
112
-
113
-
114
-
115
-
116
-
117
-
118
-
119
-
120
-
121
-
122
-
123
-
124
-
125
-
126
-
127
-
128
-
129
-
130
-
131
-
132
-
133
-
134
-
135
-
136
-
137
-
138
-
139
-
140
-
141
-
142
-
143
-
144
-
145
-
146
-
147
-
148
-
149
 |
 |

Remove the power button board.
1.
Release the ZIF connector
(1)
and disconnect the ribbon cable
(2)
from the system board.
2.
Remove the screw
(1)
that secures the power button board to the base pan and the slide the
board out of the retainer
(2)
to the left
(3)
to remove it.
Reverse this procedure to install the power button board.
54
Chapter 4
Removal and replacement procedures