HP ProBook 4525s HP ProBook 4525s Notebook PC - Maintenance and Service Guide - Page 73
Processor, Before removing the processor, follow these steps
 |
View all HP ProBook 4525s manuals
Add to My Manuals
Save this manual to your list of manuals |
Page 73 highlights
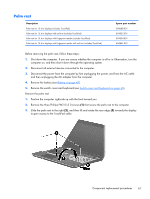
4. Clean the thermal material from the surfaces of the heat sink components (1), (3), and (5) and the system board (2), (4), and (6) each time the heat sink is removed. Replacement thermal material is included with all heat sink, system board, and processor spare part kits. Reverse this procedure to install the heat sink and fan. Processor NOTE: The processor spare part kit includes replacement thermal material. Description Athlon II P320, 2.1-GHz, 1-MB L2 cache Dual-Core (25W) V-Series V120, 2.2-GHz, 512K L2 cache Single-Core (25W) Turion II P520, 2.3-GHz, 2-MB L2 cache Dual-Core (25W) Phenom II P820, 1.8-GHz, 1.5-MB L2 cache, Tri-Core (25W) Phenom II P920, 1.6-GHz, 2-MB L2 cache Quad-Core (25W) Spare part number 594165-001 594171-001 594173-001 594167-001 594170-001 Before removing the processor, follow these steps: 1. Shut down the computer. If you are unsure whether the computer is off or in Hibernation, turn the computer on, and then shut it down through the operating system. 2. Disconnect all external devices connected to the computer. Component replacement procedures 65
-
 1
1 -
2
-
3
-
4
-
5
-
6
-
7
-
8
-
9
-
10
-
11
-
12
-
13
-
14
-
15
-
16
-
17
-
18
-
19
-
20
-
21
-
22
-
23
-
24
-
25
-
26
-
27
-
28
-
29
-
30
-
31
-
32
-
33
-
34
-
35
-
36
-
37
-
38
-
39
-
40
-
41
-
42
-
43
-
44
-
45
-
46
-
47
-
48
-
49
-
50
-
51
-
52
-
53
-
54
-
55
-
56
-
57
-
58
-
59
-
60
-
61
-
62
-
63
-
64
-
65
-
66
-
67
-
 68
68 -
 69
69 -
 70
70 -
 71
71 -
 72
72 -
 73
73 -
 74
74 -
 75
75 -
 76
76 -
 77
77 -
 78
78 -
79
-
80
-
81
-
82
-
83
-
84
-
85
-
86
-
87
-
88
-
89
-
90
-
91
-
92
-
93
-
94
-
95
-
96
-
97
-
98
-
99
-
100
-
101
-
102
-
103
-
104
-
105
-
106
-
107
-
108
-
109
-
110
-
111
-
112
-
113
-
114
-
115
-
116
-
117
-
118
-
119
-
120
-
121
-
122
-
123
-
124
-
125
-
126
-
127
-
128
-
129
-
130
-
131
-
132
-
133
-
134
-
135
-
136
-
137
-
138
-
139
-
140
-
141
-
142
-
143
-
144
-
145
-
146
-
147
-
148
-
149
 |
 |
