HP ProLiant 1500 SMART-2DH Array Controller Reference Guide - Page 67
Create Logical Drive Screen
 |
View all HP ProLiant 1500 manuals
Add to My Manuals
Save this manual to your list of manuals |
Page 67 highlights
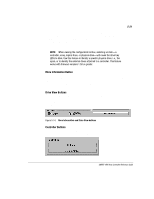
5-26 Running the Array Configuration Utility Create Logical Drive Screen In this screen, you can select the fault-tolerance method, enable the array accelerator, and set the logical drive size. Figure 5-20. Create Logical Drive screen The Logical Drive Size area shows a scale marked with the amount of drive capacity available for a logical drive. The utility does not allow you to create a logical drive larger than the maximum supported by the operating system. The purple (left) band above the scale indicates the fraction of the total that is available for data. The red (right) band indicates the fraction required for storing the parity or mirrored information, depending on the fault-tolerance method used. The red (right) band is only needed for RAID 1, RAID 4, or RAID 5. This screen is first displayed showing the maximum-sized logical drive that can be created for your drive array. You can reduce this amount if you want to create more than one logical drive on the array. To reduce the size, type the number in or drag the pointer to the left. Fine tune the size with the arrow buttons to the left of the scale. Writer: Pamela King Project: SMART-2DH Array Controller Reference Guide Comments: 295469-002 File Name: F-CH05.DOC Last Saved On: 2/27/98 11:38 AM COMPAQ CONFIDENTIAL - NEED TO KNOW REQUIRED
-
 1
1 -
2
-
3
-
4
-
5
-
6
-
7
-
8
-
9
-
10
-
11
-
12
-
13
-
14
-
15
-
16
-
17
-
18
-
19
-
20
-
21
-
22
-
23
-
24
-
25
-
26
-
27
-
28
-
29
-
30
-
31
-
32
-
33
-
34
-
35
-
36
-
37
-
38
-
39
-
40
-
41
-
42
-
43
-
44
-
45
-
46
-
47
-
48
-
49
-
50
-
51
-
52
-
53
-
54
-
55
-
56
-
57
-
58
-
59
-
60
-
61
-
 62
62 -
 63
63 -
 64
64 -
 65
65 -
 66
66 -
 67
67 -
 68
68 -
 69
69 -
 70
70 -
 71
71 -
 72
72 -
73
-
74
-
75
-
76
-
77
-
78
-
79
-
80
-
81
-
82
-
83
-
84
-
85
-
86
-
87
-
88
-
89
-
90
-
91
-
92
-
93
-
94
-
95
-
96
-
97
-
98
-
99
-
100
-
101
-
102
-
103
-
104
-
105
-
106
-
107
-
108
-
109
-
110
-
111
-
112
-
113
-
114
-
115
-
116
-
117
-
118
-
119
-
120
-
121
-
122
-
123
-
124
-
125
-
126
-
127
-
128
-
129
-
130
-
131
-
132
-
133
-
134
-
135
-
136
-
137
-
138
-
139
-
140
-
141
-
142
-
143
-
144
-
145
-
146
-
147
-
148
-
149
-
150
-
151
-
152
-
153
-
154
-
155
-
156
-
157
-
158
-
159
-
160
-
161
-
162
-
163
-
164
-
165
-
166
-
167
-
168
-
169
-
170
-
171
-
172
-
173
-
174
-
175
-
176
-
177
-
178
-
179
-
180
-
181
-
182
-
183
-
184
-
185
-
186
-
187
-
188
-
189
-
190
-
191
-
192
-
193
-
194
-
195
-
196
-
197
-
198
 |
 |
